Workspaces actions
WorkspacesThis topic relates to Journey Workspaces | Workspaces UserIncludes bank staff, helpdesk, relationship managers, and managers | This feature was introduced in the 18.11 releaseThis feature was updated in the 23.10 release
Some of the text and images below may not match what you see in your Journey Workspaces app. This is because the features described are based on a default Journey Workspaces configuration, and your Workspaces app may be configured differently; for example, with your company's branding, with fields for other information, or with a custom layout. Nevertheless, the features described work the same way in every Workspaces app.
Workspaces provides a set of standard actions for working with applications and tasks. All of the standard actions are available in the default configuration. In addition to the standard actions, Workspaces also supports the configuration of custom actions that allow your Workspaces portal to be extended with functionality that is not available in the default configuration.
Standard actions
The standard actions relating to applications are:
- : Start a new application on behalf of someone else in Journey Brokers.
- : Start a new application on behalf of someone else in Journey Workspaces.
- : See a read-only view of a submitted application.
- : In Journey Brokers, re-open an application in the same form used to start the application.
- : Obtain a URL for a Details screen relating to a specific application, task and space. This feature was introduced in the 23.10 release
- : View all notes recorded against all of an application's tasks. This feature was introduced in the 20.05 release This feature was removed in the 23.04 release
The standard actions relating to tasks are:
- : Add notes (and comments) against an application's tasks. This feature was introduced in the 23.04 release
- : Assign a task to a Workspaces user.
- : Assign a task to yourself.
- : Take a decision that progresses a task along its application journey.
- : Assign an assigned task to another user. This feature was introduced in the 22.10 release
- : See a read-only view of a submitted application.
- : Recover an abandoned or withdrawn application so that the applicant can continue with it. This feature was introduced in the 19.11 release
- : Remove a task assignment for a task assigned to you.
- : Remove a task assignment for any task.
- : Open an application that has been saved but not yet submitted in the original form.
- : Cancel an application that has been saved but not yet submitted. This feature was introduced in the 19.11 release
In Workspaces 23.04 and later releases, the View Notes action is replaced with Show All in the Notes card. To learn more, see The Application Details screen > Notes.
While each of these actions is described separately, more information about how to use each action is available in other topics.
- To learn about how the Claim, Release, and Decision actions are used when reviewing applications, see Review Actions.
- To learn about the View Form, Recover and Withdraw actions, see Helpdesk Actions.
- To learn about starting applications with the New Form action, see Assisted Channel Actions.
- To learn about managing task assignment with the Assign, Reassign, and Unassign actions, see Manage Actions.
- To learn about working with applications and tasks in Journey Brokers, see Journey Brokers > Actions.
The standard actions expose core Workspaces functionality that enables you to process applications, respond to helpdesk inquiries, assist customers, or manage your team's workload. Each standard action is associated (via configuration) with one or more spaces.
Additional custom functionality may occur as part of performing a standard action. The custom functionality occurs only if the action is successful. How you experience the custom functionality is specific to your Workspaces portal. For example, you could receive a personalized email after an action is performed. This feature the release
Custom functionality is added to an action via configuration. To learn about adding custom functionality to a standard action, see Configuration > Current space configuration > Invoke.
Standard action availability
In the default configuration, the following standard actions are available for all releases and in all spaces except as noted.
- Receipt
- Share (Review, Helpdesk, Assisted Channel, Manage spaces) This feature was introduced in the 23.10 release
- Add Notes (All spaces except Document Requests) This feature was introduced in the 23.04 release
- View Notes This feature was removed in the 23.04 release
Also, the Notes card > Comments core function is always available even when the Add Notes action is not. This feature was introduced in the 23.04 release
For the spaces in the default configuration, the following standard actions are also available:
- Review: Claim, Decision, Release
- Helpdesk: Recover, View Form, Withdraw
- Assisted Channel: New Form, Recover, View Form, Withdraw
- Manage: Assign, Reassign, Unassign
The Receipt action is available for submitted applications in all spaces, while the View Form action is available for saved applications in the Helpdesk and Assisted Channel spaces. This means you can always see the information in an application regardless of the application's state and which space you're in.
In Workspaces 22.10 and earlier releases, the View Notes action is available in all spaces so you can always view the notes that Workspaces users have made against an application which can help you understand an application's progress. View Notes is replaced by Add Notes in Workspaces 23.04 (and later releases).
Only Assisted Channel users can kick-off new applications using the New Form action, but any application started this way can be claimed by or assigned to another user subsequently.
The standard actions available in other spaces are as follows.
- Brokers: New Form, Recover, Resume, Withdraw
Resume is a new action introduced for the Brokers space and is only available in that space. Resume is equivalent to View Form in Workspaces.
Associating an action with a space is just one way that Workspaces controls the actions that are available to you at any point in time. Other factors that contribute to whether an action is available include:
- Role-based configuration of permissions.
- The current status of a task or application.
- Conditional rules based on other task or application data values. This feature was introduced in the 22.10 release
All of these factors work together with space-based access control to determine whether an action is available for a task or application as the application progresses through its life cycle. For more information about how spaces are used to control what actions you can perform, see Access control.
Performing standard actions
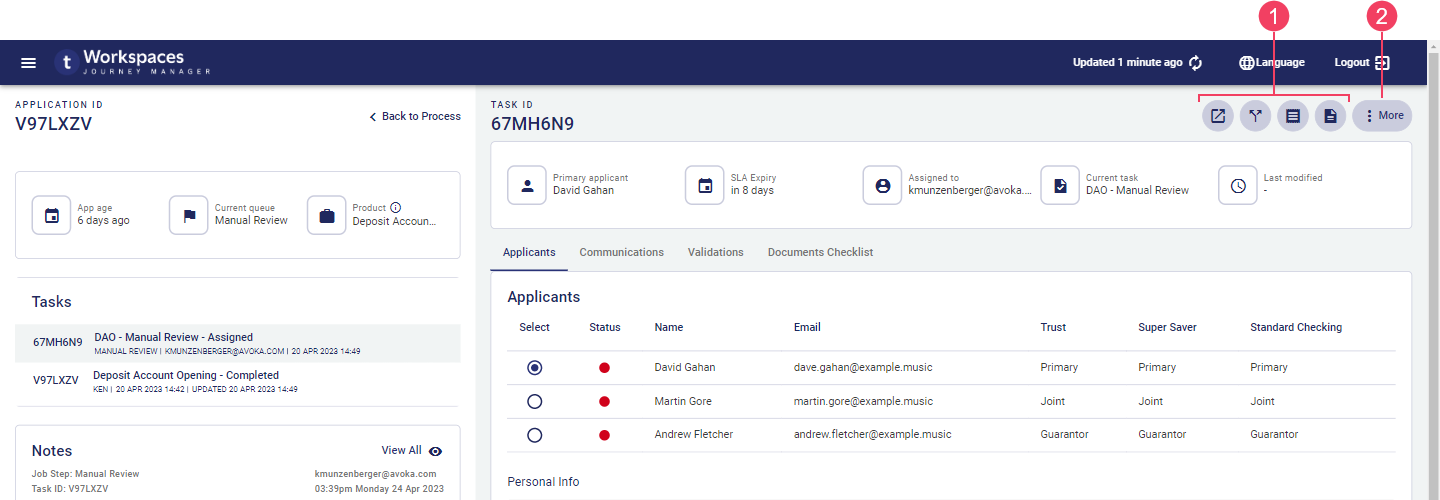
Standard actions can be performed from any List screen or Details screen. On a List screen, actions are accessed via on the right-hand side of each item in the item list. On a Details screen, actions are accessed via the in the actions group located in the top-right of the Task pane. From the List screen, you can also use the Bulk Action feature to perform multiple standard actions at once. Bulk actions are available on the Journey Workspaces List screen only. Neither Journey Brokers nor Journey Applicants support bulk actions, nor can they be performed from any Details screen.
In Workspaces 23.04, task actions are consolidated with application actions in the actions group. In earlier releases, task actions were accessed via icon on each task in the application timeline.
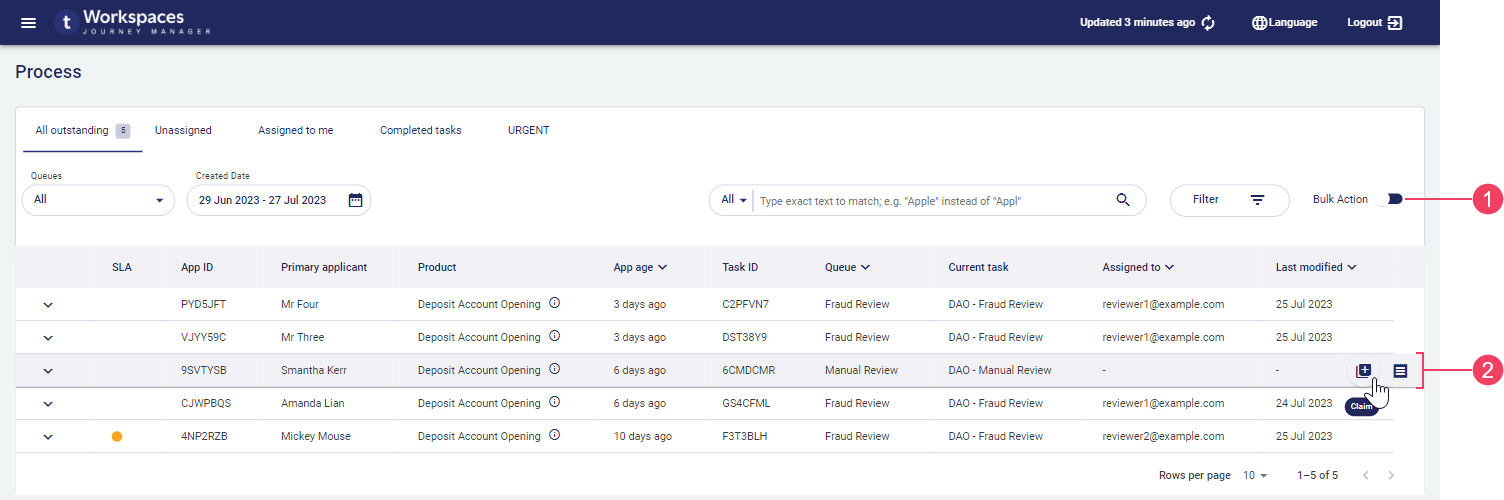
- Bulk action
- Standard action
- Standard action
- Custom action
Different actions may be available for each task. This is because the actions that can be performed on a task at any time depend on several factors including the task's current state. For example, the Assign action will be available only for tasks that aren't assigned to a user. If no actions are available, this is indicated by displaying the icon instead of the action buttons.
To perform a standard action, click the action button corresponding to the desired action. Most standard actions will display a brief message in the bottom-left corner of the screen confirming that the action was successful or notifying you that something went wrong.
Custom actions
Custom actions use third-party web services or fluent functions to extend the functionality of your Workspaces portal with features that are not available in the default configuration. Custom actions can be performed from a Details screen only.
There are no custom actions in the default Workspaces configuration. Any available custom actions, and what they do, are specific to your Workspaces portal and are not covered by this documentation.
A custom action may present a form or other interactive element to the user that they need to engage with in order to complete the action. Alternatively, a custom action may trigger some back-end functionality in Journey Manager or another back-end system. Regardless of what happens, when the custom action is complete, focus is returned to the Details screen where the user initiated the custom action.
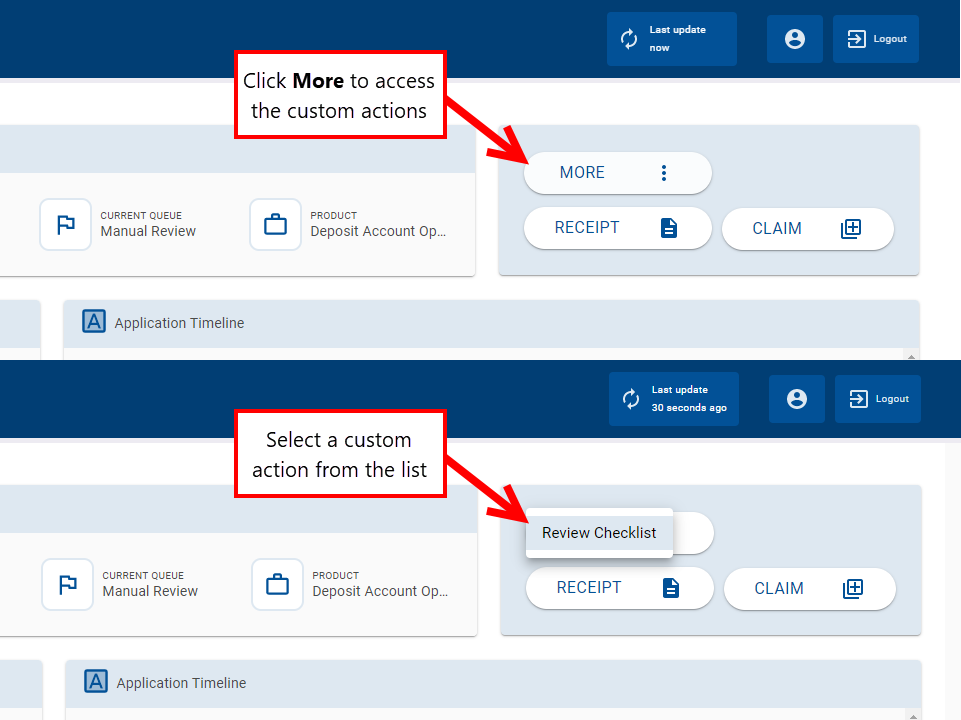
To perform a custom action:
- On a List screen, select a task from the item list. The corresponding Details screen is displayed, showing details for the selected task.
- Click to display the list of available custom actions.
- 23.04 and later: is located in the action group, in the top-right of the Task pane.
- 20.05 to 22.10: is specific to each task in the application timeline.
- Prior to 20.05: is located in the action group to the right of the card.
- Select the desired action from the list of custom actions.
- Workspaces triggers the custom functionality in Journey Manager or another back-end system. What happens next depends on the configuration of the custom action, and user interaction may be required.
- Once the custom behavior is complete, Workspaces refreshes the screen.

- Selected task
- button
- menu