Workspaces core concepts
WorkspacesThis topic relates to Journey Workspaces | Workspaces UserIncludes bank staff, helpdesk, relationship managers, and managers | This feature was introduced in the 18.11 releaseThis feature was updated in the 23.10 release
Journey Workspaces is underpinned by a set of core concepts. Learning about these concepts will help you to understand how Workspaces works, allowing you to get the most out of your Workspaces experience.
- Roles and Spaces
- Applications and Tasks
- Service Level Agreement (SLA) This feature was introduced in the 19.11 release This feature was updated in the 23.10 release
- Queues
- Views
- Access control
Roles and spaces
Roles and spaces are used together in Workspaces to define workflow solutions for various purposes.
- A Role represents a responsibility you might have or a job you need to do, aligned with a specific user type. Roles control user access to various Workspaces features (including spaces).
- A Space is a configuration of Workspaces features, such as queues, views and filters.
- Several spaces can be grouped together under a Space Group which imposes common access permissions to all spaces under it.
Workspaces has been designed with several default spaces, each of which is associated with a role and configured with features to facilitate the actions required to fulfill the space's intended purpose.
| Space | Used by (Role) | Description |
|---|---|---|
| Review1 | Processing staff | Offers review capabilities for pending applications that need manual action. |
| Document Requests1 | Processing staff | Offers review capabilities for tasks assigned to customers and which require their action. |
| Helpdesk | Helpdesk staff | Find applications quickly and easily to provide prompt and accurate customer assistance. |
| Assisted Channel | Relationship managers | Kick start the application process on behalf of customers, and monitor application progress. |
| Manage | Managers and supervisors | Provides task management capabilities. |
| Brokers | Authenticated non-bank staff | Allows applicant representatives (such as brokers) to start, monitor, and manage applications through to completion. |
- By default, the Review and Document Requests spaces are grouped together under the Process space group.
The default Workspaces configuration caters for bank staff in various roles, and includes all of these spaces except the Brokers space. Journey Brokers and Journey Applicants are separate Workspaces portals for use by authenticated non-bank staff and applicants, respectively, configured with just one space. Regardless of how Workspaces is configured, only authenticated users can access it, and you'll only see those spaces that are accessible to you.
Applications and tasks
It's important to understand the difference between an application and a task.
- An application, sometimes referred to as an application form, refers to both the form that you enter data into when applying for a product and the data itself. The life cycle of an application progresses through various stages, from the initial submission to a final decision or even abandonment.
- A task represents an application at a particular stage of its life cycle, or step in the processing of an application. As a task moves through its life cycle, it becomes available on different queues making the task available for attention by the staff that have access to each queue.
Abandoned applications
Sometimes, an application is started but not saved or submitted. This could be a deliberate choice by the applicant, but it may also be due to circumstances beyond the applicant's control; for example, if their browser crashes or the form session times out. Regardless of how or why it happens, an application that hasn't been saved or submitted eventually becomes abandoned (assuming the application form has been configured with the background save feature enabled).
An abandoned application does not have an assignee. An application must be submitted before it can be assigned or claimed.
After an application has become abandoned, the applicant may decide that they want to continue their application. Workspaces allows you to recover an abandoned application, within a configured time frame, so that the applicant can continue the application they started without having to re-enter any saved information.
Any Personally Identifiable Information (PII) in a recovered application is not available if the data retention period has expired.
Service-level agreement
A service-level agreement (SLA) is a contract between parties stating how certain aspects of business between them is to be conducted. Often, an SLA defines time-based escalation points with respect to a fixed point in time and against which the progress of work is monitored. Workspaces supports this aspect of SLAs, using an approach comprised of multiple threshold dates measured from a reference date being either the application's creation date or another date in the future.
The following diagram illustrates what a Workspaces SLA might look like. This example SLA has a 14-day processing period, with a 3-day cooling-off period after submitting an application, and escalation points 4 days before and 1 day before application processing is due to be complete. There's also an additional escalation point 1 day after the due date to highlight that application processing is overdue. The colors are used in the Workspaces user interface to reflect SLA progress; for example, as the color of the SLA indicator on a List screen.

You can easily monitor the progress of applications against an SLA using the SLA Expiry field in the card on the Details screen. Also, in the Review space and Manage spaces, there's a graphical SLA indicator in the item list that provides an overview of application processing progress at a glance.
Basic SLA
In addition to the comprehensive SLA described above, Workspaces also offers an alternative basic SLA that follows a three-stage approach using two pre-configured time periods:
- SLA Period: The maximum amount of time allowed to complete processing of the application under the terms of the SLA.
- SLA Warning Period: An amount of time, shorter than the SLA Period, during which the application will be flagged as approaching the end of the SLA Period.
As mentioned above, the terms of an SLA usually stipulate the SLA processing period and when the SLA starts. It's common for the SLA Period to start when the application is submitted but it may be any time after this. While the SLA Period is measured forward in time from when the SLA commences, the SLA Warning Period starts at a point in time measured backwards from the end of the SLA Period. The following diagram illustrates the relationship between the two periods and the key SLA milestones.

Queues
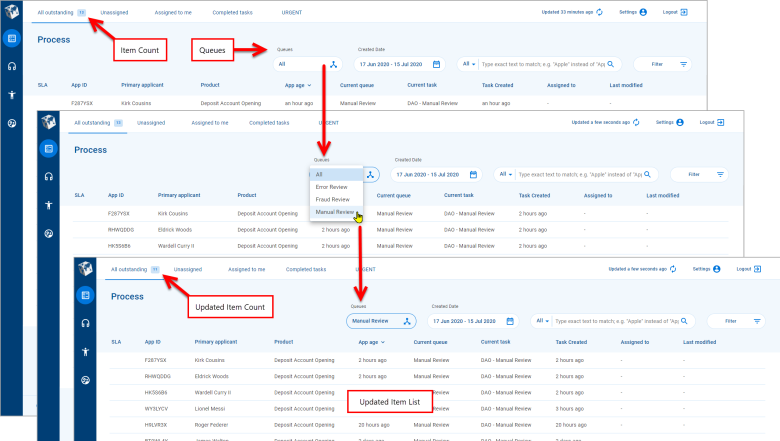
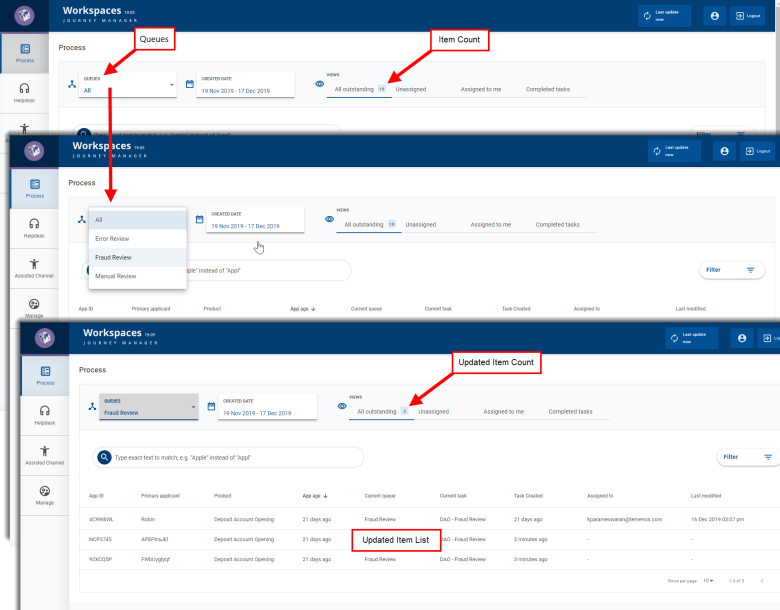
The default configuration of the Review space and Manage spaces in the Journey Workspaces portal includes a default queue selection. A queue acts as the source of tasks for populating the item list. The default setting is selected automatically when the List screen is displayed causing various screen elements to be updated, and reflecting the tasks that are now available for the selected queue; for example, the number of tasks available in the queue and the items in the item list.
You may have access to more than one queue. If you do, you can select a queue to see a different set of tasks. When you select a queue, the item list on the List screen is updated to show tasks that are available in the selected queue, and the item count is updated accordingly.
Views
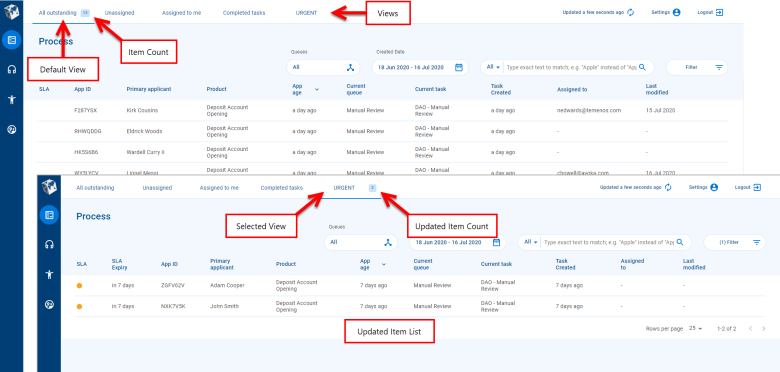
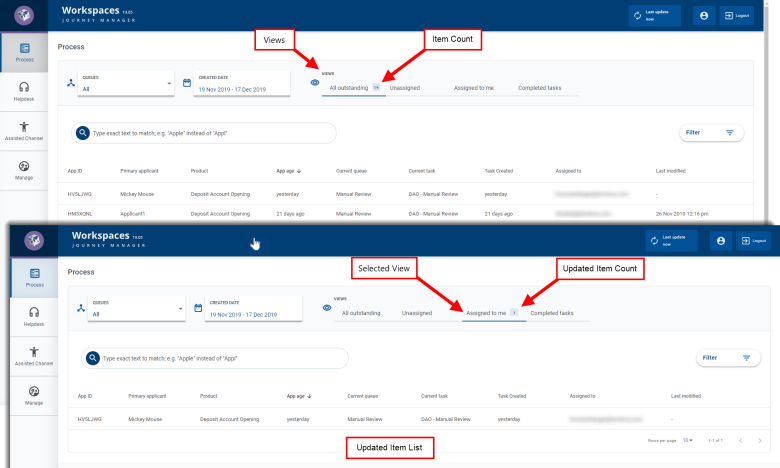
The default configuration of each Journey Workspaces space includes a default view selection. A view is a predefined configuration of item list fields, view filters and sort options. These default settings are selected automatically when a List screen is displayed causing various screen elements to be updated, and reflecting the tasks that are now available for the selected view.
You may have several views to choose from. When you select a view, the item list on the List is updated to show items that meet the filter and sort criteria defined for the selected view, and the item count is updated accordingly.
Access control
Your Journey Workspaces portal imposes various restrictions that constrain your access to Workspaces features and elements such as spaces, queues, tasks and applications, and the portal itself. Your access to Workspaces features is enabled through and determined by configuration. If there are features that you need to use but you don't have access to them, contact your Workspaces administrator.
Workspaces is accessible to authenticated users only. To access your Workspaces portal, login using your Workspaces username and password which your Workspaces administrator can provide to you. Once you have logged in, you can interact with the features and elements that you have been given access to, such as selecting a space to work in or selecting a queue from a list of queues.
The spaces you can access also control which features are available to you. For example, if you have access to the Review space or Manage spaces, you can select a queue which gives you access to the specific tasks on that queue. Then, the tasks or applications you can access and their current state determine what actions you can take. For more information about when various actions are available, see Workspaces Actions.


