Workspaces Helpdesk
WorkspacesThis topic relates to Journey Workspaces | Workspaces UserIncludes bank staff, helpdesk, relationship managers, and managers | This feature was introduced in the 19.05 releaseThis feature was updated in the 23.04 release
Some of the text and images below may not match what you see in your Journey Workspaces app. This is because the features described are based on a default Journey Workspaces configuration, and your Workspaces app may be configured differently; for example, with your company's branding, with fields for other information, or with a custom layout. Nevertheless, the features described work the same way in every Workspaces app.
Sometimes, applicants need help. Some applicants need help to complete their application while others just want to know how their application is progressing. Whatever the inquiry, customer service staff can use Workspaces to help answer customer questions quickly and efficiently.
Customer service needs are supported in Workspaces via the inclusion of a Helpdesk space. In its default configuration, the Helpdesk space includes a List screen and a Details screen that are configured with features designed to make activities related to customer service fast and efficient, so that you can focus on providing a great customer service experience.
Search Screen
The Search screen in the Helpdesk space includes all the standard features of a Workspaces Search screen.
- An item list containing a list of applications, and which may be empty initially depending upon how it is populated.
- A global view selector, used to apply a pre-defined set of fields, filters and sort options to the item list.
- A global filter that restricts the applications in the item list to just those for a selected form / product type.
- A Created Date global filter that restricts the applications in the item list based on the date they were created.
- Flexible search, filter and sort options that you can use to refine the set of applications in the item list.
- Paging tools that allow you to browse all of the items matching your selected criteria over multiple item list pages.
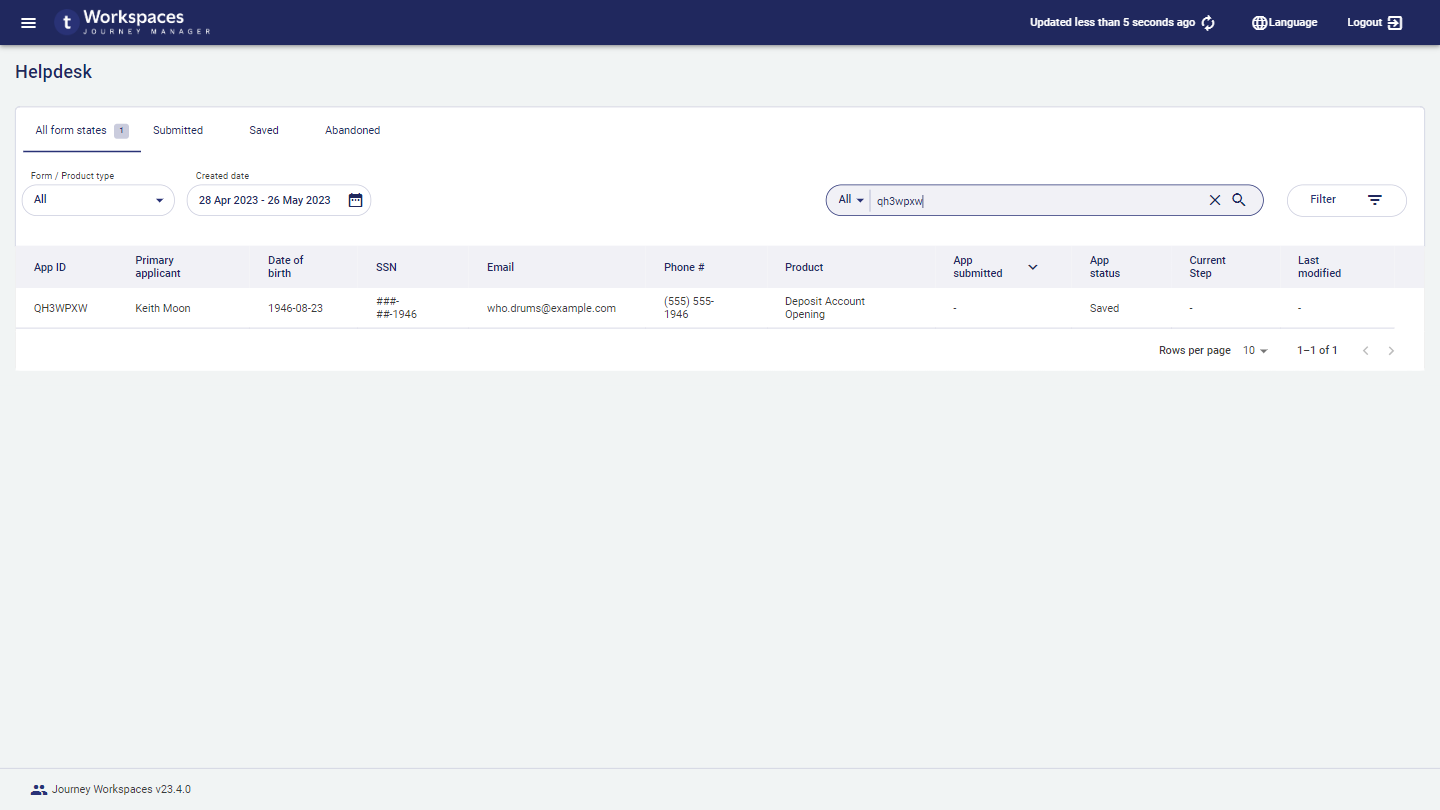
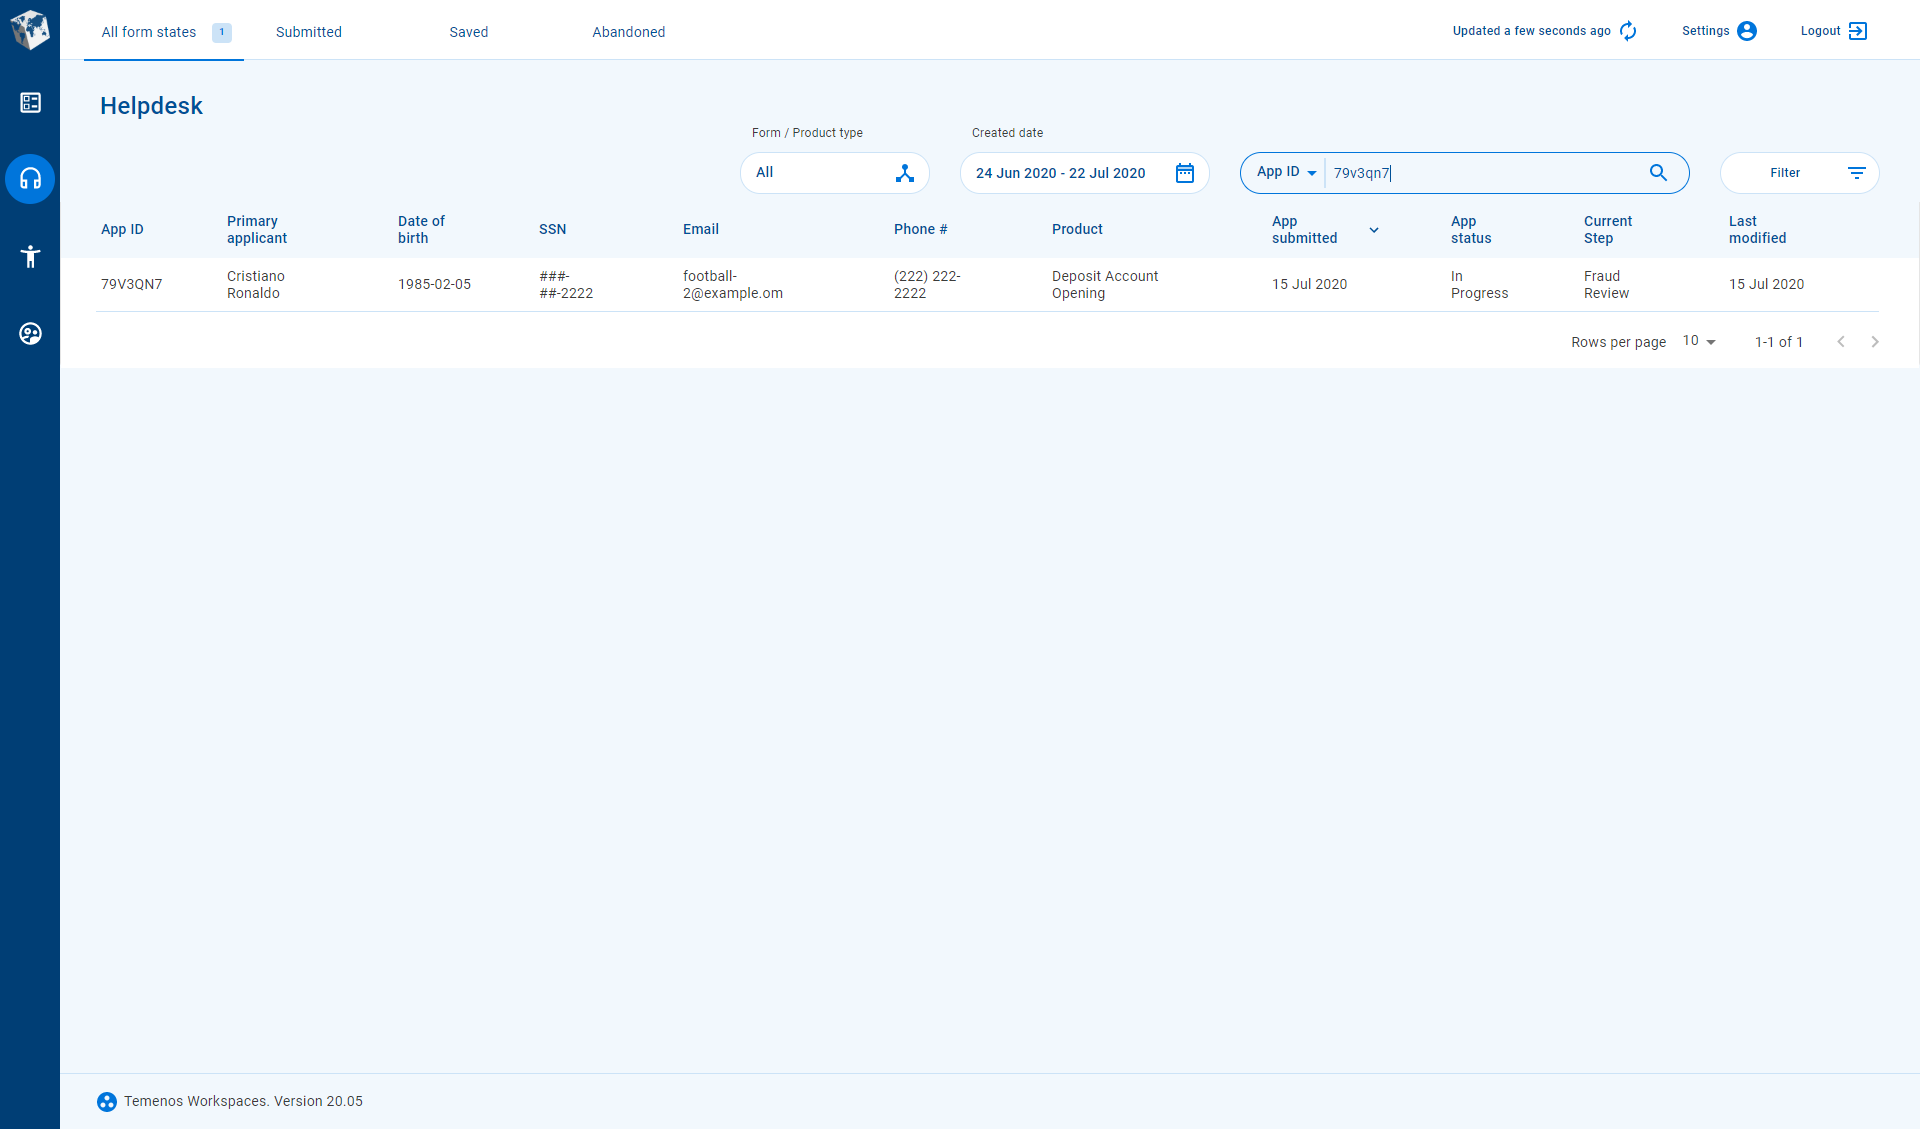
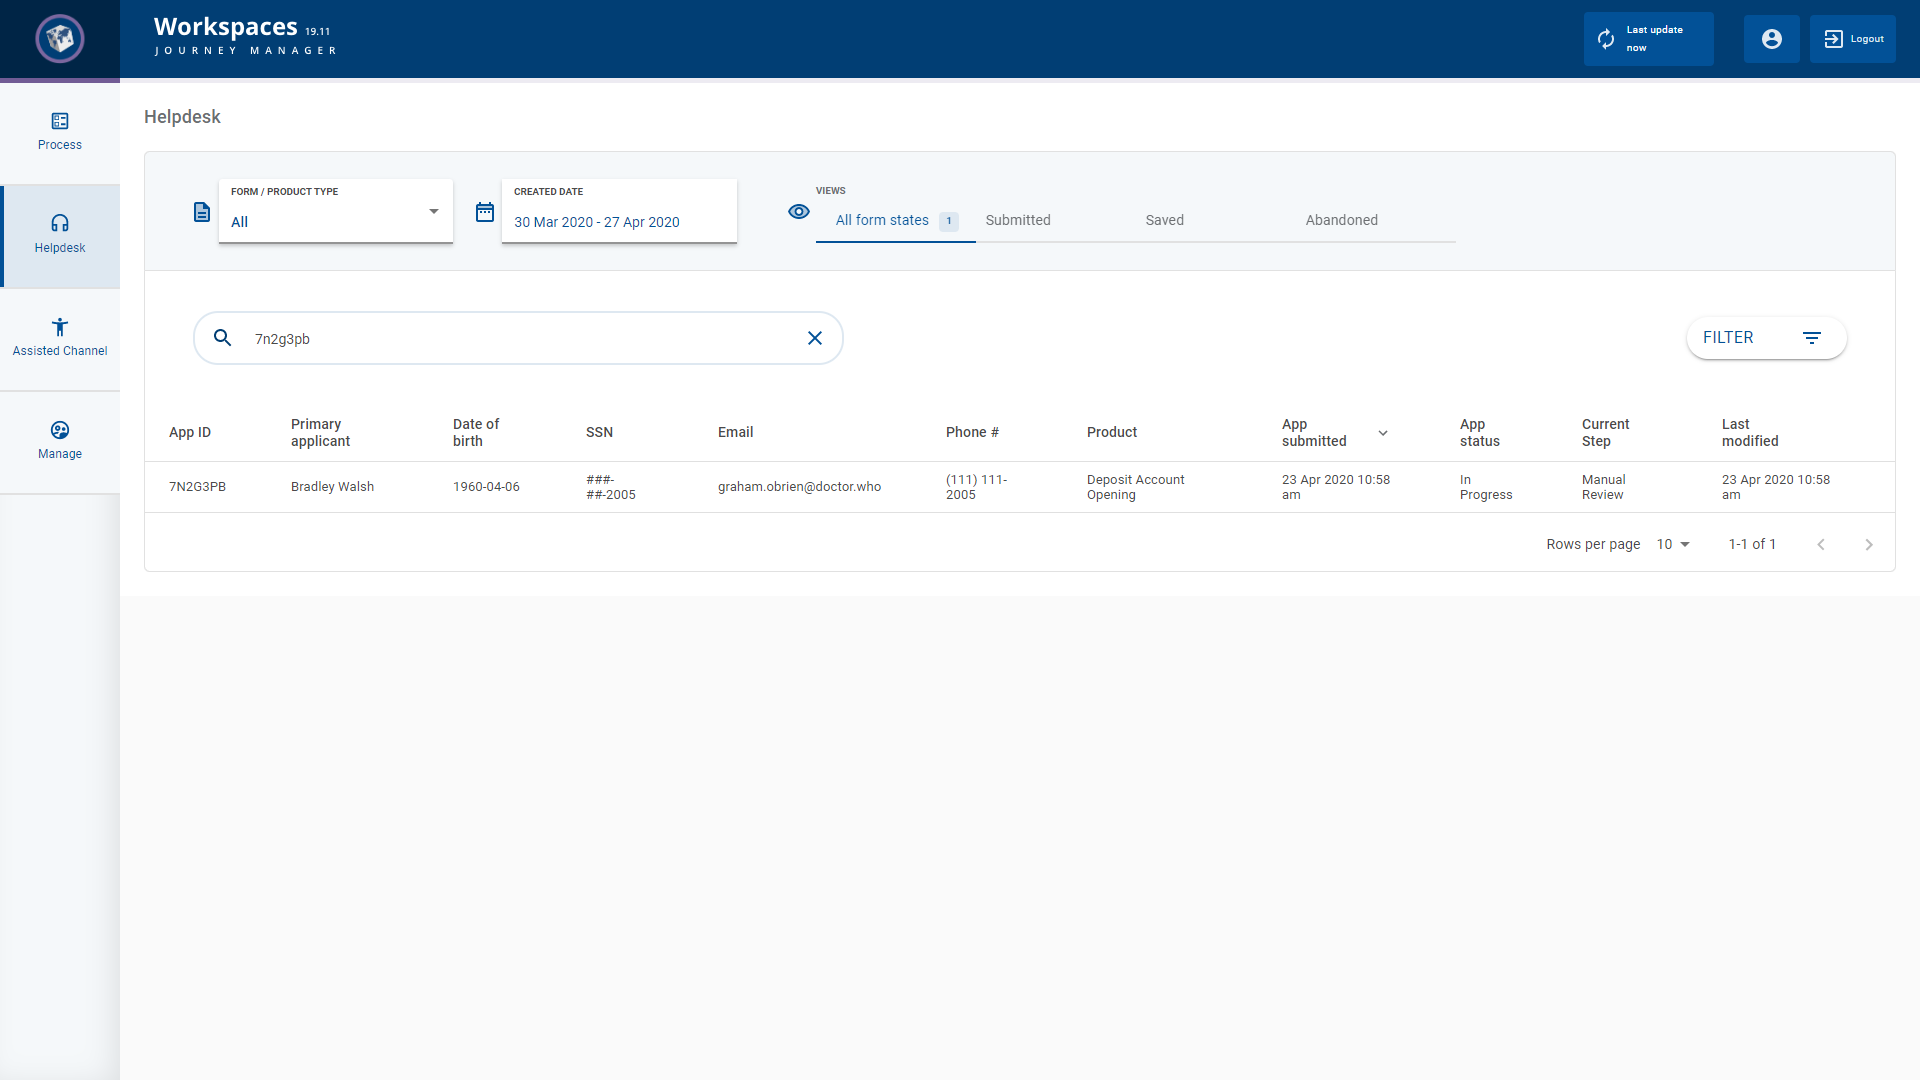
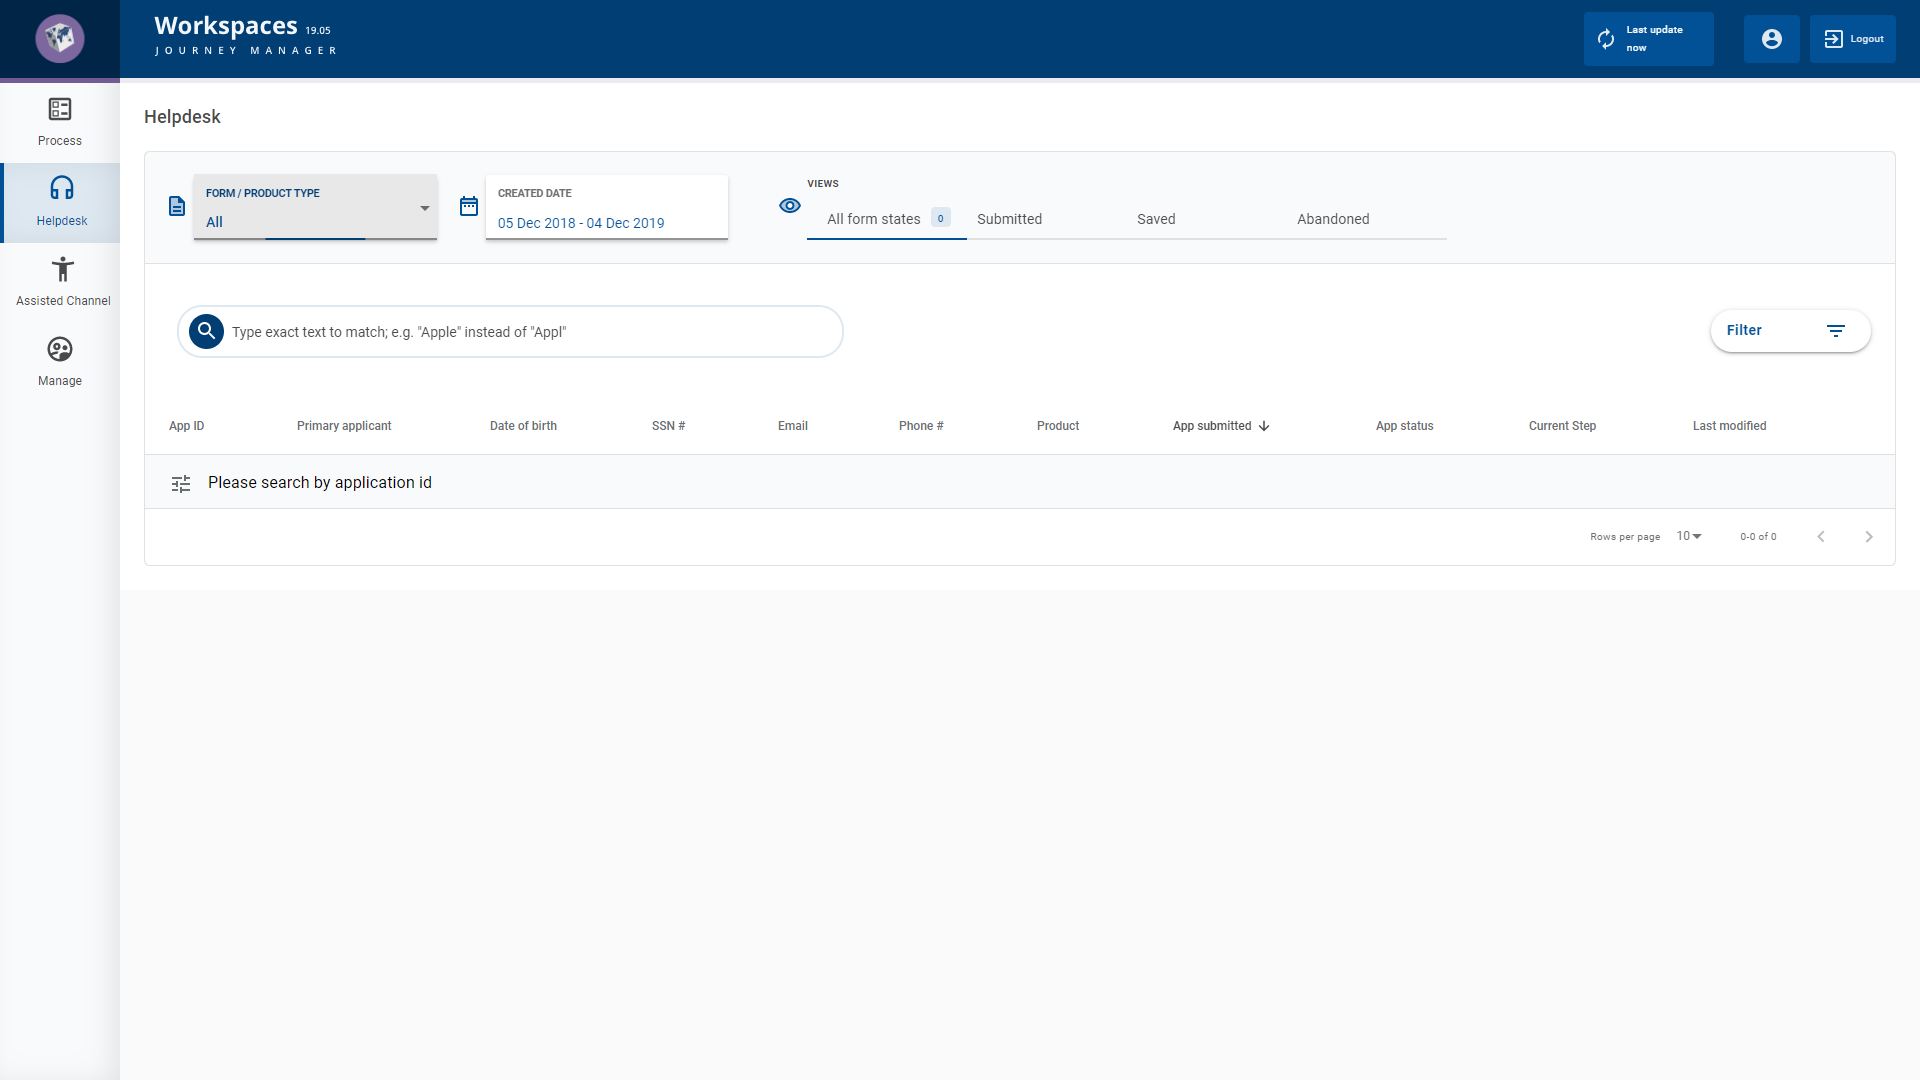
The item list on the Helpdesk space's List screen is empty by default. You might find this surprising but there's a very good reason why this is the case. When you start helping an applicant with an inquiry, you don't have any information about the applicant or their application, and Workspaces reflects this situation via an empty item list. Once you obtain some information from the applicant, you can use this information to start looking for applications that are related to the applicant's inquiry. The most useful information you can get from the applicant is the App ID, but if the applicant doesn't have that to hand, you can try searching or filtering on other criteria, then browse the item list. To learn more about searching and filtering, see Search for a Task or Application and Filter the Item List.
Once you've found the application you're interested in, you can select it in the item list to perform an action on it. To learn about the available actions, see Actions below.
Details Screen
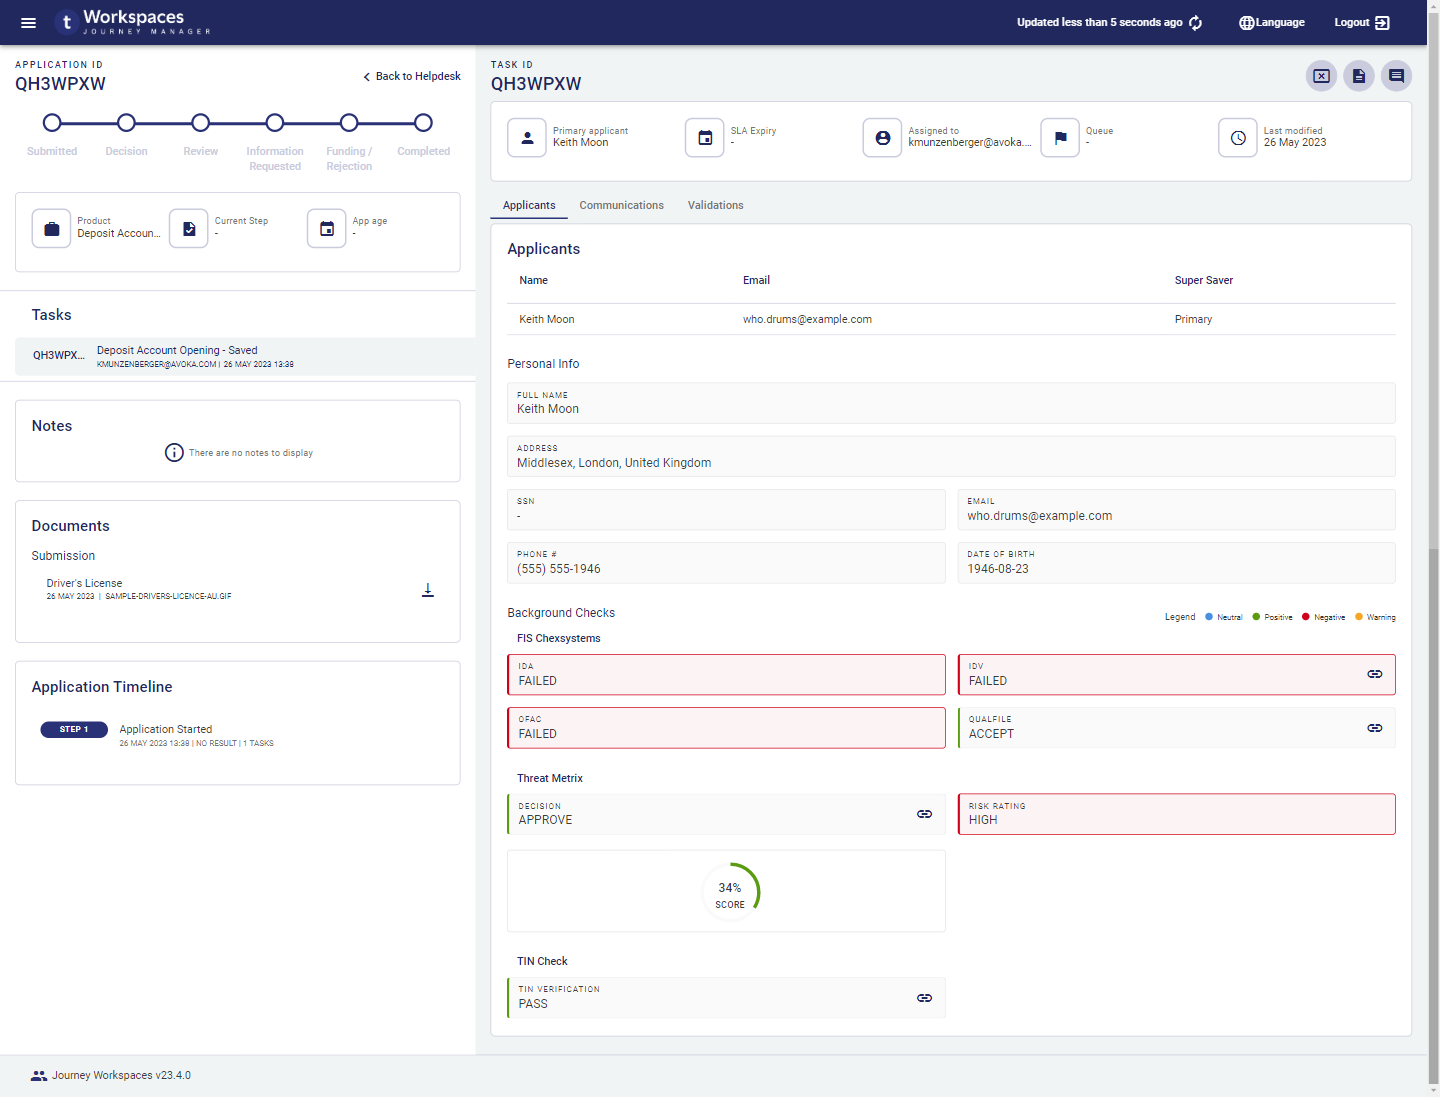
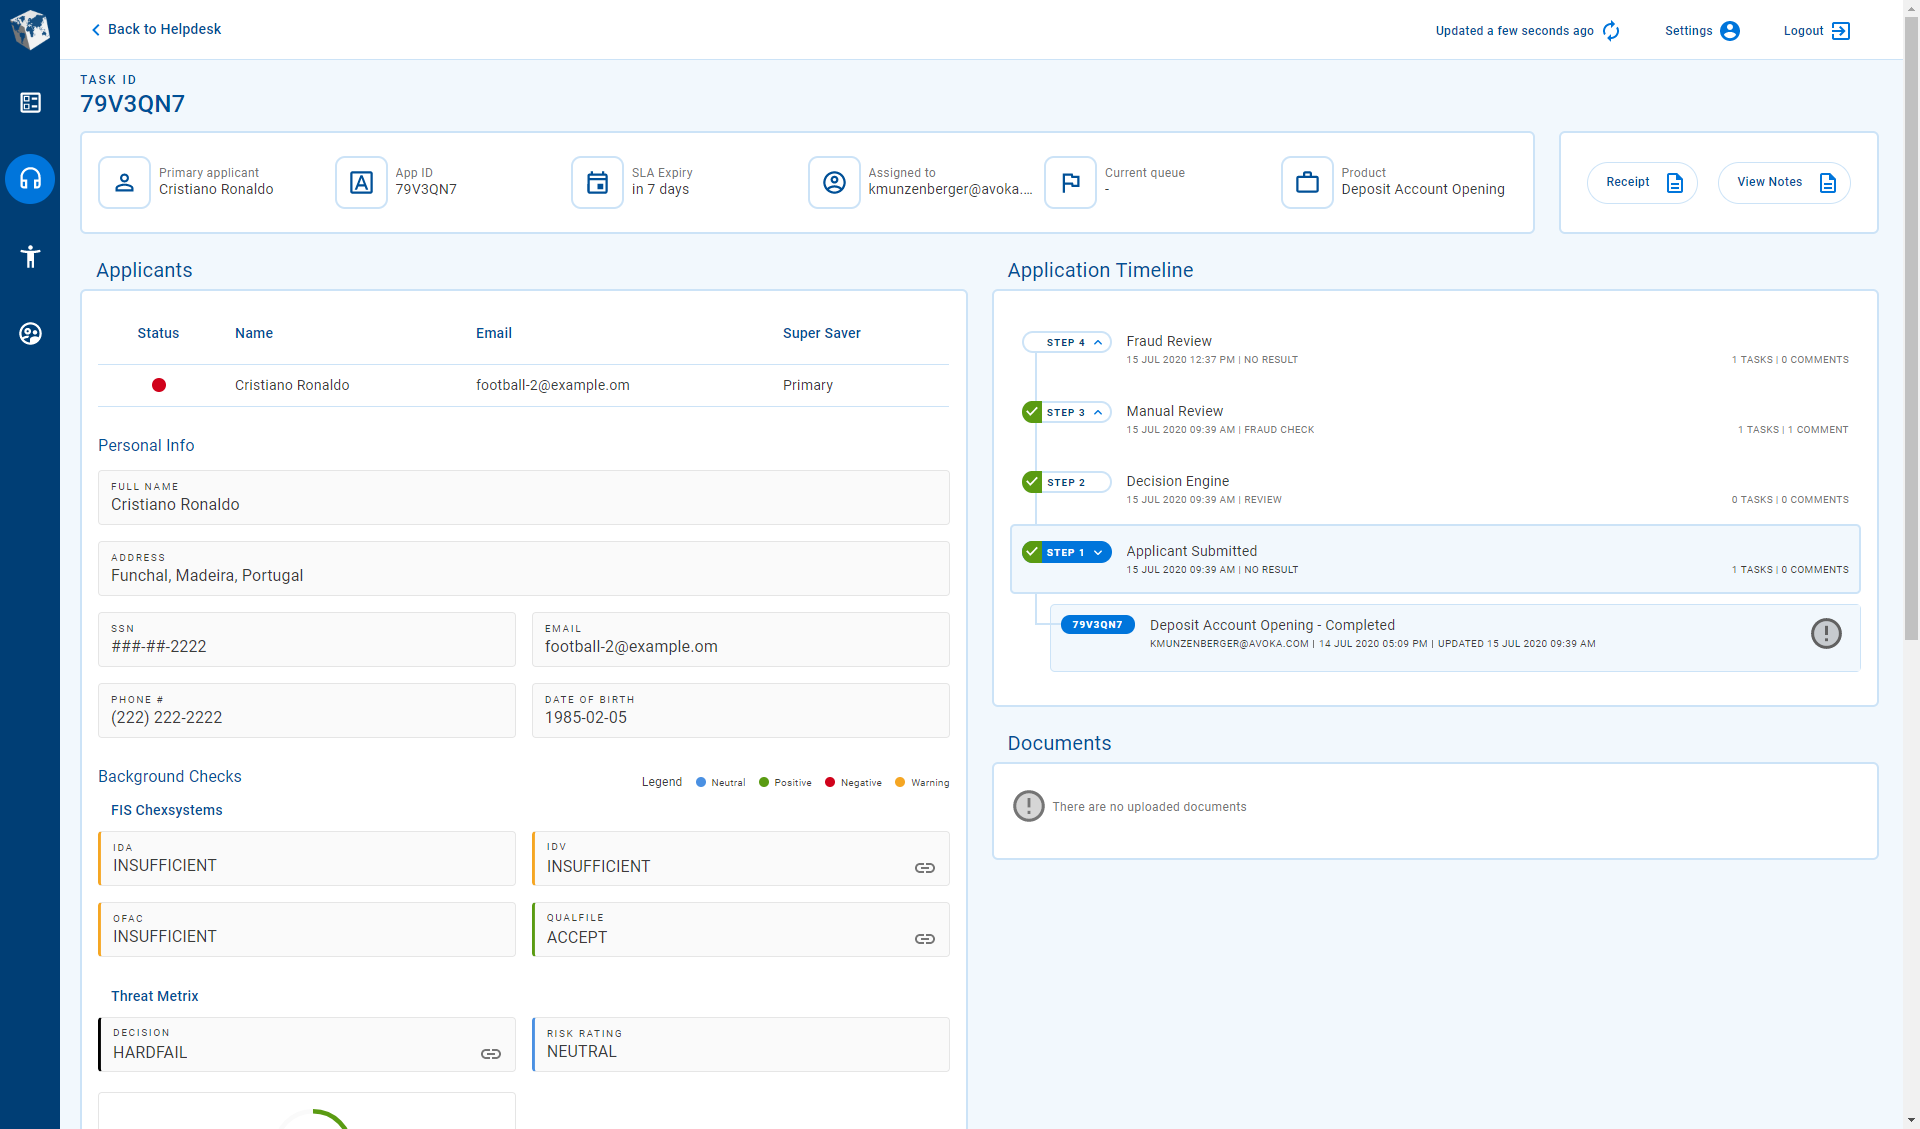
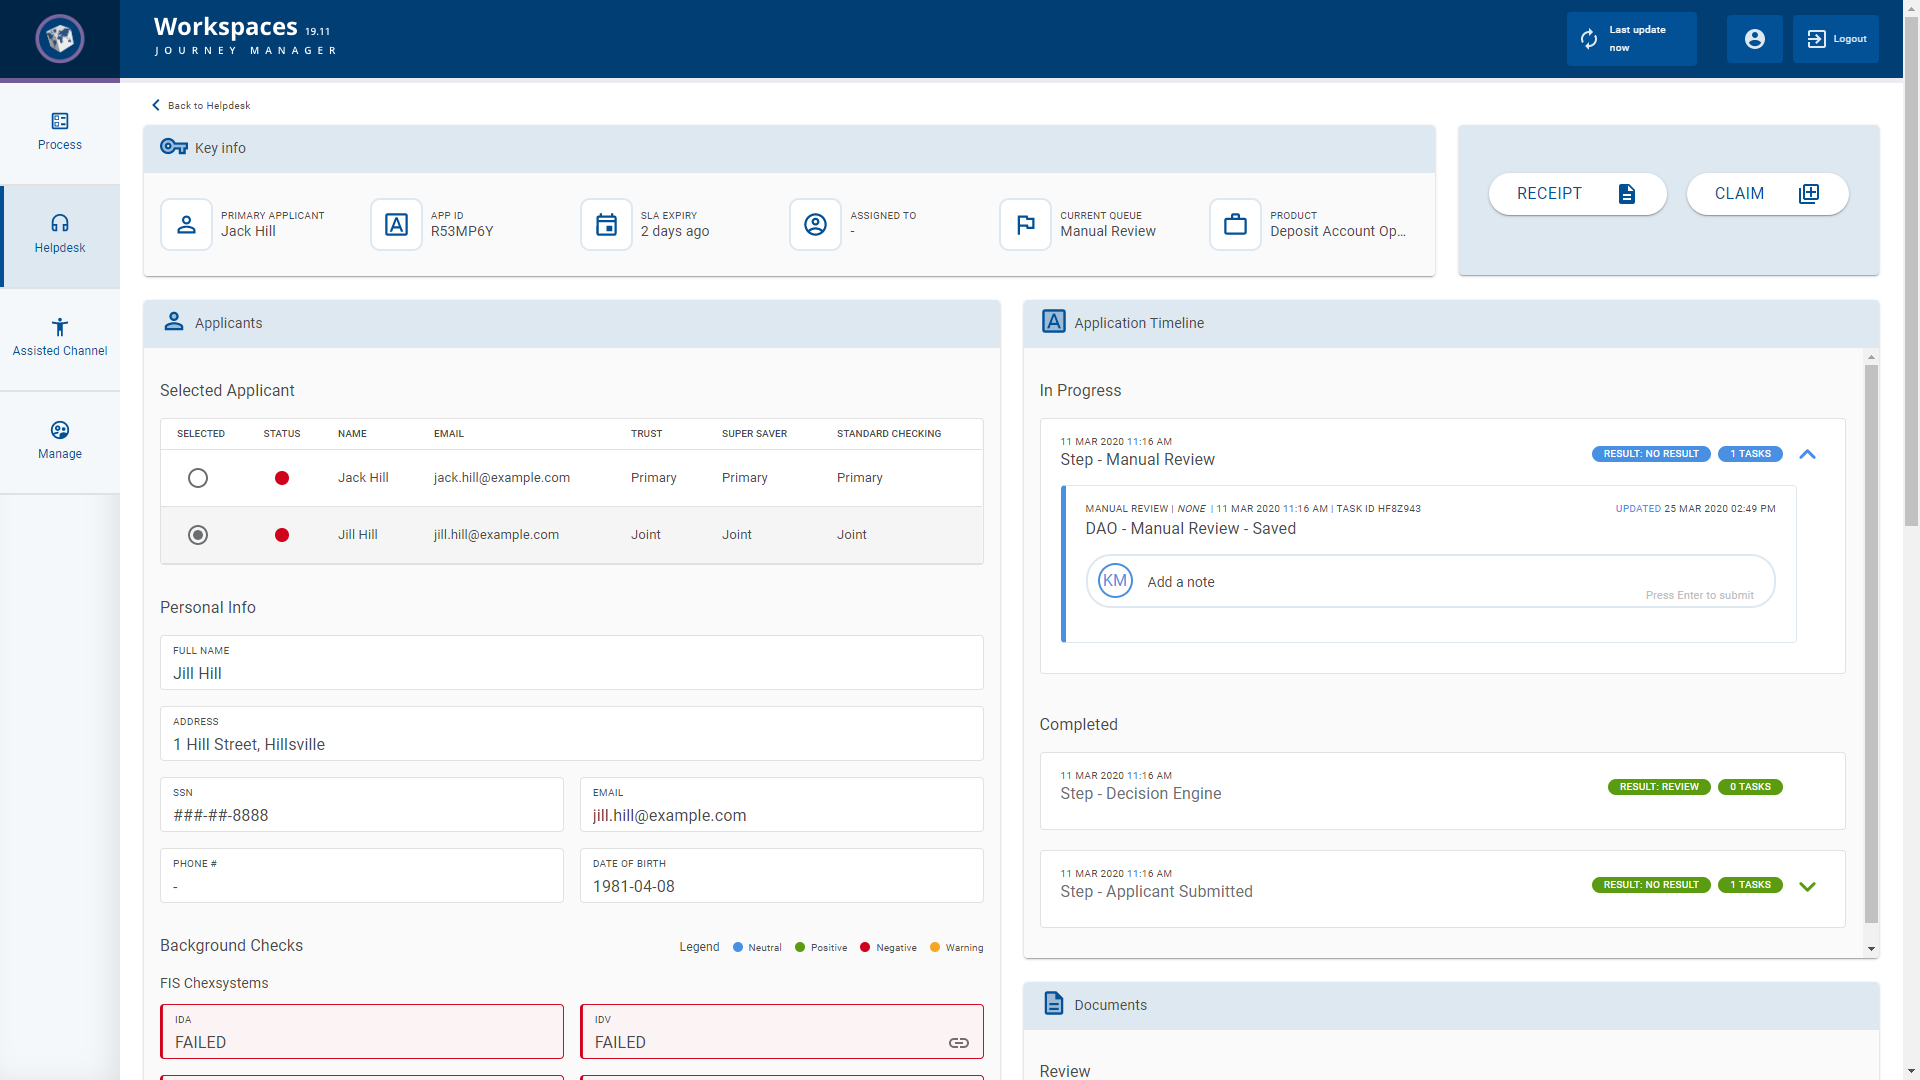
The Details screen in the Helpdesk space includes all the standard features of a Workspaces Details screen.The Details screen displays comprehensive information about an application and a selected task, and provides access to the Helpdesk actions. Each of the following features is contained in a separate container (pane, card or section).
- Separate panes for application and task content. This feature was introduced in the 23.04 release
- Separate for the application and the selected task. This feature was introduced in the 23.04 release
- The ability to track application progress against an SLA.
- A progress stepper showing a high-level indication of the application's progress. This feature was updated in the 23.04 release
- A task switcher showing all the application's tasks, from which you can select one to display in the Task pane. This feature was introduced in the 23.04 release
- A Notes card, bringing all notes and comments for a selected application together in a single component. Each note and its comments form a threaded conversation between the applicant and bank staff. This feature was introduced in the 23.04 release
- A collection of documents relating to the application.
- An application timeline showing the steps (tasks) that the application has progressed through. This feature was updated in the 23.04 release
- A dynamic set of actions that are applicable to the application or selected task and which are available for you to perform in the Helpdesk space at the current stage of the application's life cycle.
- An Applicants tab, providing access to applicant data including:
- An applicant list showing how each applicant relates to each product in the application. Select an applicant to view more details about them.
- Personal information for the selected applicant, including identity and contact details.
- The outcomes of preconfigured background checks which provide an assessment of a selected applicant's suitability.
- A Communications tab listing emails sent to the applicant with options to view and resend.
- Options to view the details of background checks in various formats including JSON, XML, HTML, or PDF.
- A checklist of documents that need to be uploaded, as well as an upload status for each document.
To learn about any of these features, click the links above or see The Application Details Screen if you're using Workspaces 23.04 or later and The Application Details Screen (22.10 and earlier) if you're using an earlier Workspaces release.
Prior to the 23.04 release, the application timeline is an interactive component where the user can select a task, add or view notes, and perform task actions. In the 23.04 release, these interactive features have been removed from the application timeline and, instead, are available in separate components. For details, see Task switcher, Notes, and Actions.
Actions
The following actions are available in the Helpdesk space.
- : Add notes (and comments) against an application's tasks. This feature was introduced in the 23.04 release
- : See a read-only view of a submitted application.
- : Recover an abandoned or withdrawn application so that the applicant can continue with it. This feature was introduced in the 19.11 release
- : Obtain a URL for a Details screen relating to a specific application, task and space. This feature was introduced in the 23.10 release
- : Open an application that has been saved but not yet submitted in the original form.
- : View all notes recorded against all of an application's tasks. This feature was introduced in the 20.05 release This feature was removed in the 23.04 release
- : Cancel an application that has been saved but not yet submitted. This feature was introduced in the 19.11 release
The Receipt and View Form actions are similar in that they both provide a way to view information entered by the applicant, but there are differences in how you can interact with that information. The Recover and Withdraw actions allow you to change the status of applications, generally at an applicant's request. All of these actions are described below in the context of the Helpdesk space, including examples of how to use them.
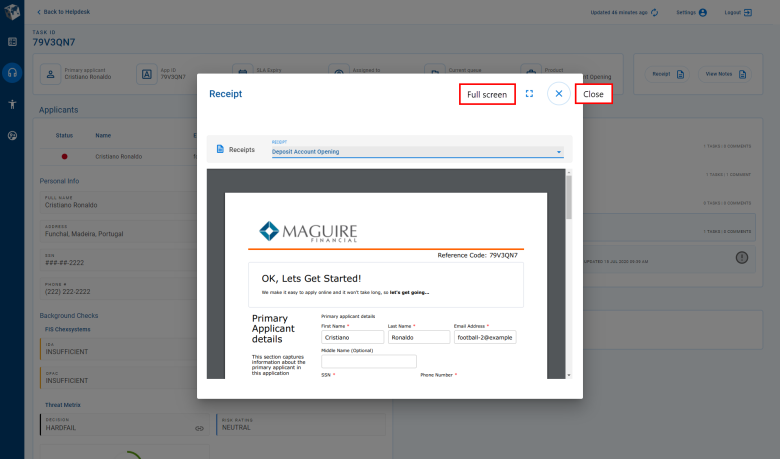
View a Receipt
After you've submitted an application, you may want to see the information that was submitted. You can use the Receipt action to view the information for a submitted application.
To continue an application that has been saved but not yet submitted, use the Resume action.
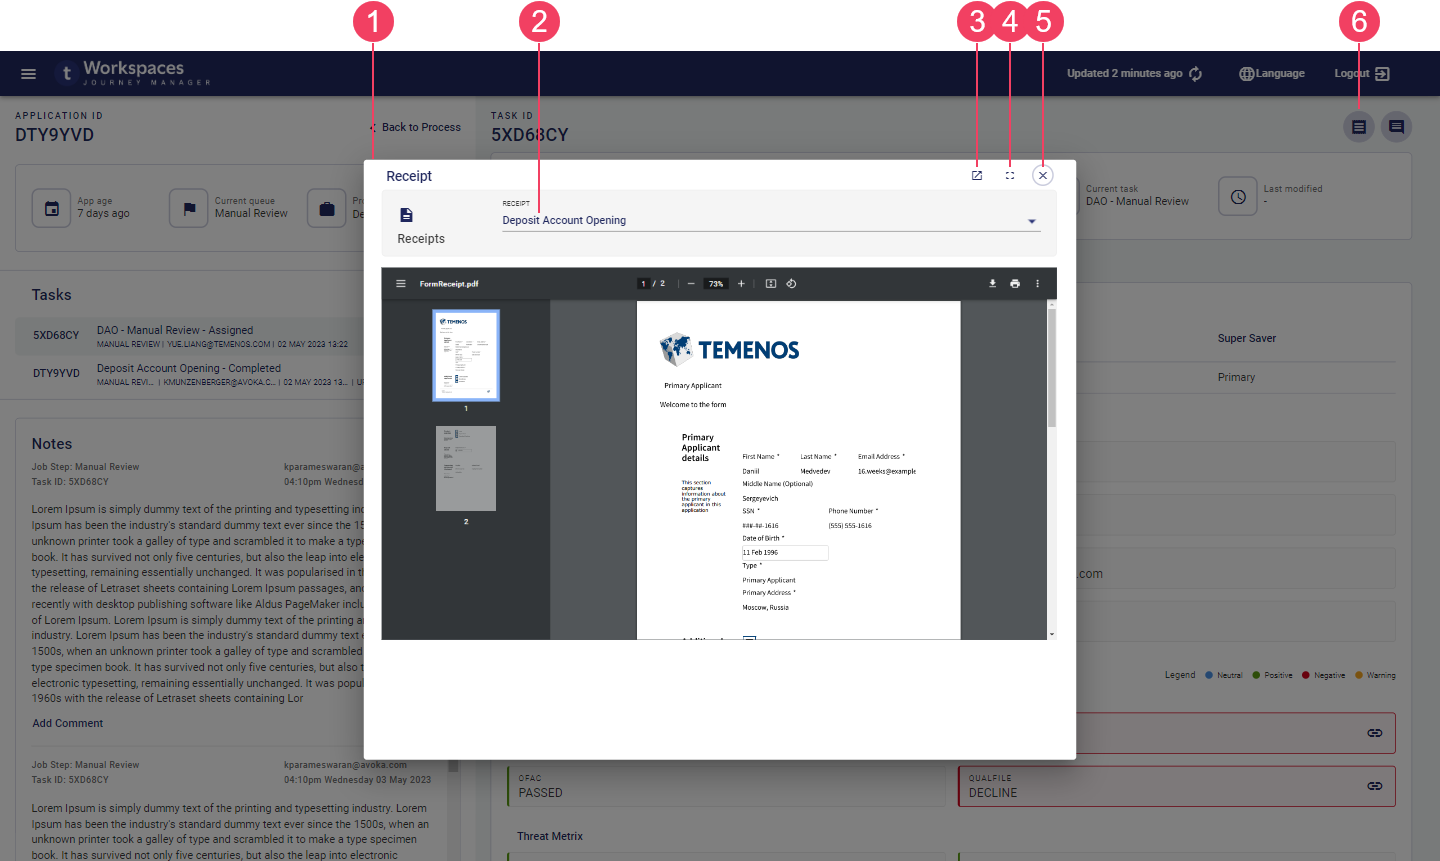
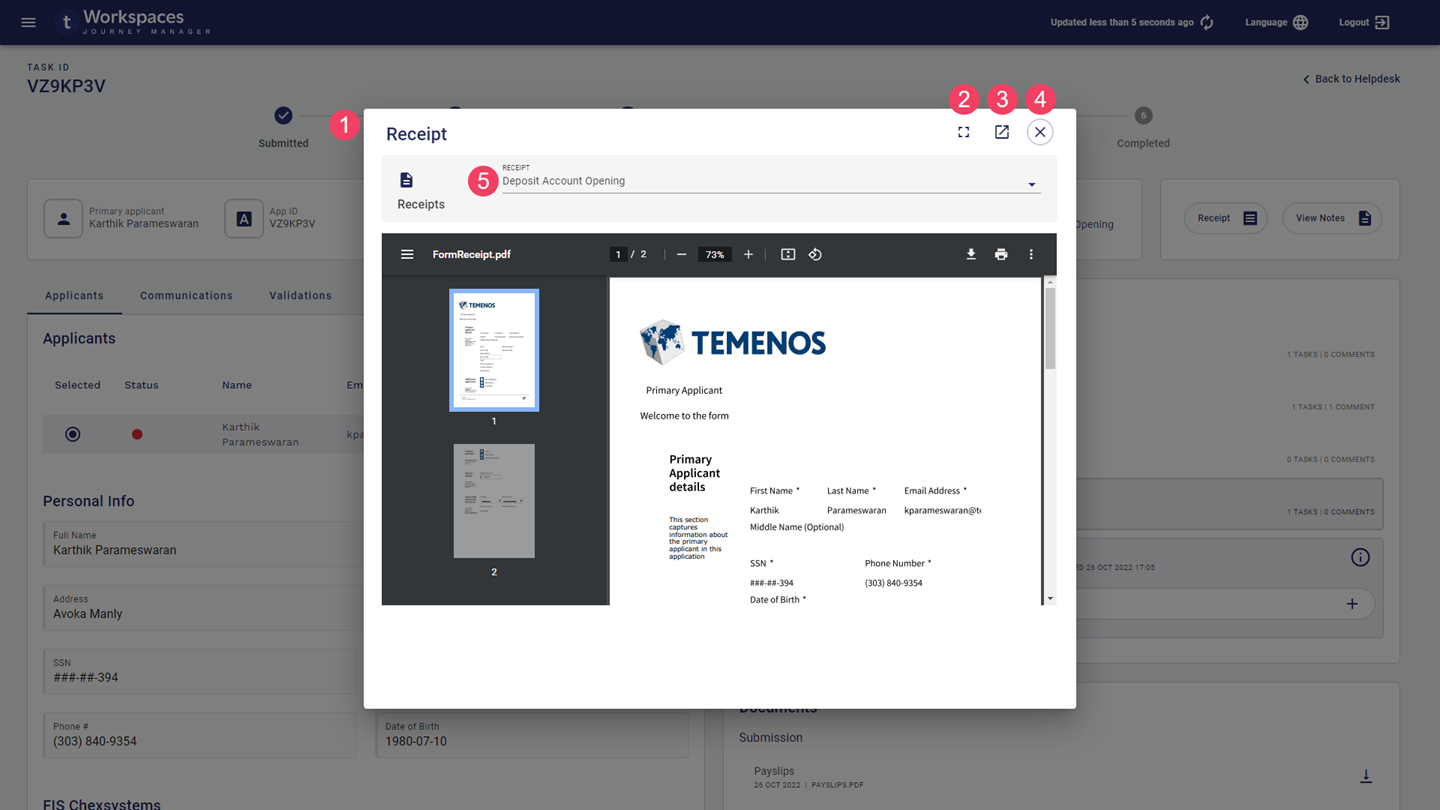
- Receipt modal window
- Receipt selector
- Pop out to new tab
- Expand to full screen
- Close modal window
- Receipt button
- Modal window
- Expand to full screen
- Pop out to new tab
- Close modal window
- Receipt selector
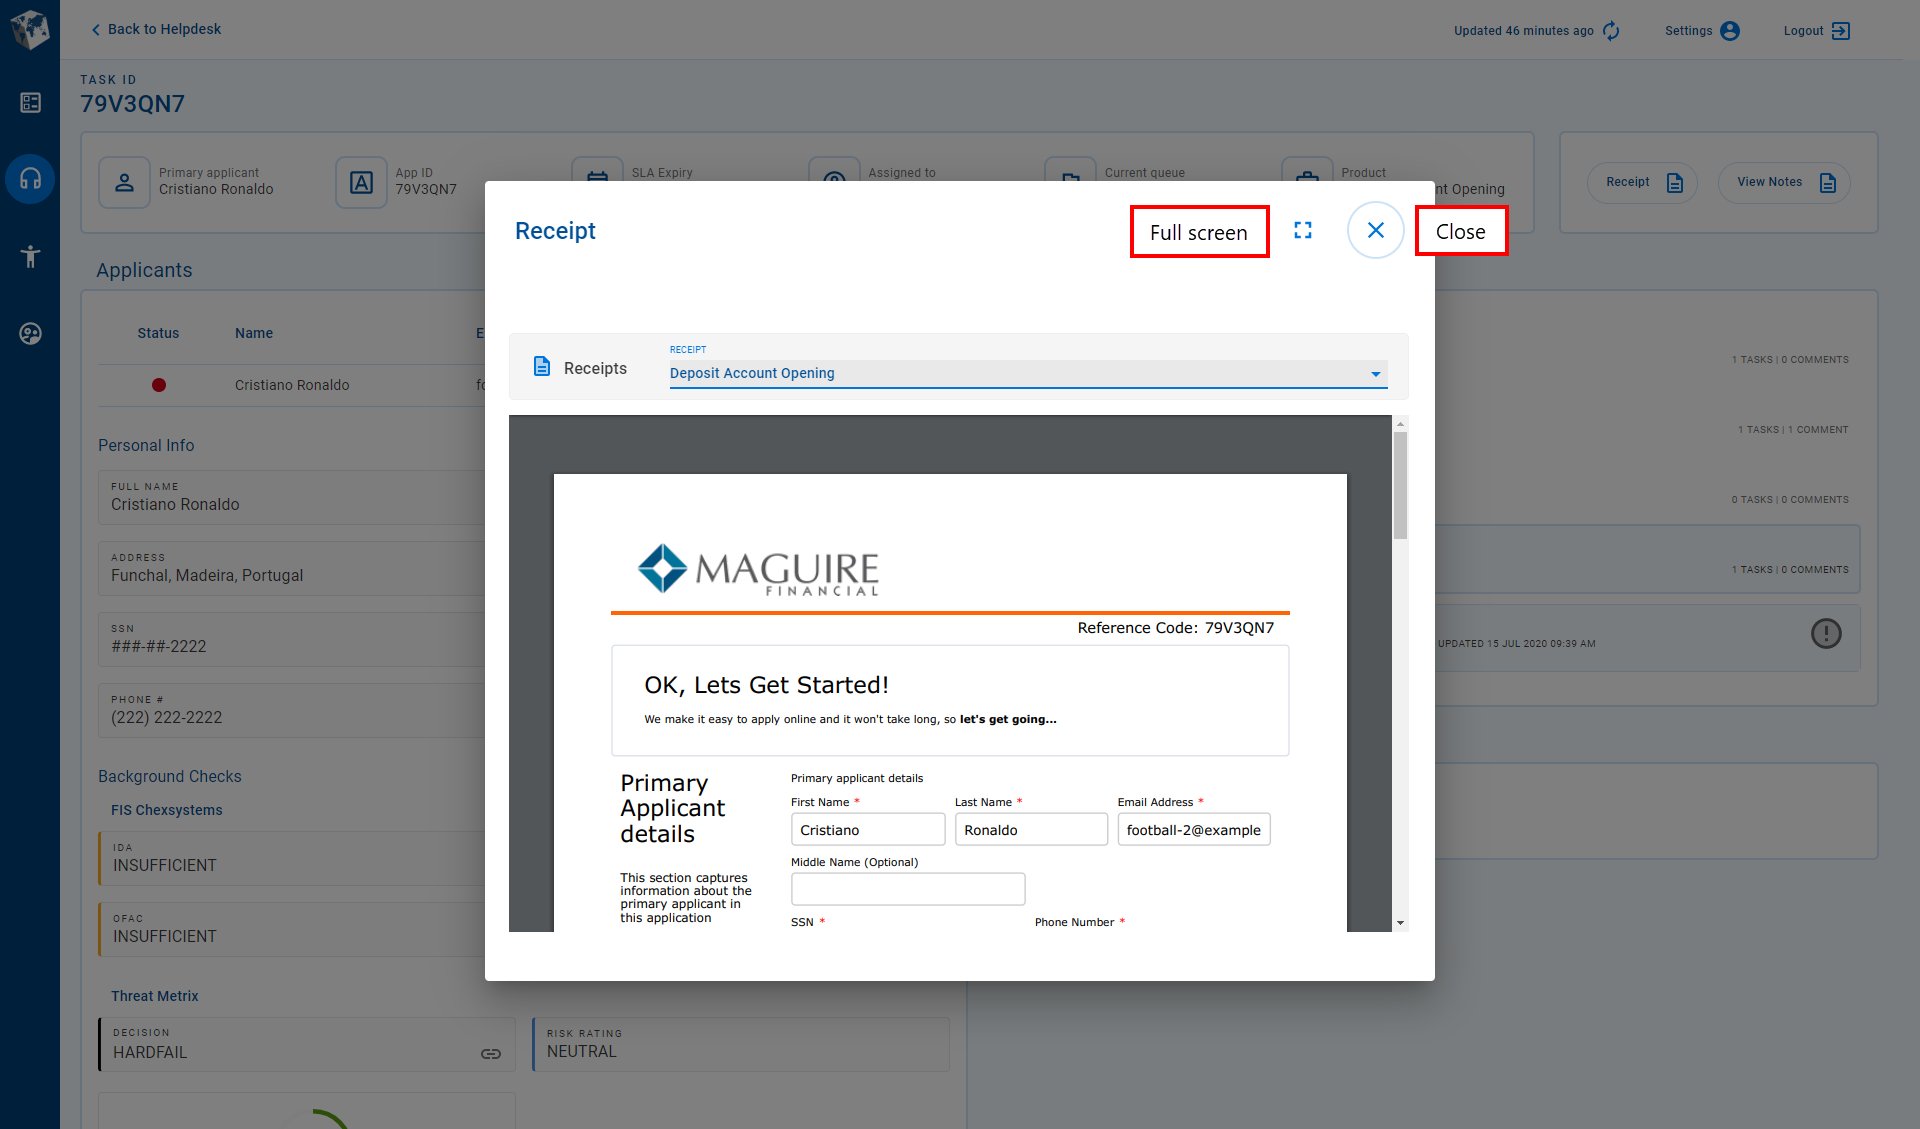
A receipt is a read-only view of information submitted by an applicant or other Workspaces user, and displayed in the same form used to capture that information. You can view a receipt from any space, and for any item (application or task) even if it's not assigned to you. Each task associated with an application may have a receipt. If there are multiple receipts for an application, you can view a specific receipt using the Receipt selector at the top of the modal window. Note that viewing a receipt does not allow you to change the application in any way.
When you select the Receipt action, the receipt for the selected task is displayed unless there isn’t a receipt associated with the task, in which case the most recent receipt is shown by default. However, if you're using Workspaces 22.04 or earlier, the most recent receipt is always displayed by default. | 22.10This feature was updated in 22.10.
View a Form
Some of the actions you perform in Workspaces rely upon you being able to see the information that has been entered and saved by an applicant; for example, when responding to a customer inquiry or assisting a customer to complete an application. You can use the View Form action to view the information in a saved application.
To view the information in a submitted application, use the Receipt action.
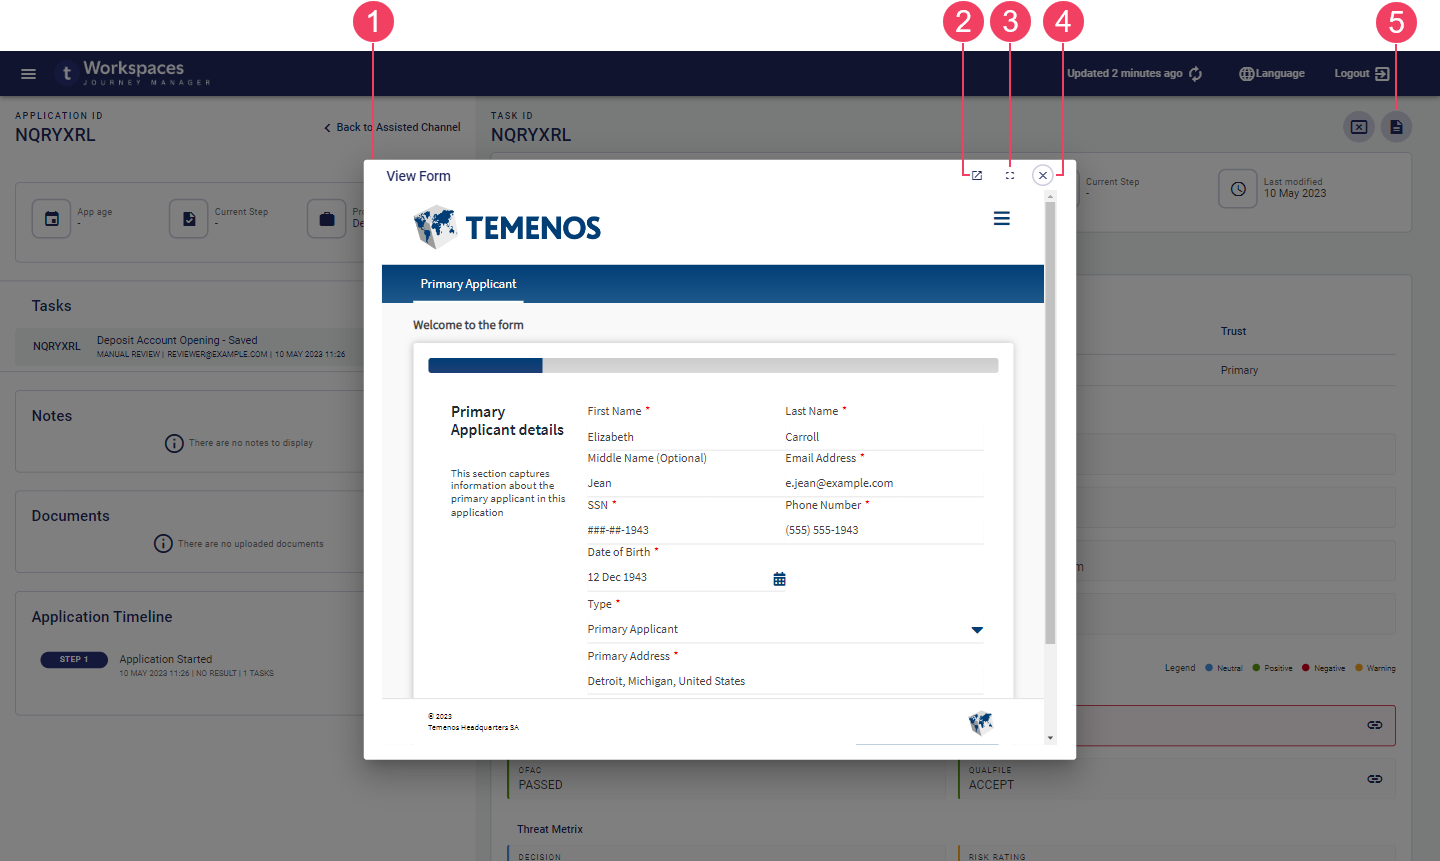
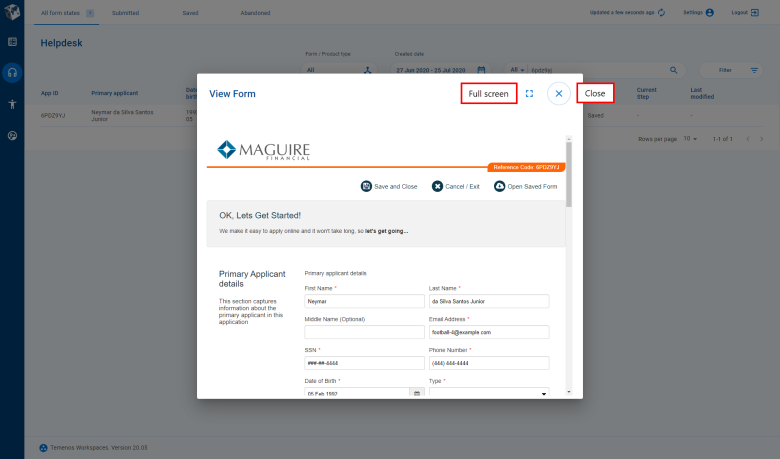
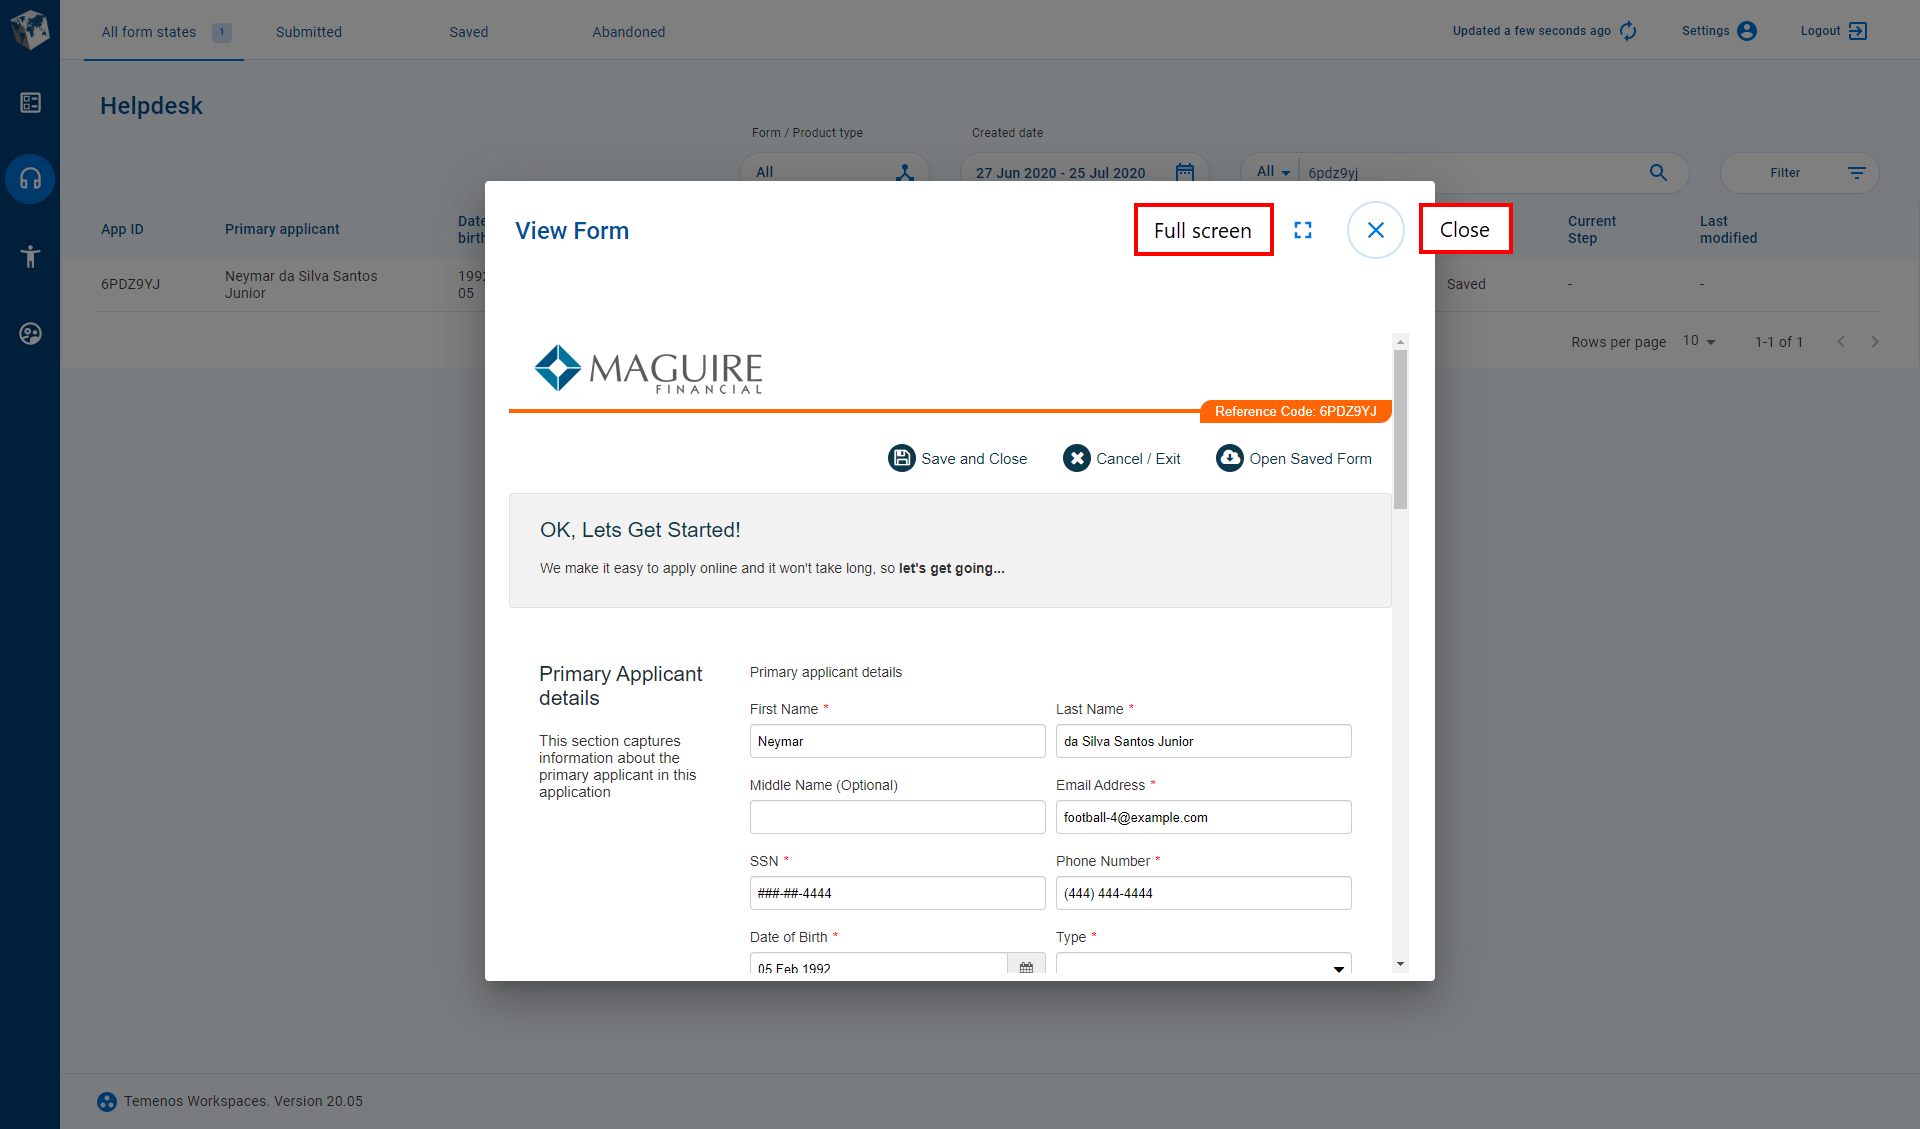
- View Form modal window
- Pop out to new tab
- Expand to full screen
- Close modal window
- View Form button
When you view a form, the information entered by the applicant is displayed in the same form that was used to capture that information. Viewing a form differs from viewing a receipt in that the form is not read-only. When you view a form, you can enter or update application information; for example, to help the applicant to complete their application.
Recover an Application
Let's say someone starts an application but their browser crashes before they can save or submit it. They give up on their application for now, and so it becomes . A short time later, the applicant decides to complete the application they started after all, so they call the support helpdesk. You're able to reassure the applicant because you can recover their application so that they can complete and submit it.
Any Personally Identifiable Information (PII) in a recovered application is not available if the data retention period has expired.
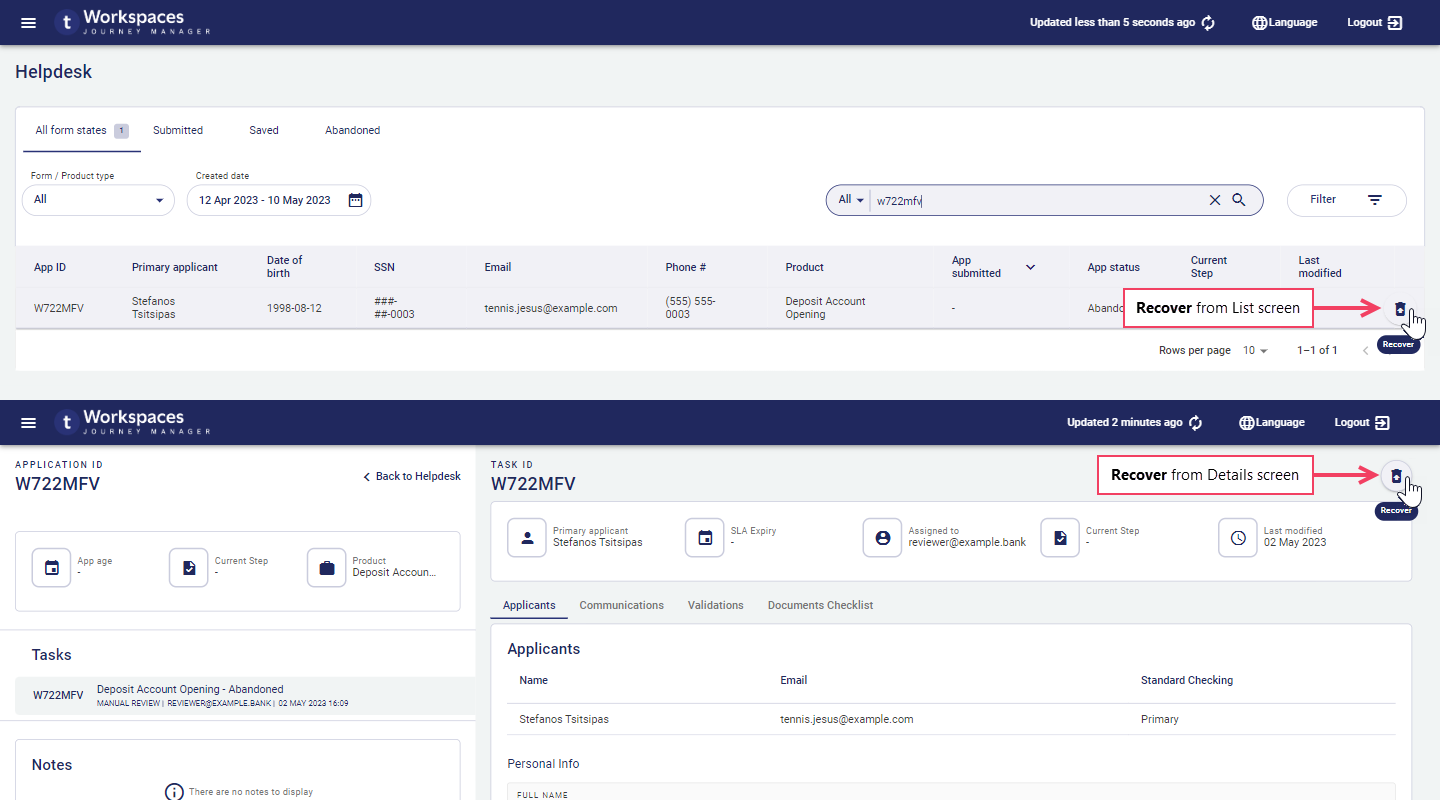
It's easy to recover an application. Go to the Helpdesk List screen and locate the application to be recovered, then select the Recover option. Alternatively, once you've found the application on the List screen, you can view its Details screen and recover the application from there. This latter approach can be useful if you 're not able to determine from the limited details on the List screen whether you've got the right application.
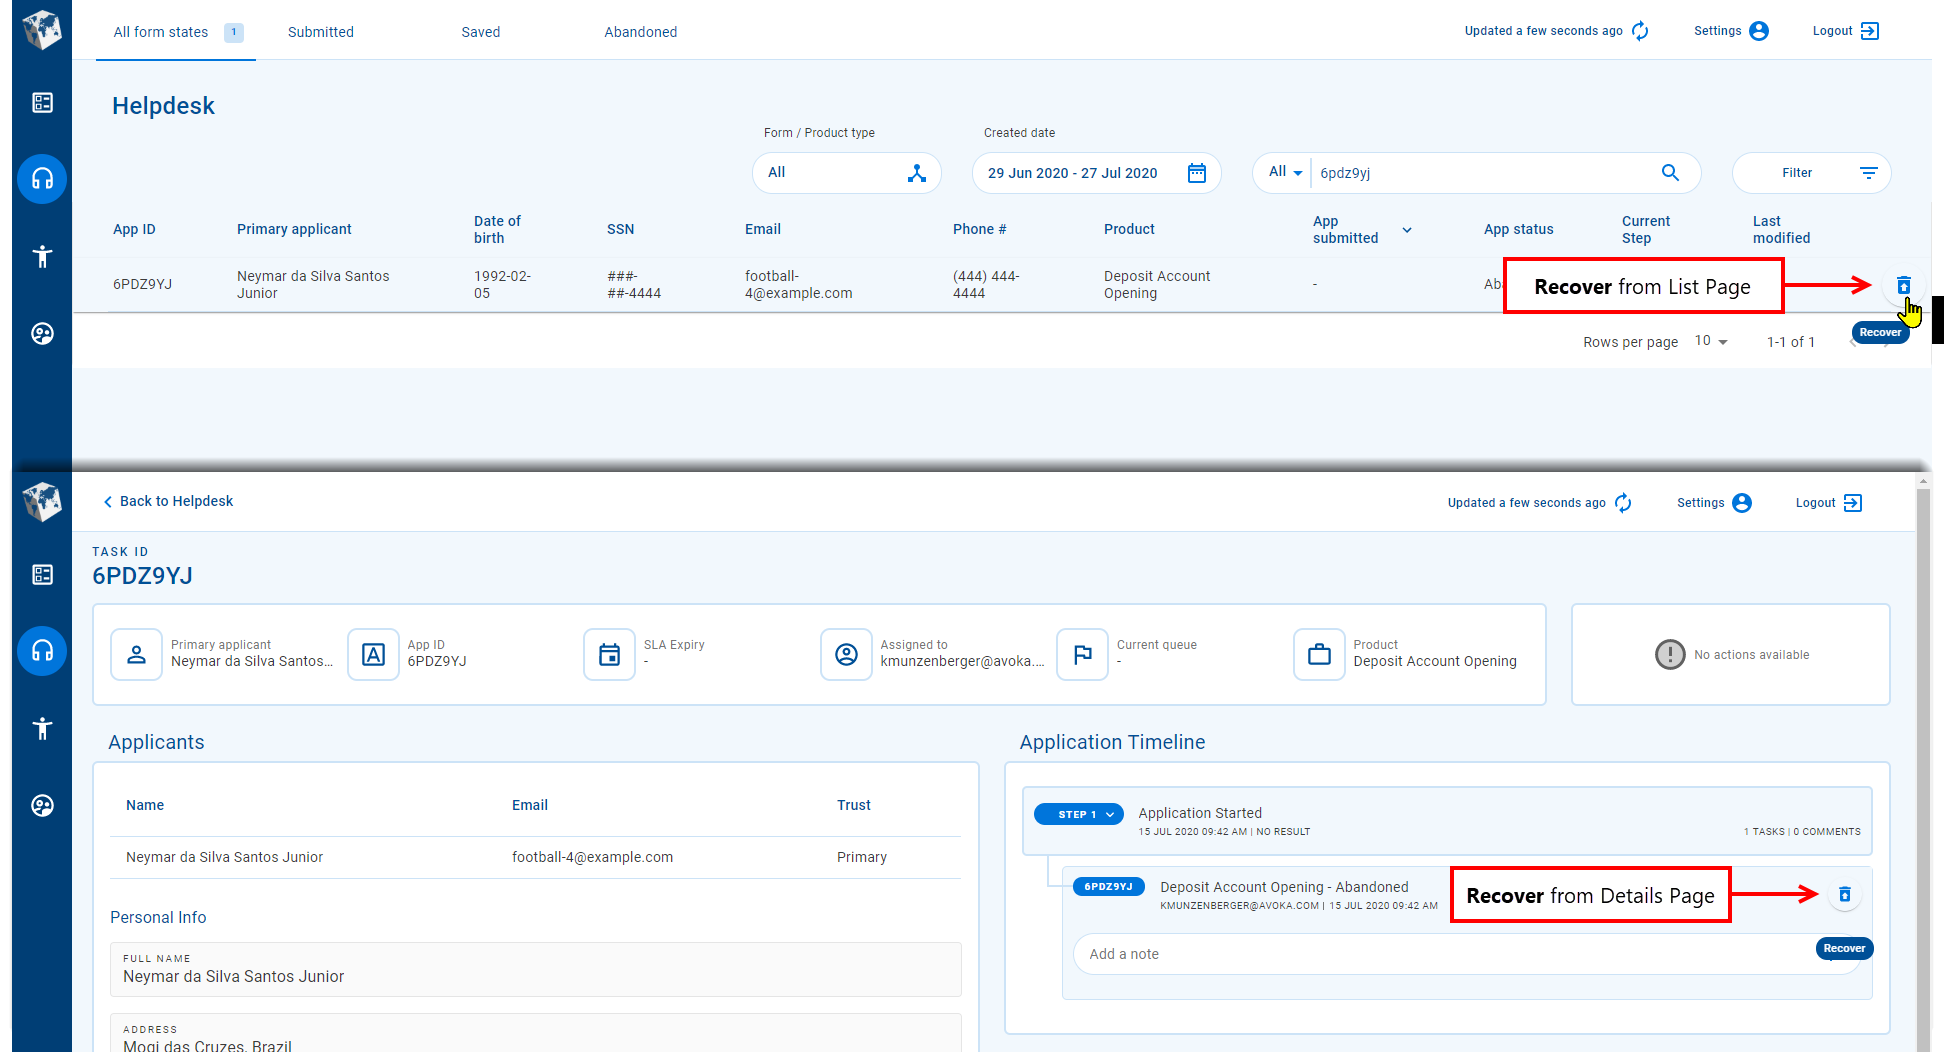
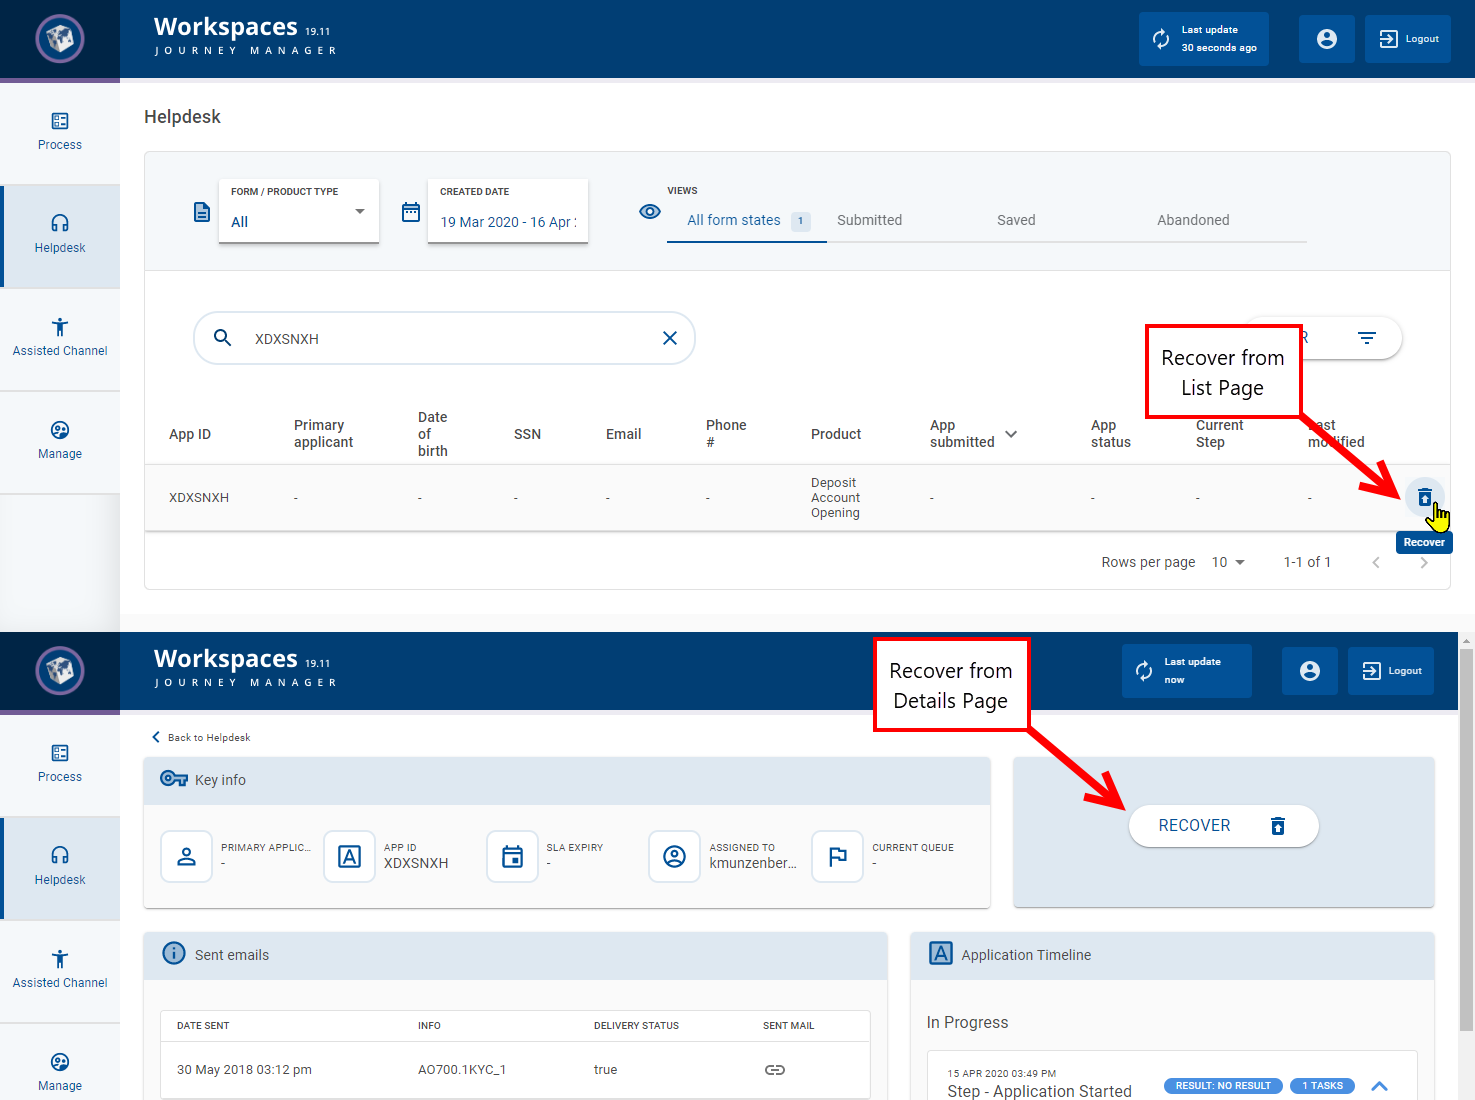
Workspaces does not mandate how an applicant can access a recovered application in the default configuration as this is an aspect that will be specific to each Workspaces portal. However, it's likely that the applicant will have received an email at some point - such as when they started or saved their application - and this will include a link to take them back to their application.
In addition to abandoned applications, an application that has been withdrawn can also be recovered.
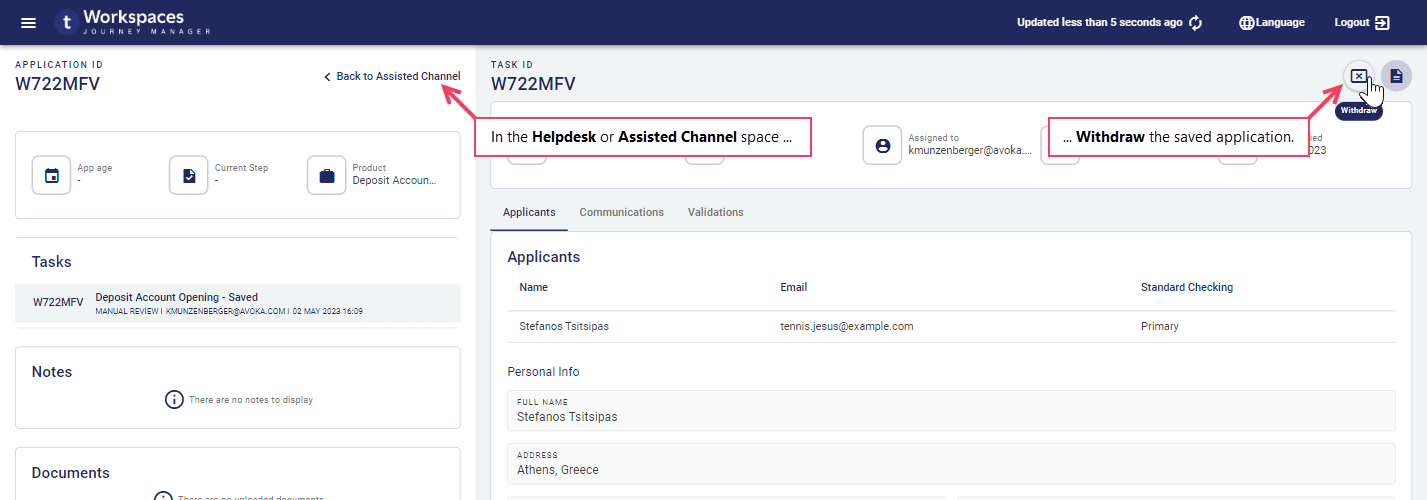
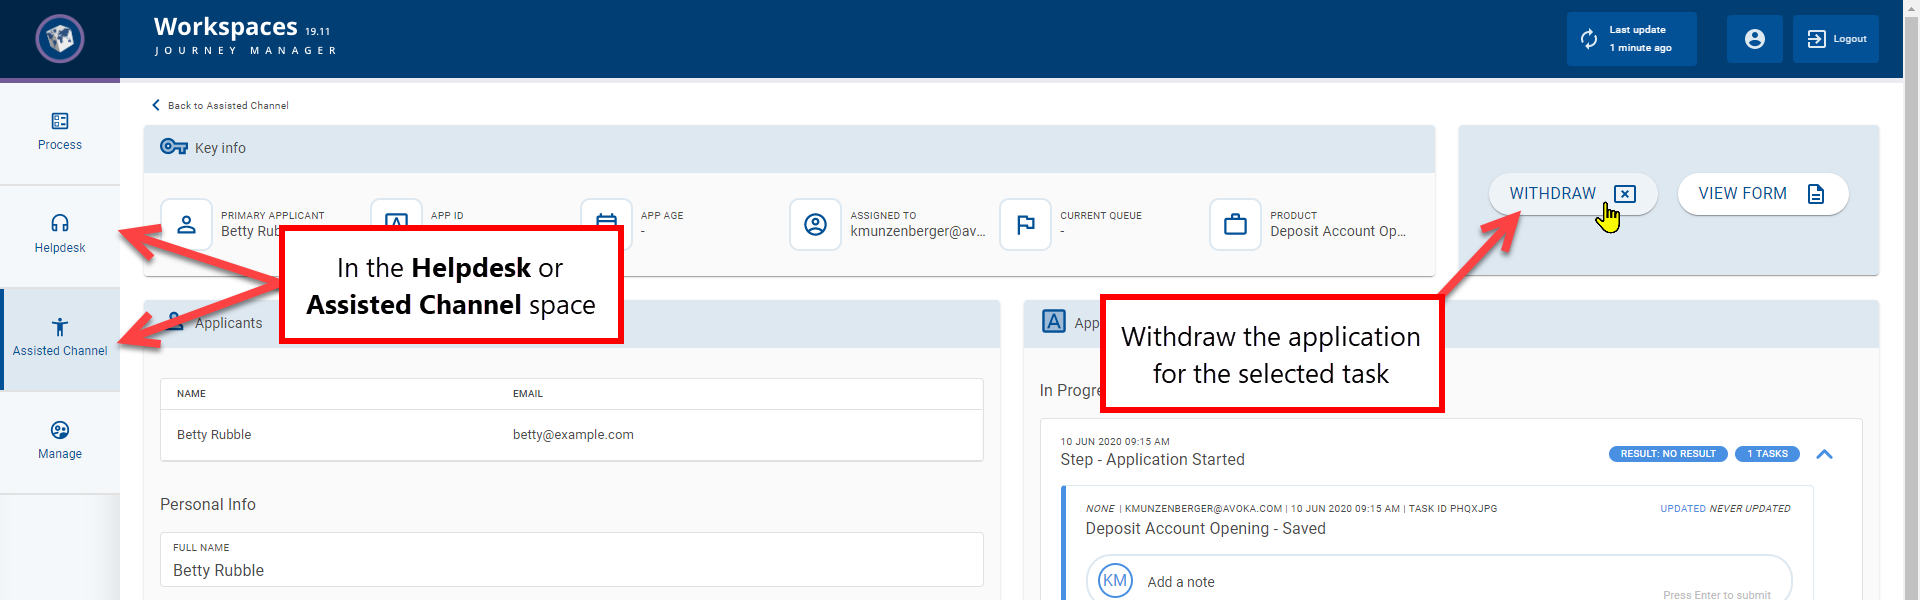
Withdraw an Application
Now, let's say someone starts an application but, before submitting it, they decide not to proceed with the application after all. So, they contact the support helpdesk and ask for the application to be canceled. You can help the applicant here by withdrawing the application.
Just like recovering an application, it's easy to withdraw an application. Go to the Helpdesk List screen and locate the application to be withdrawn, then select the Withdraw option. Alternatively, once you've found the application on the List screen, you can view its Details screen and withdraw the application from there. This latter approach can be useful if you 're not able to determine from the limited details on the List screen whether you've got the right application.
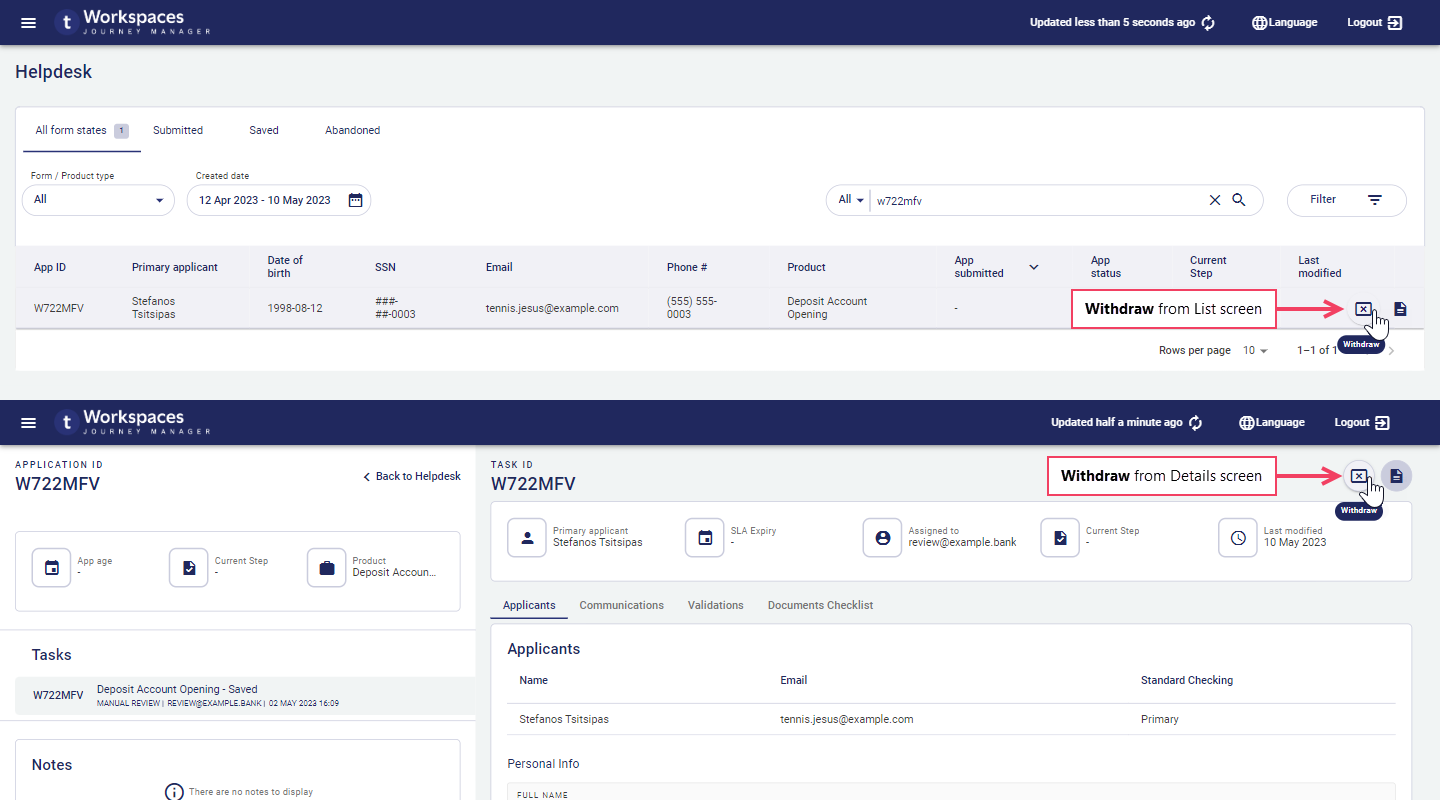
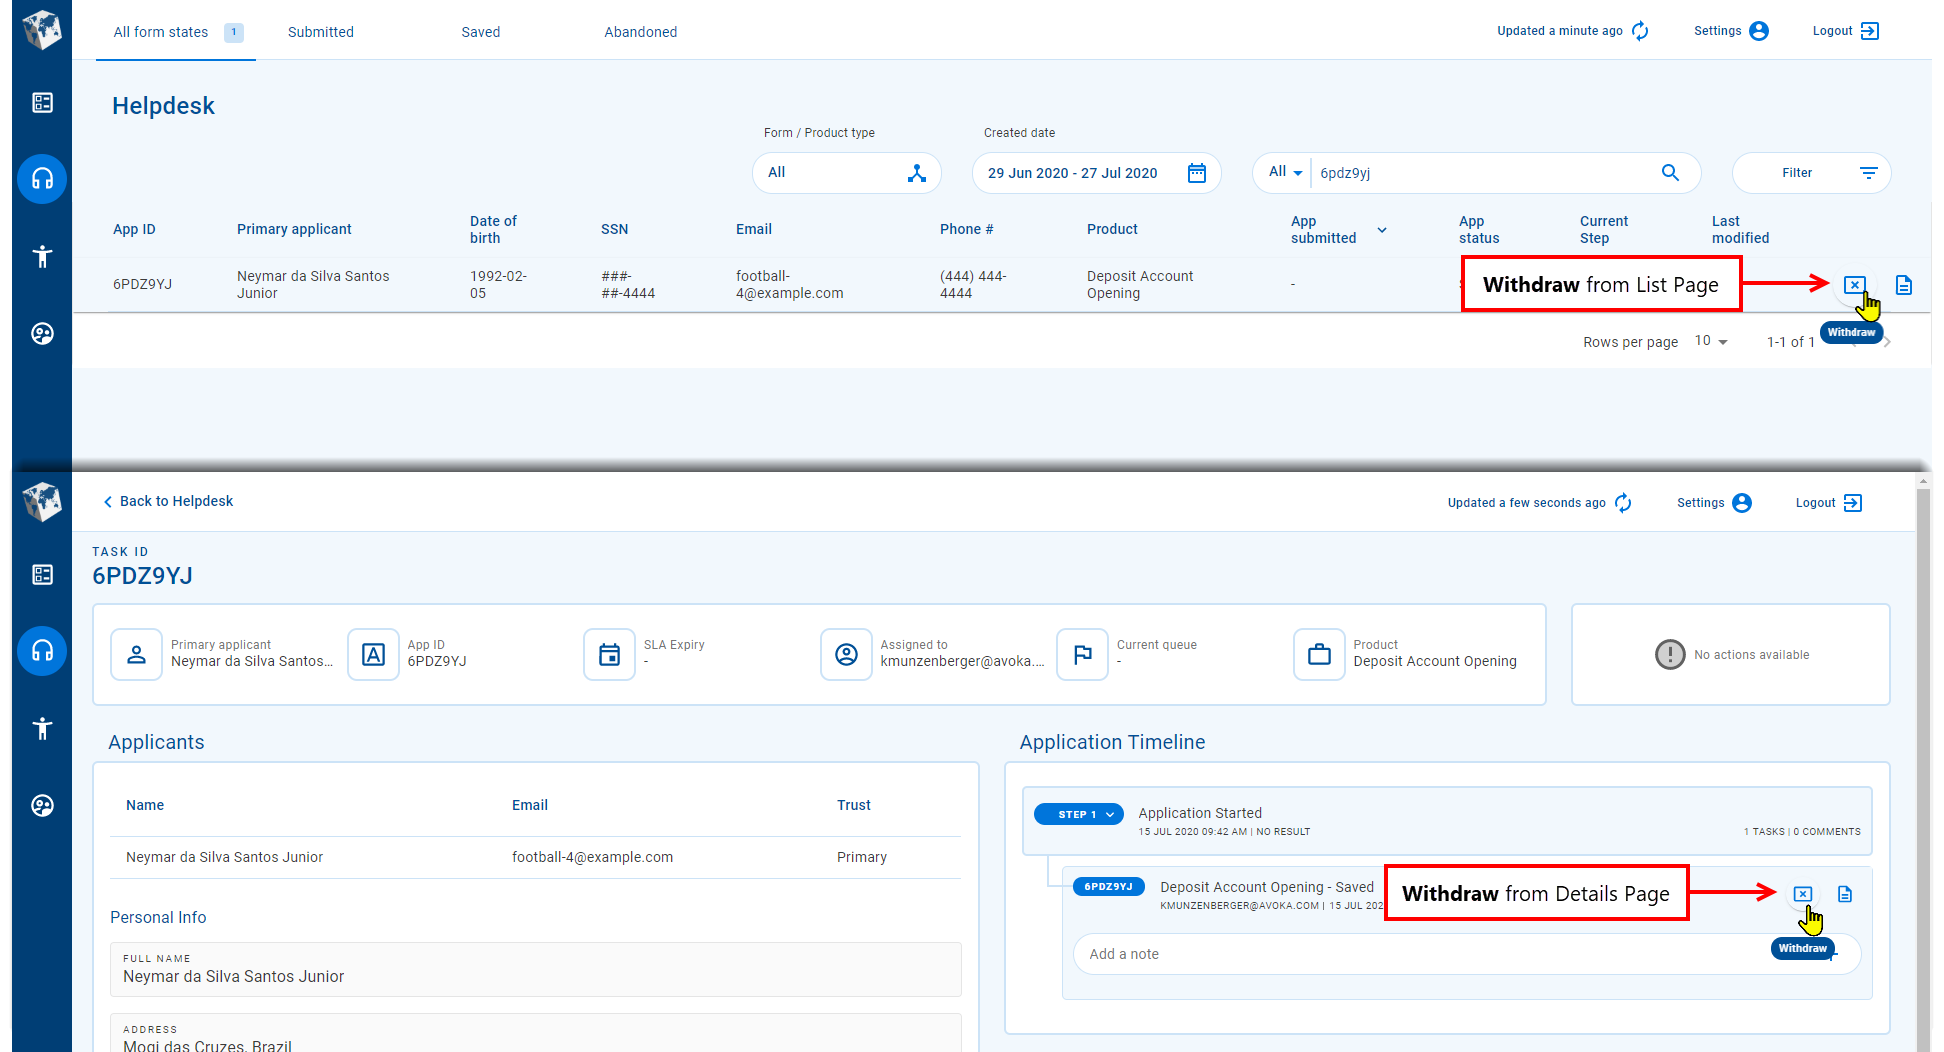
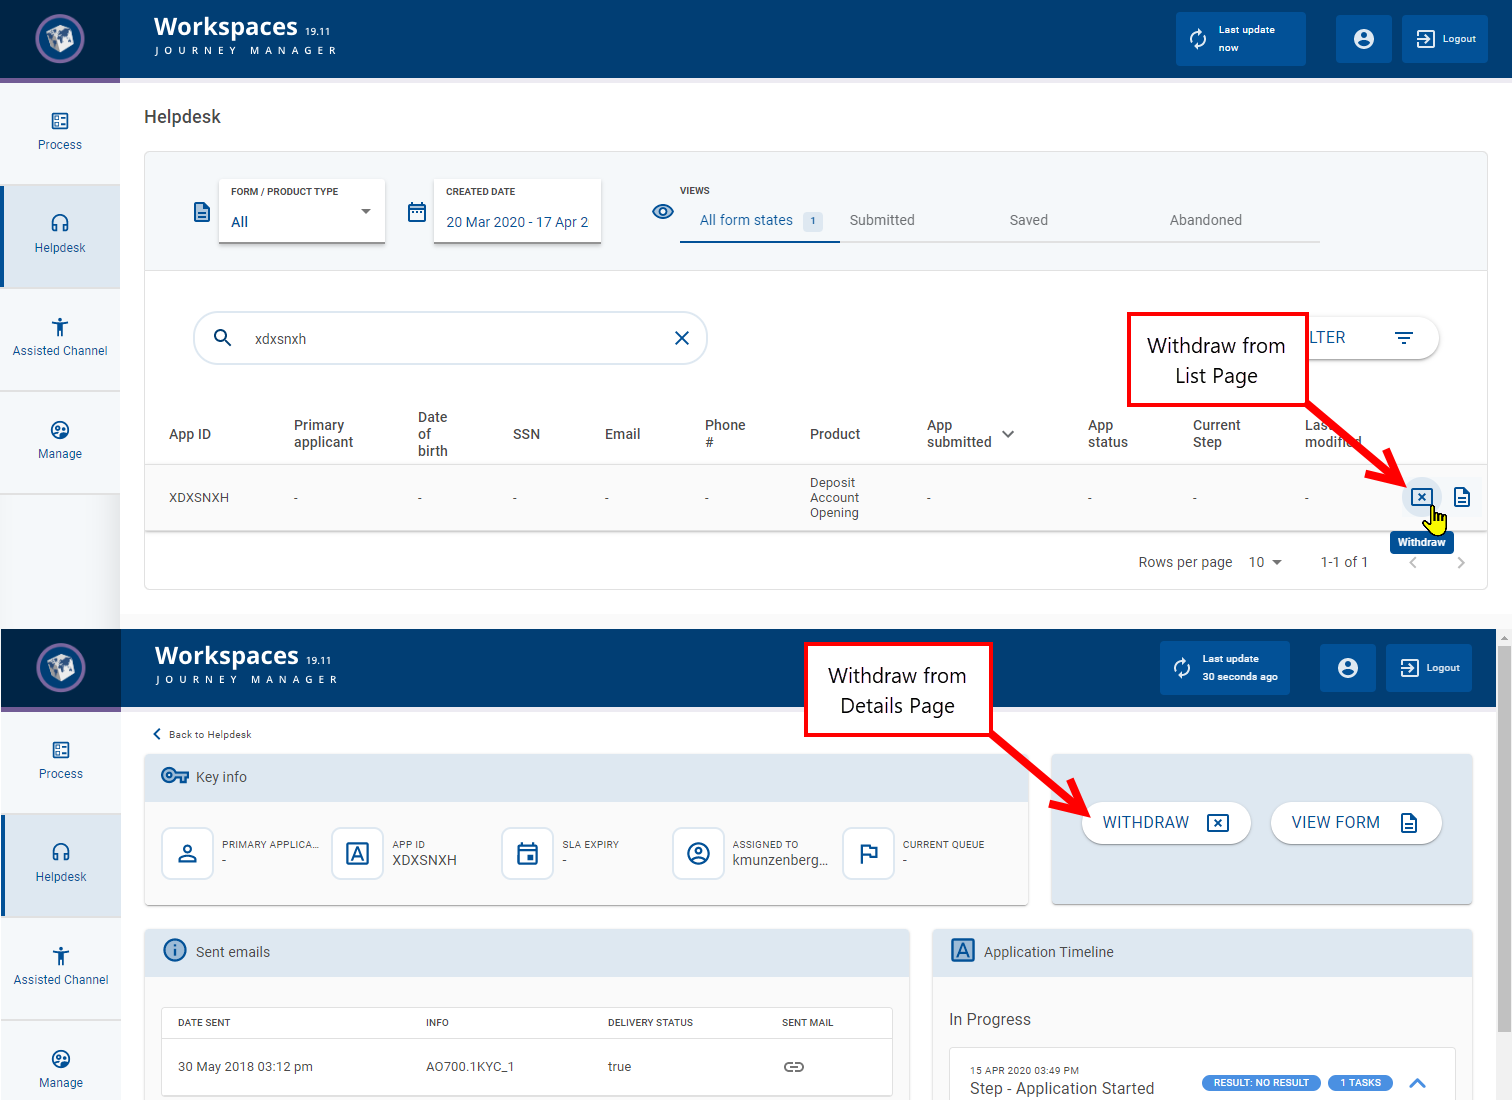
An application that has been withdrawn can subsequently be recovered should the applicant have a change of heart.
Action Examples
Let's go step by step through some examples to demonstrate how you can use the Helpdesk actions when responding to applicant inquiries.
There are examples for the following actions below.
- View a receipt on the Details screen
- Recover an abandoned application on the List screen
- View an application form on the List screen
- Withdraw an unsubmitted application on the Details screen
Step-by-step examples are also available for other actions and features that you may need while responding to applicant inquiries. These examples are demonstrated in other spaces as indicated.
- View all notes for an application on the Details screen This feature was removed in the 23.04 release
- Upload a document on the Details screen
View a Receipt
This example shows you how to view a receipt from the Details screen, using the search feature to locate the application to be viewed.
- Login to Workspaces and select the Helpdesk space. The List screen is displayed.
- In the
Search box, type the full App ID to search for applications with this App ID. In this example, the App ID is "79V3QN7", and just one item is found.
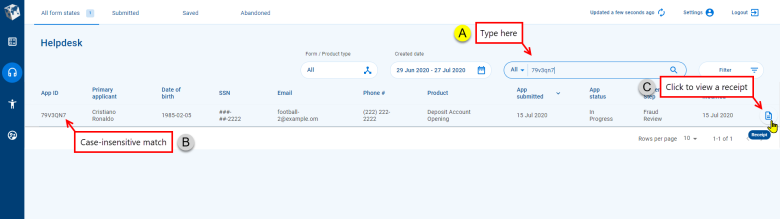
- Click the application item to display its details, then click Receipt on the
Details screen. The
Receipt window opens displaying the application information. Scroll bars are available to allow you to see the full page, and you can use any navigation tools on the form to see all of the application.
- When you're finished viewing the receipt, click in the top-right corner to close the Receipt window and return to the Details screen.

View a Form
This example shows you how to locate a task for a saved application using the search feature, then view and update the saved information.
- Login to Workspaces and select the Helpdesk space.
- In the
Search box, type the full App ID to search for applications with this App ID. In this example, the App ID is "6PDZ9YJ", and just one item is found.
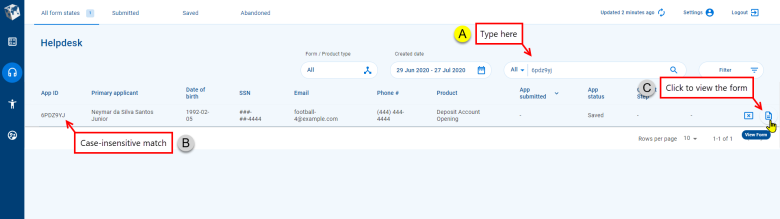
- Now, you can view the saved information for this application. Point your cursor at the item you found – the available actions appear at the right-hand side of the item list.
- Click
. A window opens displaying the application in the same form used to capture the original information. Scroll bars are available to allow you to access the full page, and you can use any navigation tools on the form to access all of the application.
- Update the form, adding or modifying details as appropriate, then click Save and Close on the form to save your changes.
- When you're finished updating the form, click in the top-right corner to close the View Form window and return to the List screen.

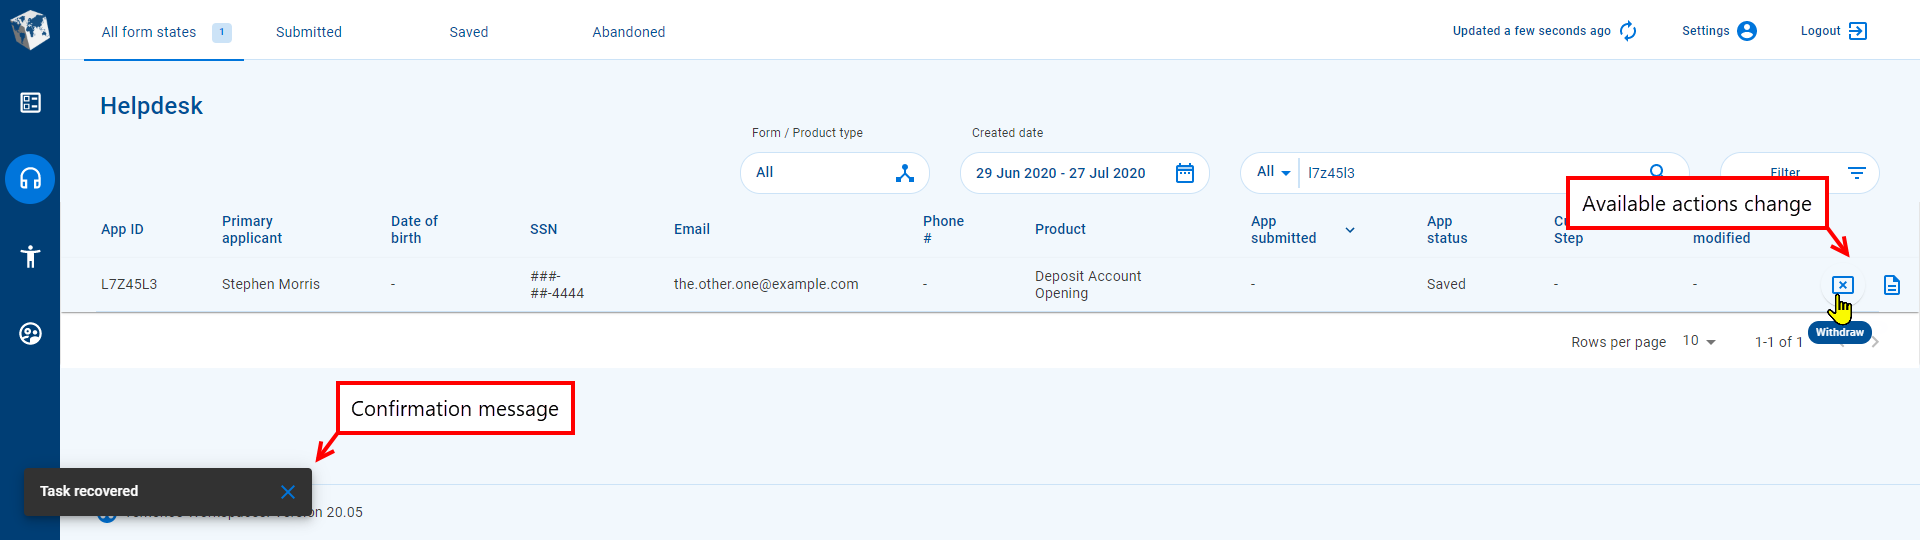
Recover an Abandoned Application
This example shows you how to locate an abandoned application using the search feature, then recover the application from the List screen.
- Login to Workspaces and select the Helpdesk space.
- In the
Search box, type the full App ID to search for all matching applications. In this example, the App ID is
L7Z45L3, and just one item is found.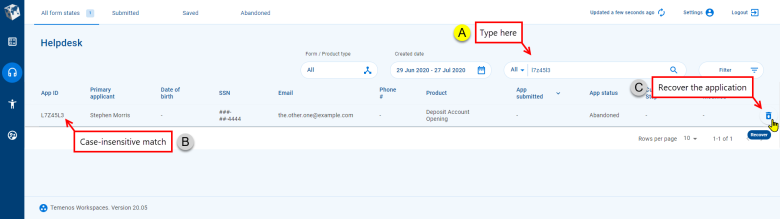
- Point your cursor at the item you found – the available actions appear at the right-hand side of the item list. The Recover action is available here if the application has been saved, either intentionally by the applicant or in the background by the form, before becoming abandoned or being withdrawn.
- Click
.
The available actions change, and a message confirming you have recovered the application is displayed briefly in the bottom-left corner of the screen.
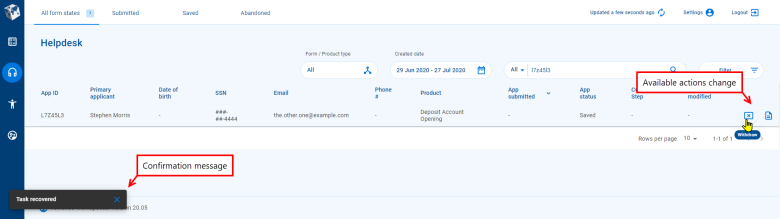

The application is now available for the applicant to continue. How the applicant accesses the recovered application will depend on how your Workspaces portal is configured. However, it's likely that the applicant will have received an email at some point - such as when they started or saved their application - and this will include a link to take them back to their application.
Withdraw an Unsubmitted Application
This example shows you how to locate an unsubmitted application using the search feature, view the application's details to confirm you have the correct application, then cancel the application by withdrawing it on the Details screen.
- Login to Workspaces and select the Helpdesk space.
- Click the
Search box then type the full App ID to search for all matching applications. In this example, the App ID is L7Z45L3, and just one item is found.
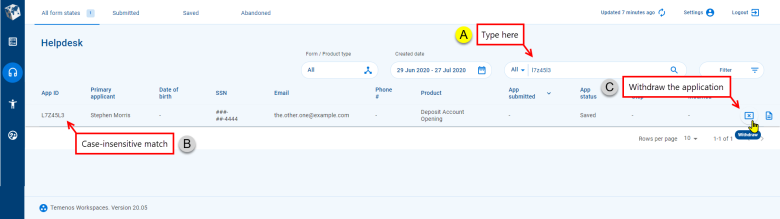
- If you point your cursor at the item you found, the available actions appear at the right-hand side of the item list. The Withdraw action is available here if the application has been saved, either intentionally by the applicant or in the background by the form. While you could withdraw the application here, click the application item instead to display its details.
- On the
Details screen, you can see more information about the application which is useful to confirm that this is indeed the application that you want to withdraw. Having confirmed that you're looking at the correct application, click .
is located in the Actions group.

is located within the selected task in the application timeline.
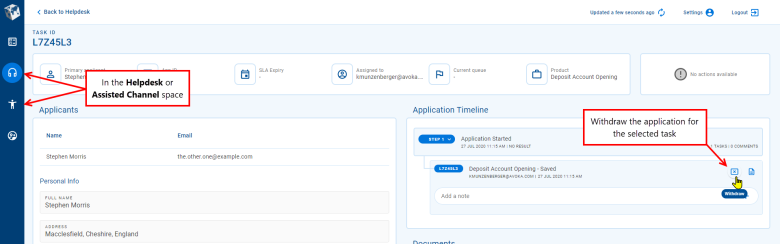
Note that the Withdraw action is only available for the first task of an application that has been saved but not yet submitted.
The Withdraw button is located in the Action panel.

- The application is withdrawn, the available actions change, and a message confirming you have withdrawn the application is displayed briefly in the bottom-left corner of the screen.
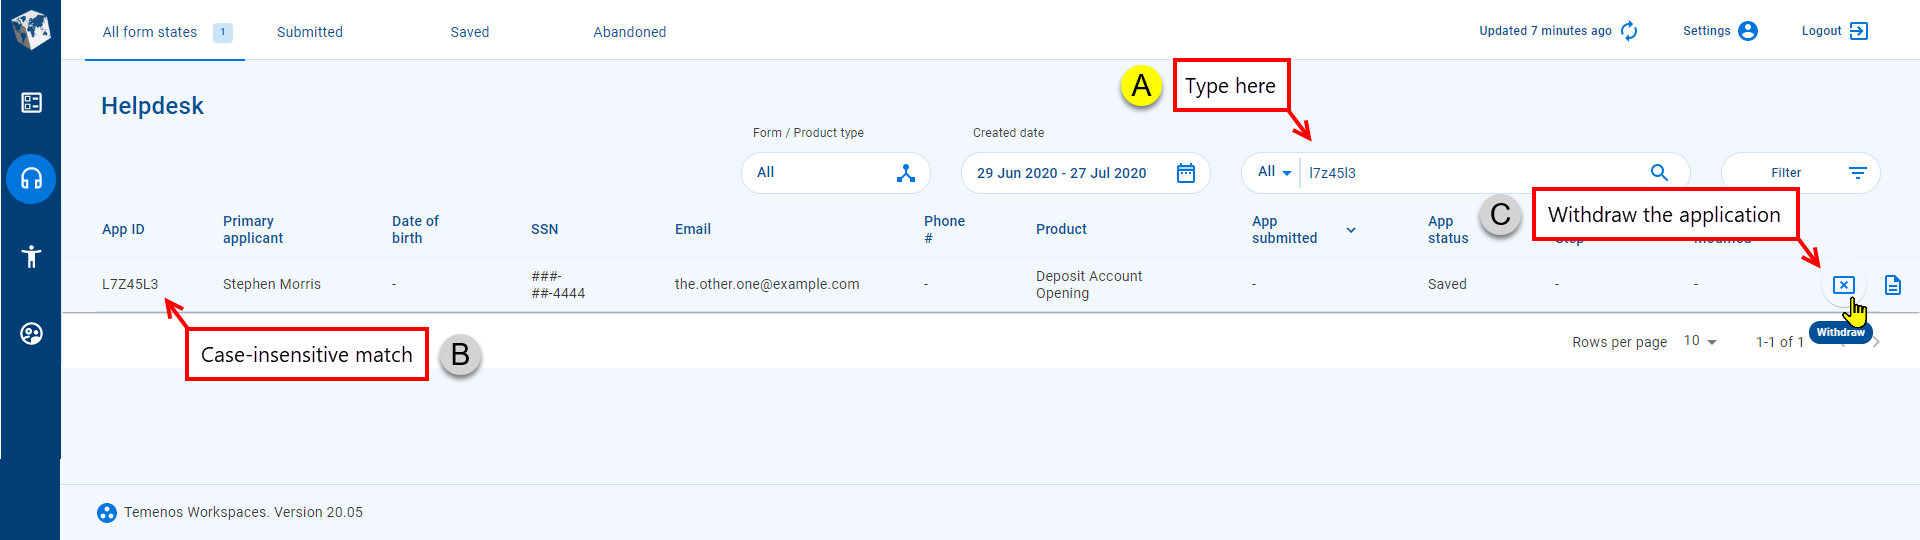

The application has now been withdrawn, but can be recovered should the applicant want to continue with this application.