WorkspacesThis topic relates to Journey Workspaces | Workspaces UserIncludes bank staff, helpdesk, relationship managers, and managers | 18.11This topic was introduced with the 18.11 release | 23.04This topic was updated for the 23.04 release
Note
Some of the text and images below may not match what you see in your Workspacesportal. This is because the features described are based on a default Workspacesportal configuration, and your Workspacesportal may be configured differently; for example, with your company's branding or with other fields. Nevertheless, the features described work the same way in every Workspacesportal.
Applications submitted by new and existing customers are not always able to be approved or declined immediately. Pending applications are referred to bank staff for their attention in determining whether or not an application is successful. Staff
can use
Workspaces to review and resolve pending applications efficiently, minimizing any delays and contributing to higher customer satisfaction.
The default
Workspaces configuration includes a
Review space, complete with a
List screen and a
Details screen configured with features designed to make application processing fast and efficient.
The Review space works in conjunction with the Document Requestsspace, providing a mechanism for interaction between applicants and reviewers; in particular, to enable communication between an applicant and bank staff when the applicant needs to upload documents required for application processing. | 22.10
This feature was introduced in 22.10.
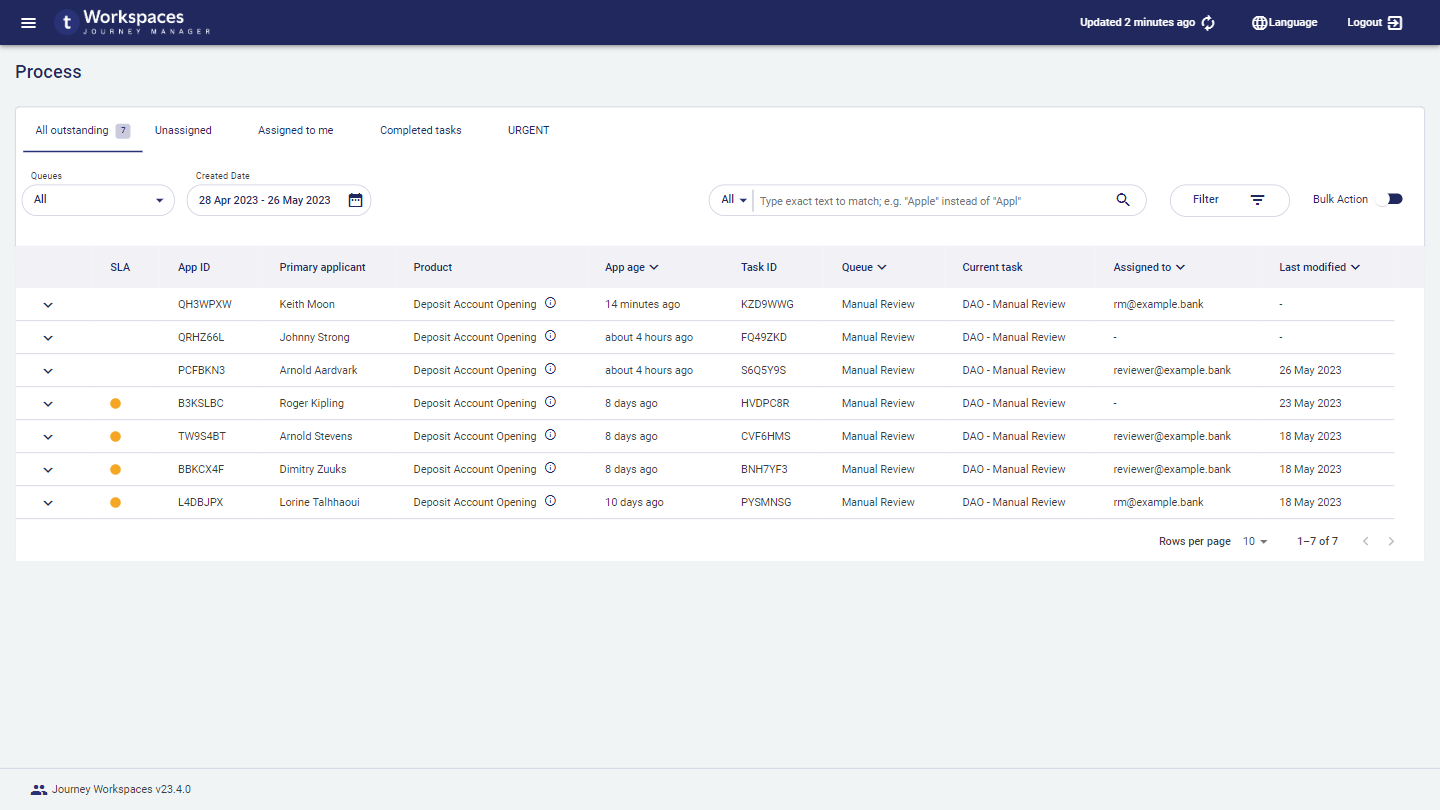
List Screen
The List screen in the Review space includes all of the standard features of a WorkspacesList screen.
An item list populated with tasks sourced from the active queue.
Support for optional item listexpansion rows presenting additional content. 23.04This feature was introduced in the 23.04 release
A graphical SLA indicator that lets you monitor application progress against an SLA at a glance. 19.11This feature was introduced in the 19.11 release
A global view selector, used to apply a pre-defined set of fields, filters and sort options to the item list.
A global filter to select the queue that tasks are sourced from.
A second global filter, Created Date, that restricts the tasks in the item list based on the date they were created.
Flexible search, filter and sort options that you can use to refine the set of tasks in the item list.
A Bulk Action mode switch to change between acting on a single task or multiple tasks. 22.10This feature was introduced in the 22.10 release
Paging tools that allow you to browse all of the items matching your selected criteria over multiple item listpages.
The Review space's List screen displays a list of tasksfrom the selected queue, and taking into consideration the current view and any active search, filter and sort options. Each row in the item list corresponds to a single task, showing a set of pre-configured data items in columns including an SLA indicator that identifies how application processing is progressing against the SLA conditions. Rows can be expanded to show additional details. The name of the active queue is displayed in the Queue selector, and the name of the current view is highlighted in the View selector. The list of tasks displayed can be further refined using the filter and sort options. Filtering restricts which tasks are displayed in the list, and sorting determines the order that tasks appear in the list. To learn more about these options, see Filter the Item List and Sort the Item List.
Once you've found the task you're interested in, you can select it in the item list to perform an action on it. To learn about the available actions, see Review Actions below.
Details Screen
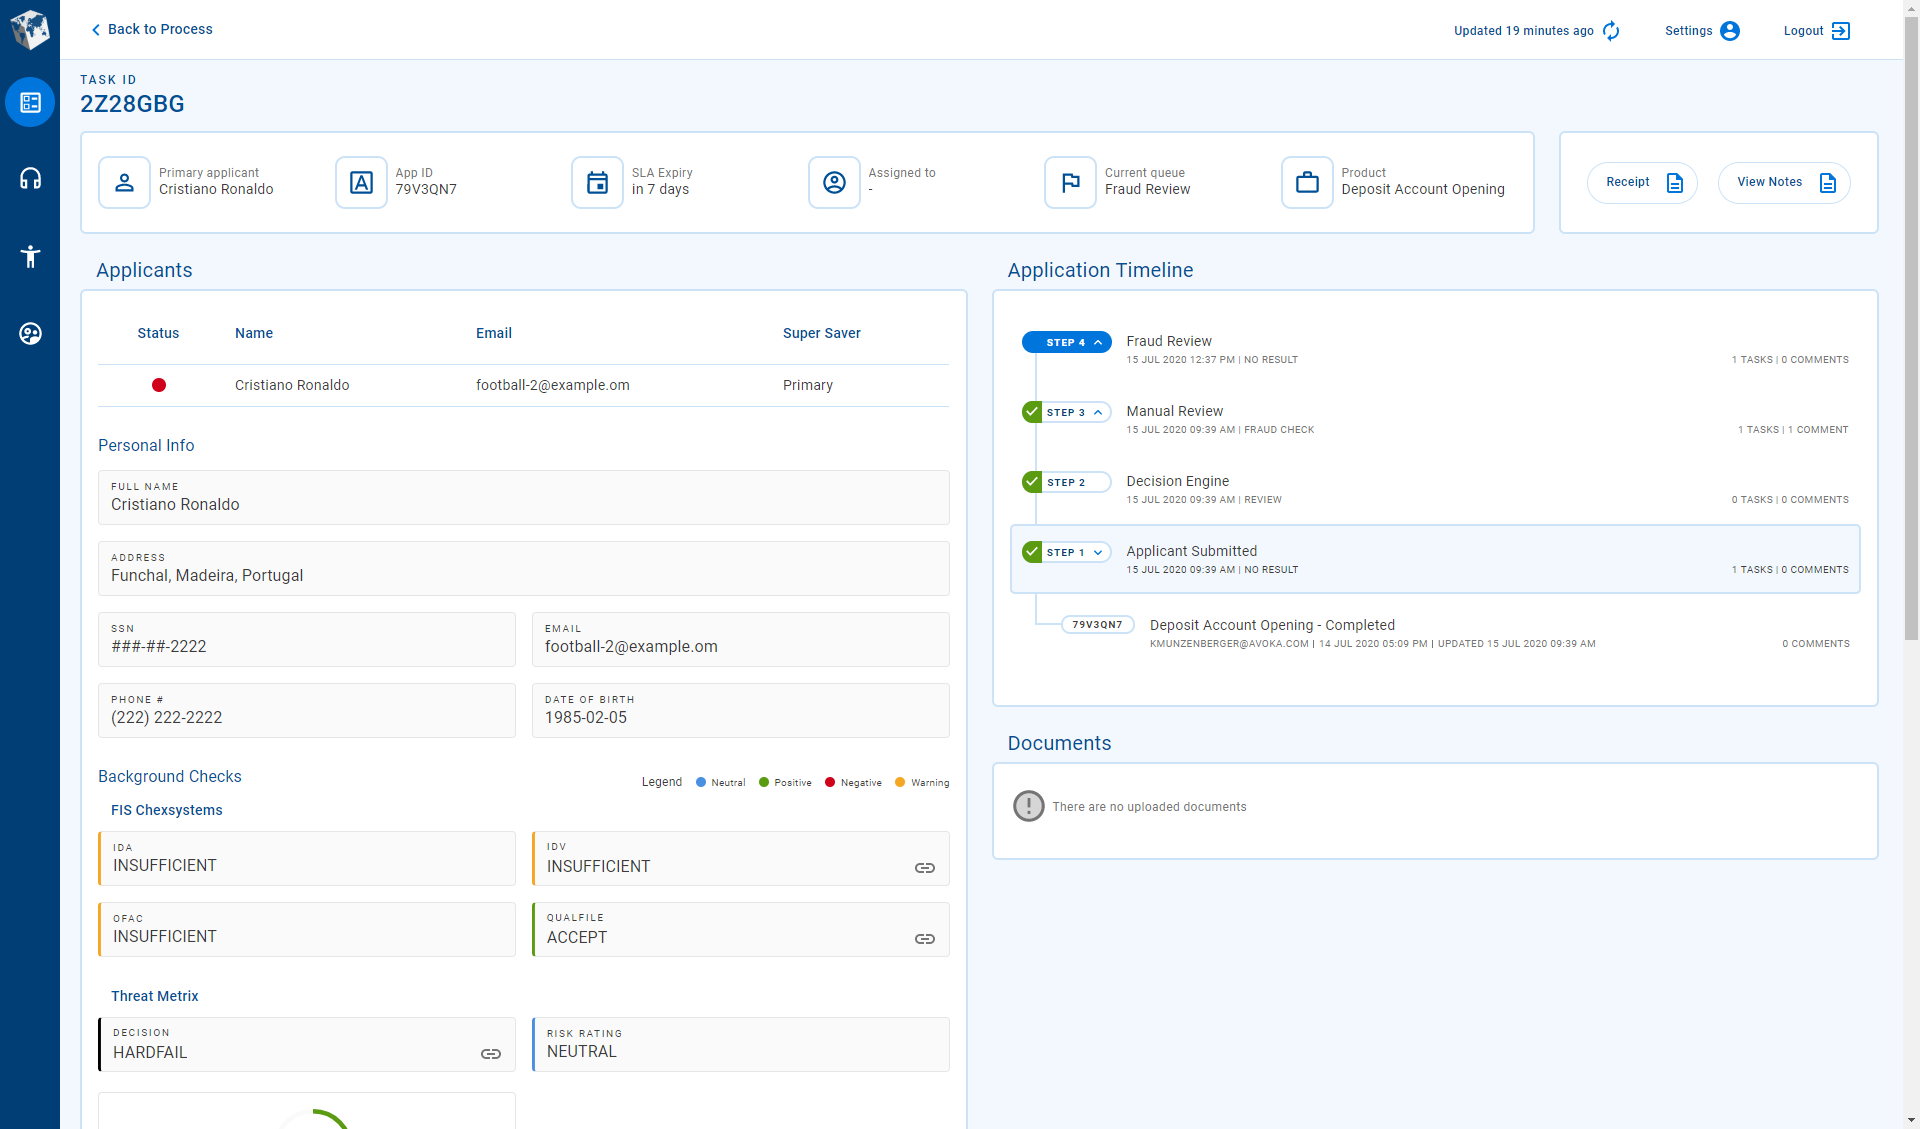
The Details screen in the Review space supports all of the standard features of a WorkspacesDetails screen. It displays comprehensive information about an application and a selected task, and provides access to actions for processing applications. This includes the following features, each of which is contained in a separate card or section.
Separate panes for application and task content. 23.04This feature was introduced in the 23.04 release
Separate key information cards for the application and the selected task. 23.04This feature was introduced in the 23.04 release
A task switcher showing all the application's tasks, from which you can select one to display in the Task pane. 23.04This feature was introduced in the 23.04 release
A Notescard, bringing all notes and comments for a selected application together in a single component. Each note and its comments form a threaded conversation between the applicant and bank staff. 23.04This feature was introduced in the 23.04 release
A collection of documentsused during application processing to verify applicant details.
An application timeline showing the steps (tasks) that the application has progressed through. 23.04This feature was updated in the 23.04 release
A dynamic set of actions that are applicable to the application or selected task and which are currently available for you to perform in the Review space at the current stage of the application's life cycle.
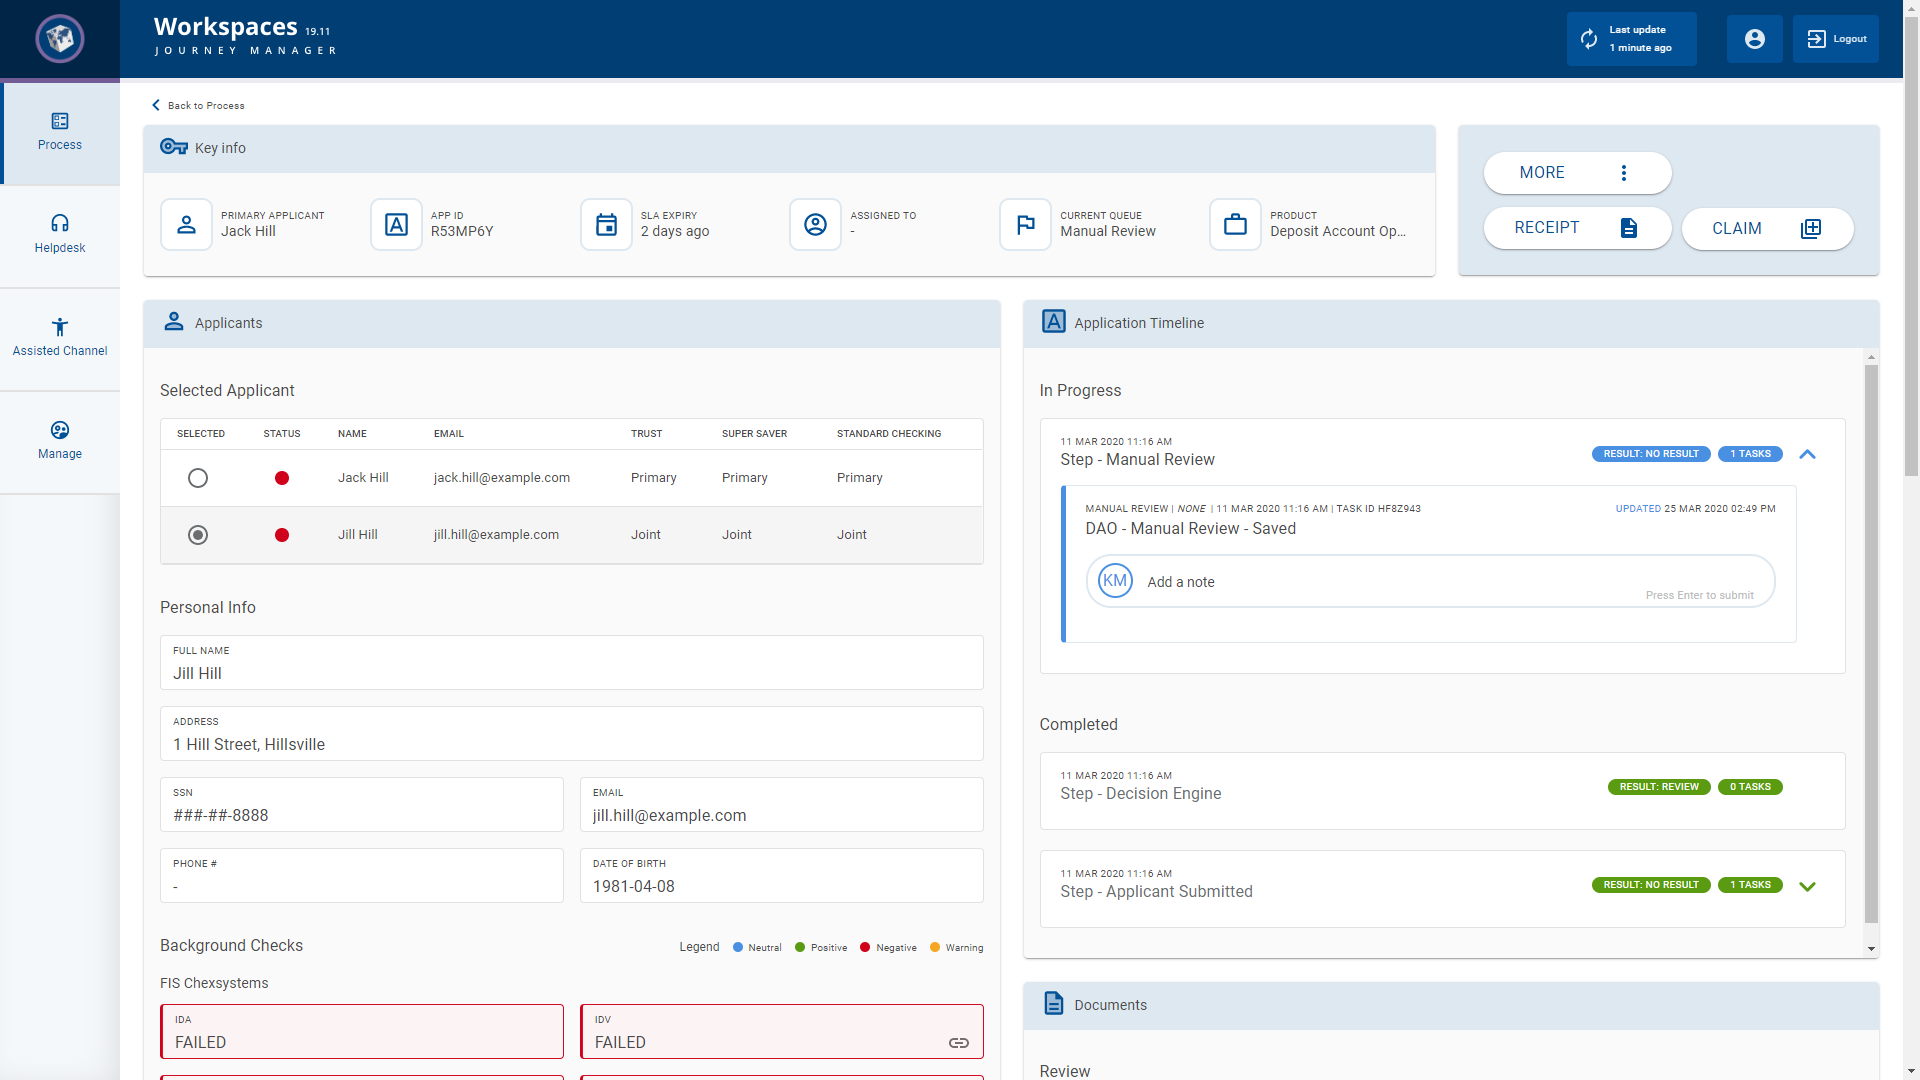
An Applicantstab, providing access to applicant data including:
An applicant list showing how each applicant relates to each product in the application. Select an applicant to view more details about them.
Personal information for the selected applicant, including identity and contact details.
The outcomes of preconfigured background checks which provide an assessment of a selected applicant's suitability.
A Communicationstab listing emails sent to the applicant with options to view and resend.
Options to view the details of background checks in various formats including JSON, XML, HTML, or PDF.
A checklist of documents that need to be uploaded, as well as an upload status for each document.
Prior to the 23.04 release, the application timeline is an interactive component where the user can select a task, add or view notes, and perform task actions. In the 23.04 release, these interactive features have been removed from the application timeline and, instead, are available in separate components. For details, see Task switcher, Notes, and Actions.
Decision: Take a decision that progresses a task along its application journey.
Receipt: See a read-only view of a submitted application.
Release: Remove a task assignment for a task assigned to you.
View Notes: View all notes recorded against all of an application's tasks. 20.05This feature was introduced in the 20.05 release23.04This feature was removed in the 23.04 release
The
Claim,
Release, and
Decision actions are described below in the context of the
Review space, including examples of how to use them.
Claim and
ReleaseTasks
When you want to work on a task, you can select it in the item list and claim it so that everyone will know you are working on it. Once you have claimed a task, other actions may become available for you to perform on that task; in particular, taking a decision about whether or not an application is successful. When you no longer need to work on the task, you can release it so that it can be assigned to someone else.
You can claim a task that is not already assigned to anyone, thereby assigning it to you, but you can’t claim a task that has already been assigned to someone else. Also, you can't use the Claim action to assign a task to someone else, only to yourself. To assign a task to someone else, you need to have access to the Assign action, normally only available to managers and supervisors.
You can release a task that is assigned to you, but you can’t release a task that is assigned to someone else. Releasing a task returns it to the pool of unassigned tasks in the item list, allowing it to be assigned to someone else.
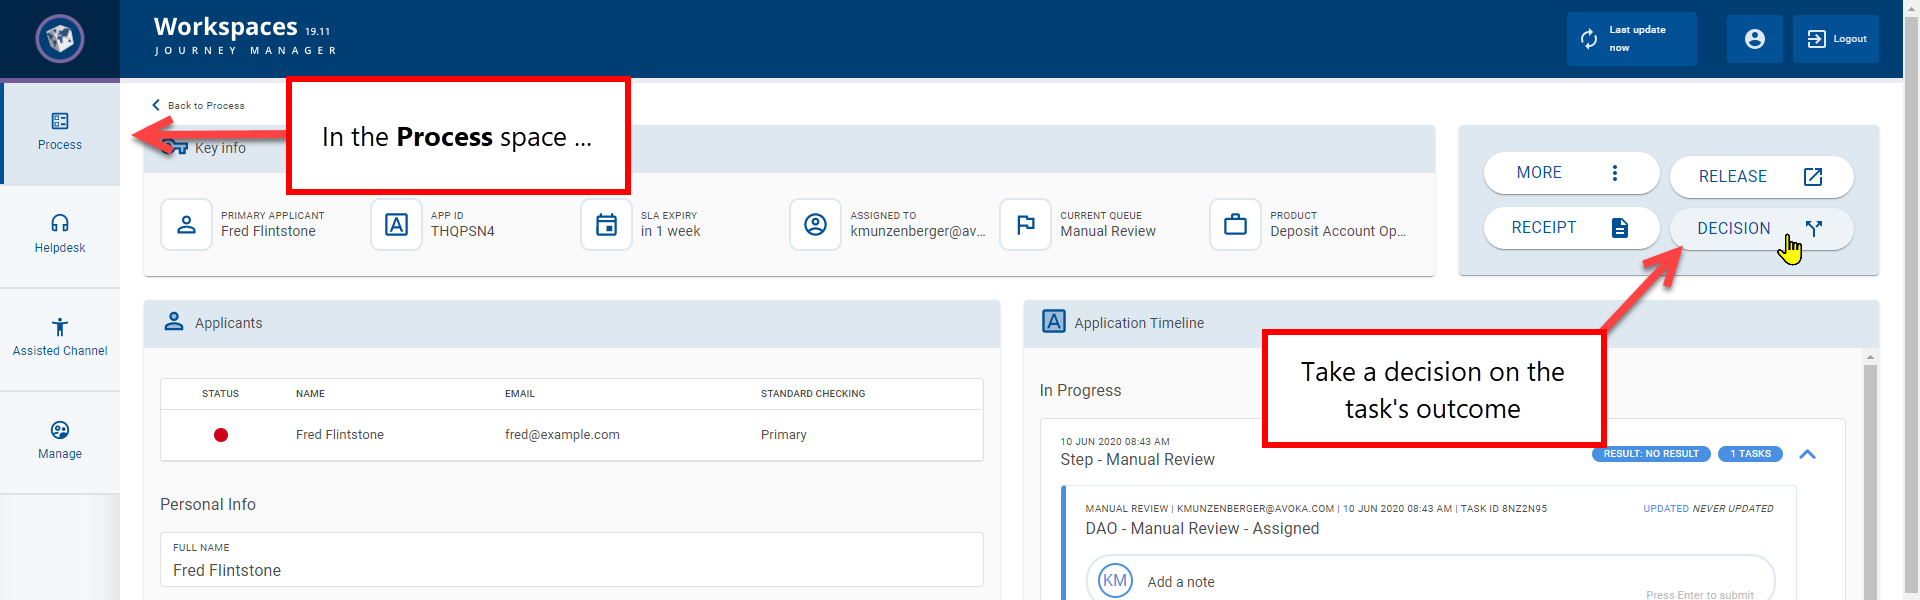
Take a Decision
When you have all the information you need about a task, you can take a decision on the task's outcome. Taking a decision on a task completes the task and moves it along in its life cycle.
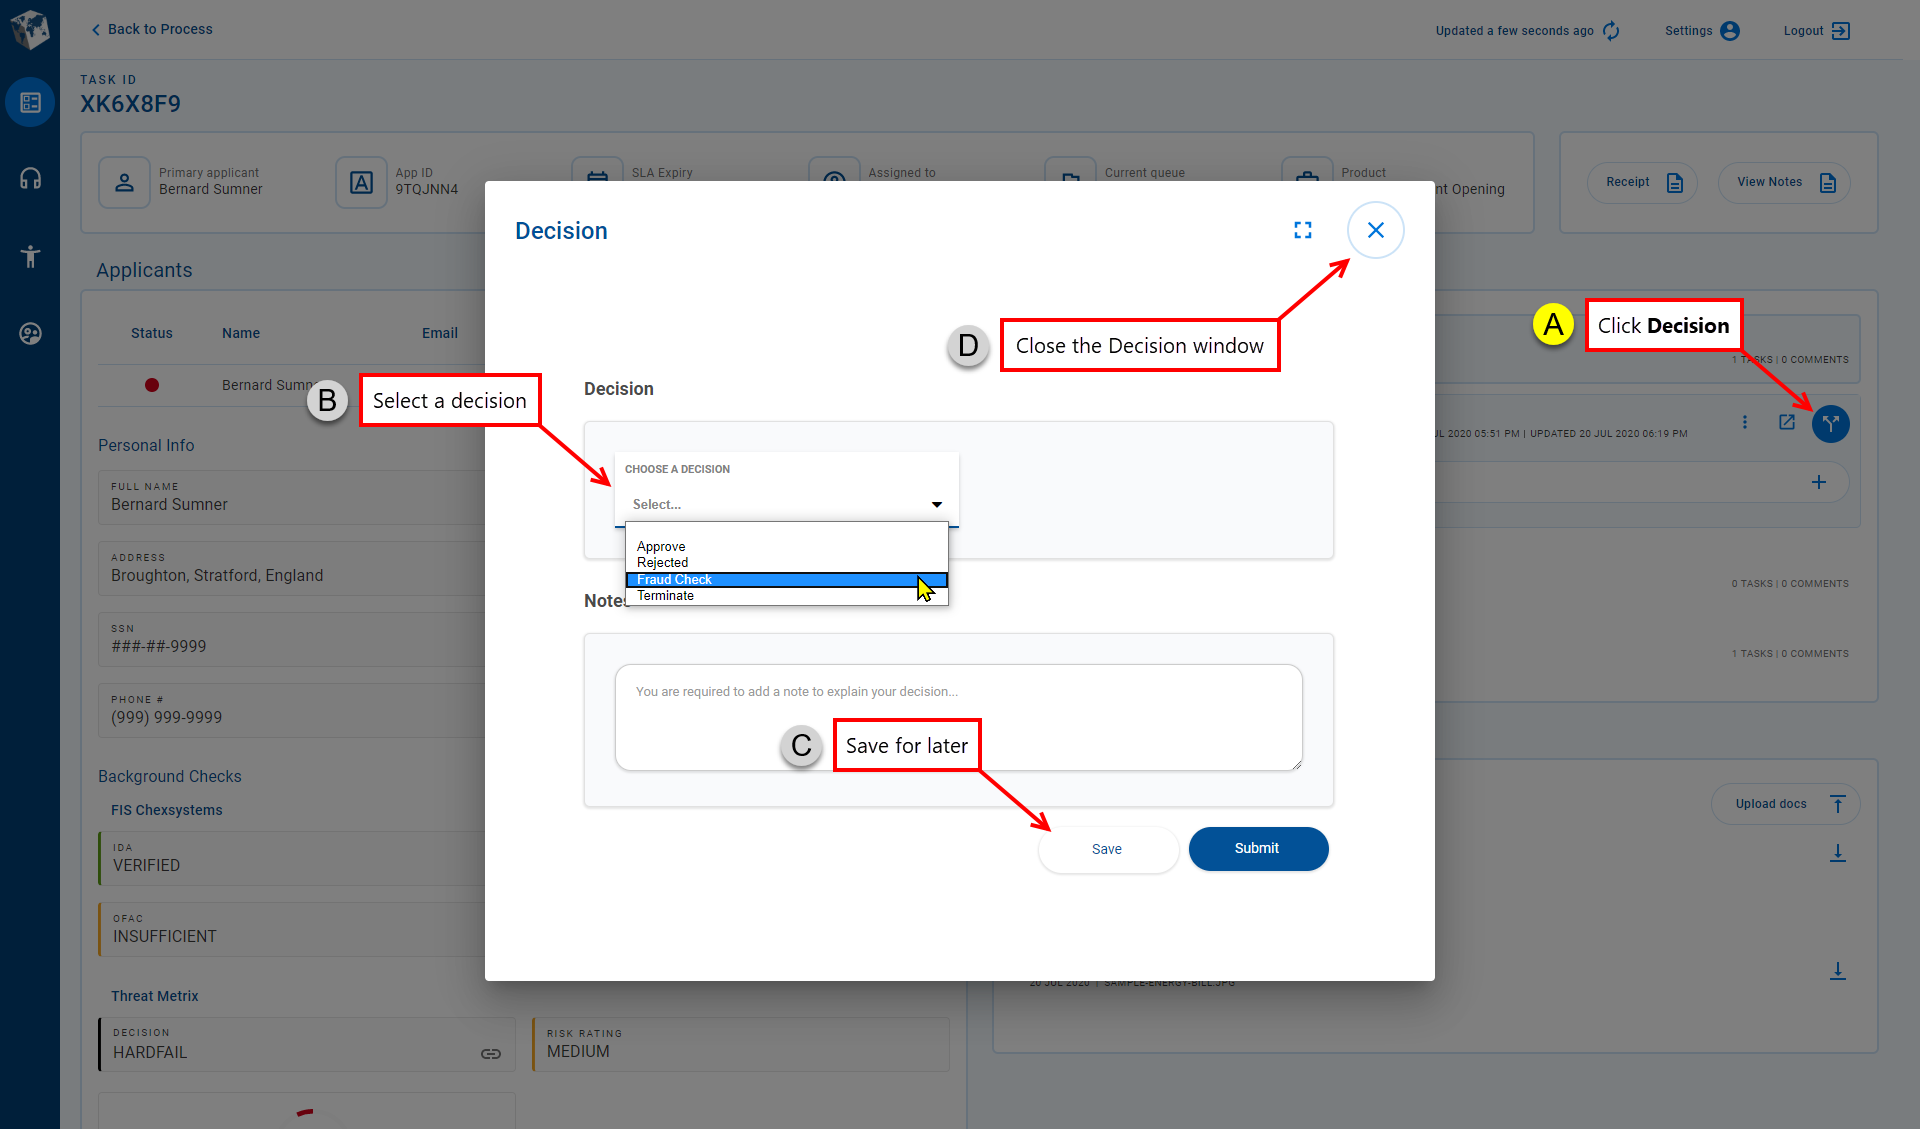
The Decision action is available only from the Details screen in the Review space, and only for tasks that are assigned to you; you cannot take a decision for a task that is assigned to someone else. When you take a decision, you must provide both the decision (representing some outcome, assessment or result) and a note supporting the decision. The note is important because it helps others to understand how you arrived at your decision, and may be prefilled with relevant information.
If you don't have all the information you need to complete the decision right now, you can click Save (at step 6) to save the information you have entered and complete the decision later. Subsequently, when you are ready to complete the decision, repeat the necessary steps above to return to the Decisionmodal window, update the Decision and Note as required, and then click Submit to record the decision you have made.
This example shows you how to claim a
task on the
List screen, using the search feature to locate the
task to be claimed.
Login to
Workspaces and select the Review space. The
List screen is displayed.
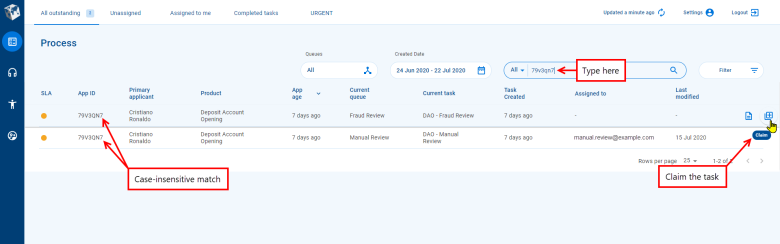
Click in the searchSearch box then type the full App ID to search for
tasks with this App ID. In this example, the App ID is "79V3QN7", and two
tasks are found.
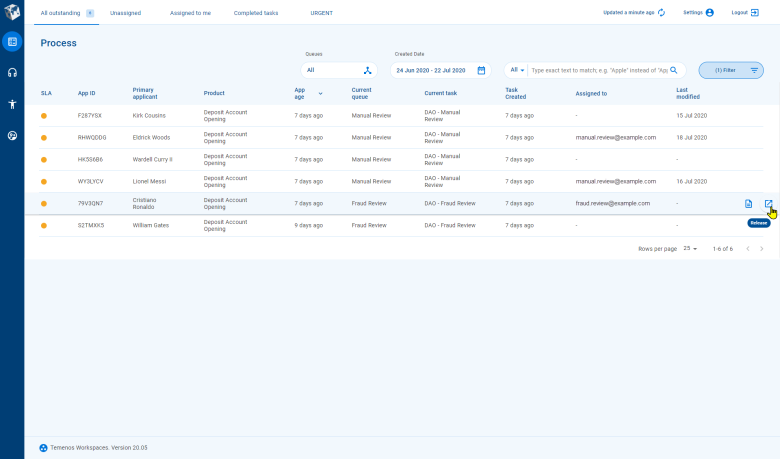
Point your cursor at the
task that you want to claim – the available actions appear at the right-hand side. Click
library_addClaim to assign the
task to yourself.
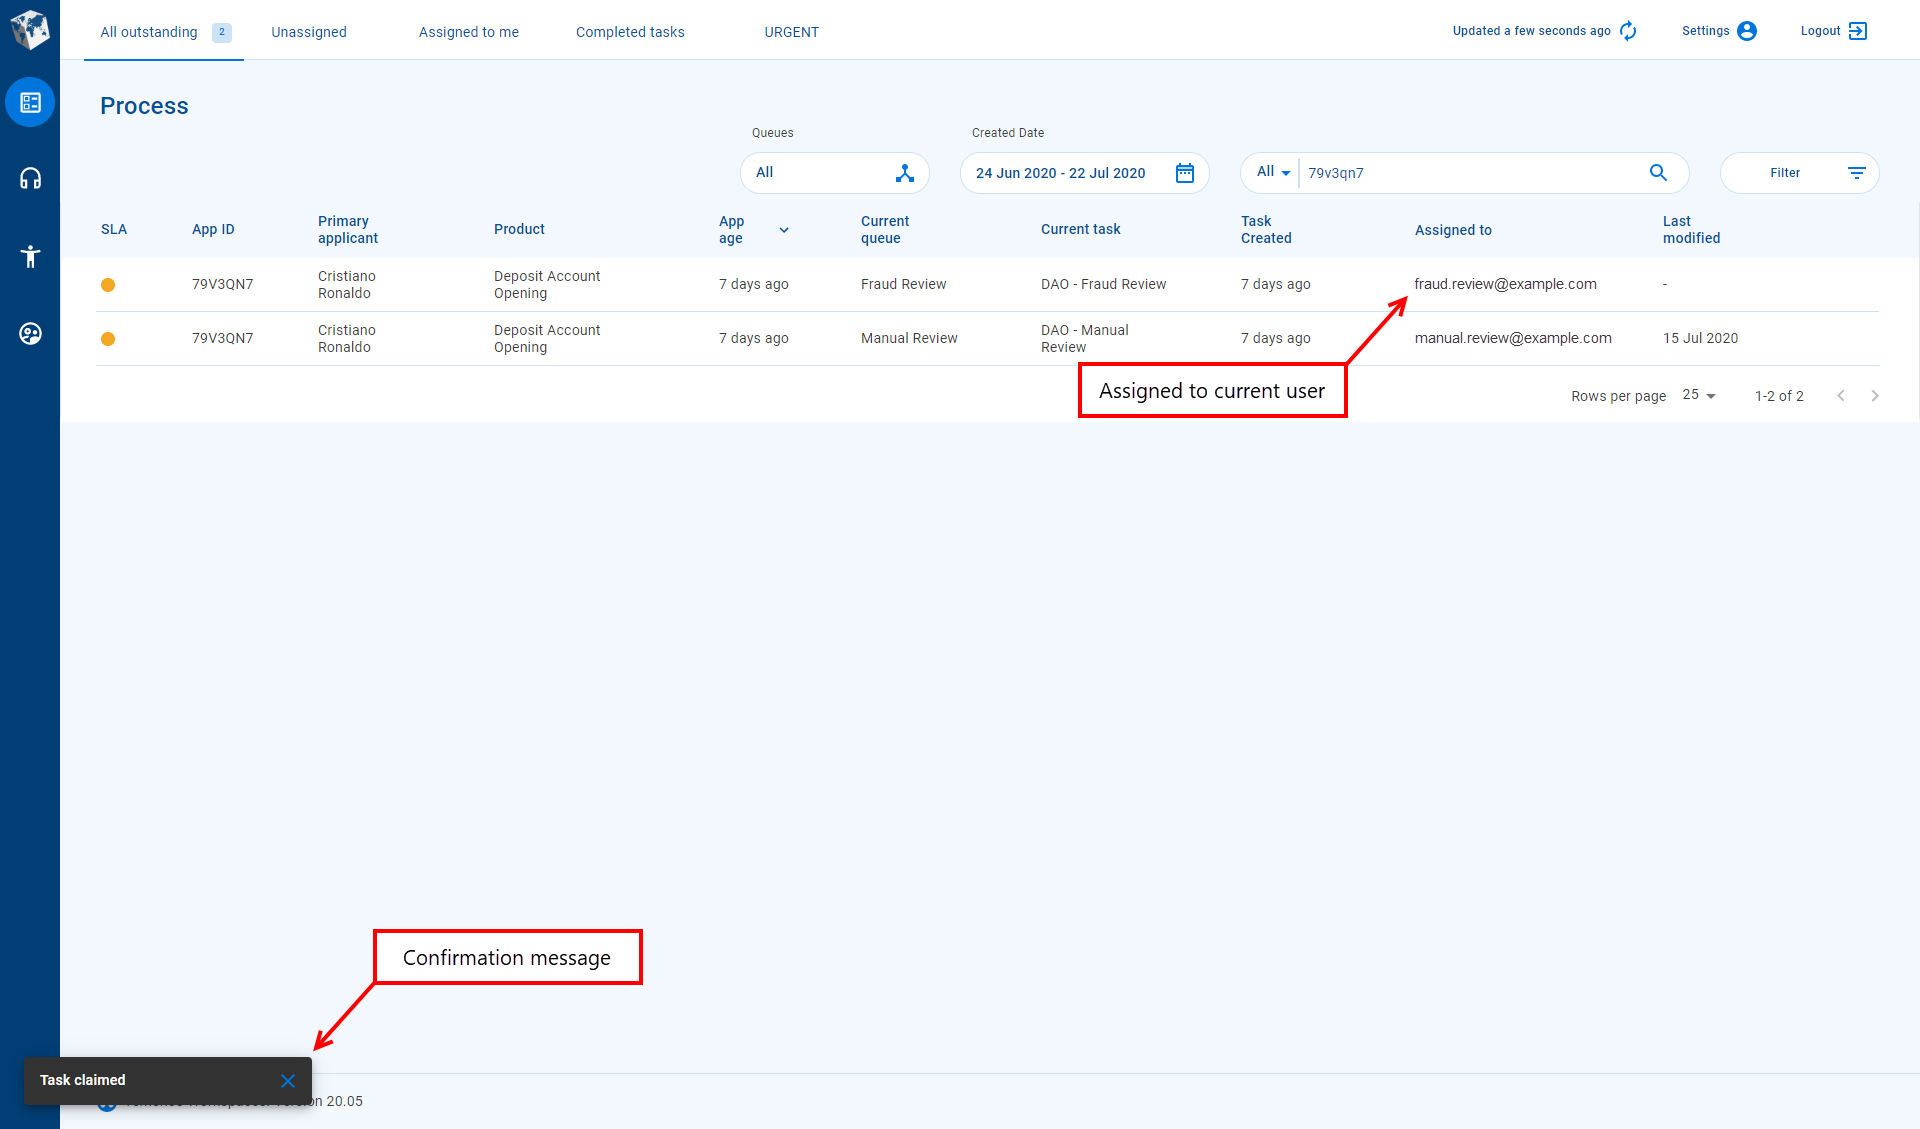
The A message confirming you have claimed the task is displayed briefly in the bottom-left corner of the screen.
Alternatively, you can click the
task to display its application details and then click the Claim button on the
Details screen.
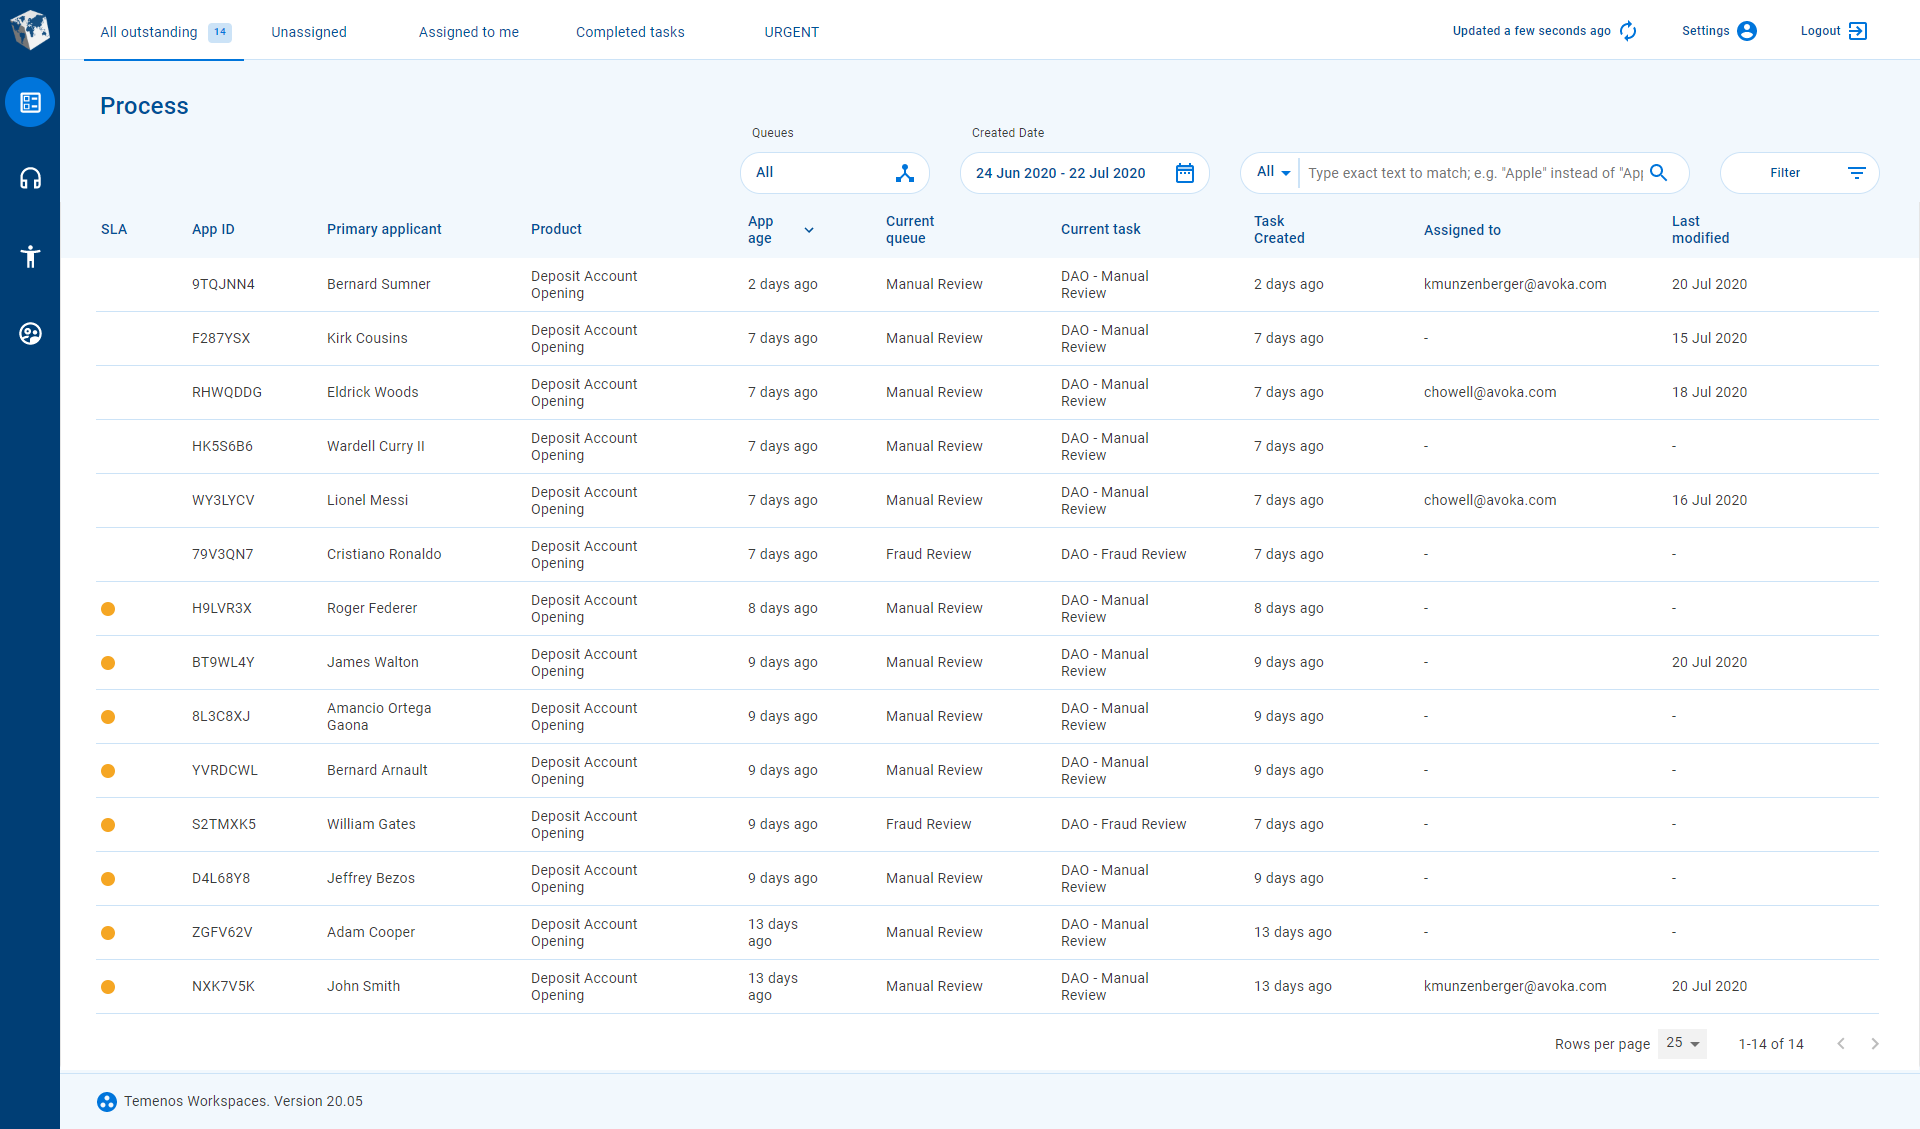
Release a Task
This example shows you how to locate a
task using the filter feature then release the
task so that it's no longer assigned to you.
Login to
Workspaces and select the Review space.
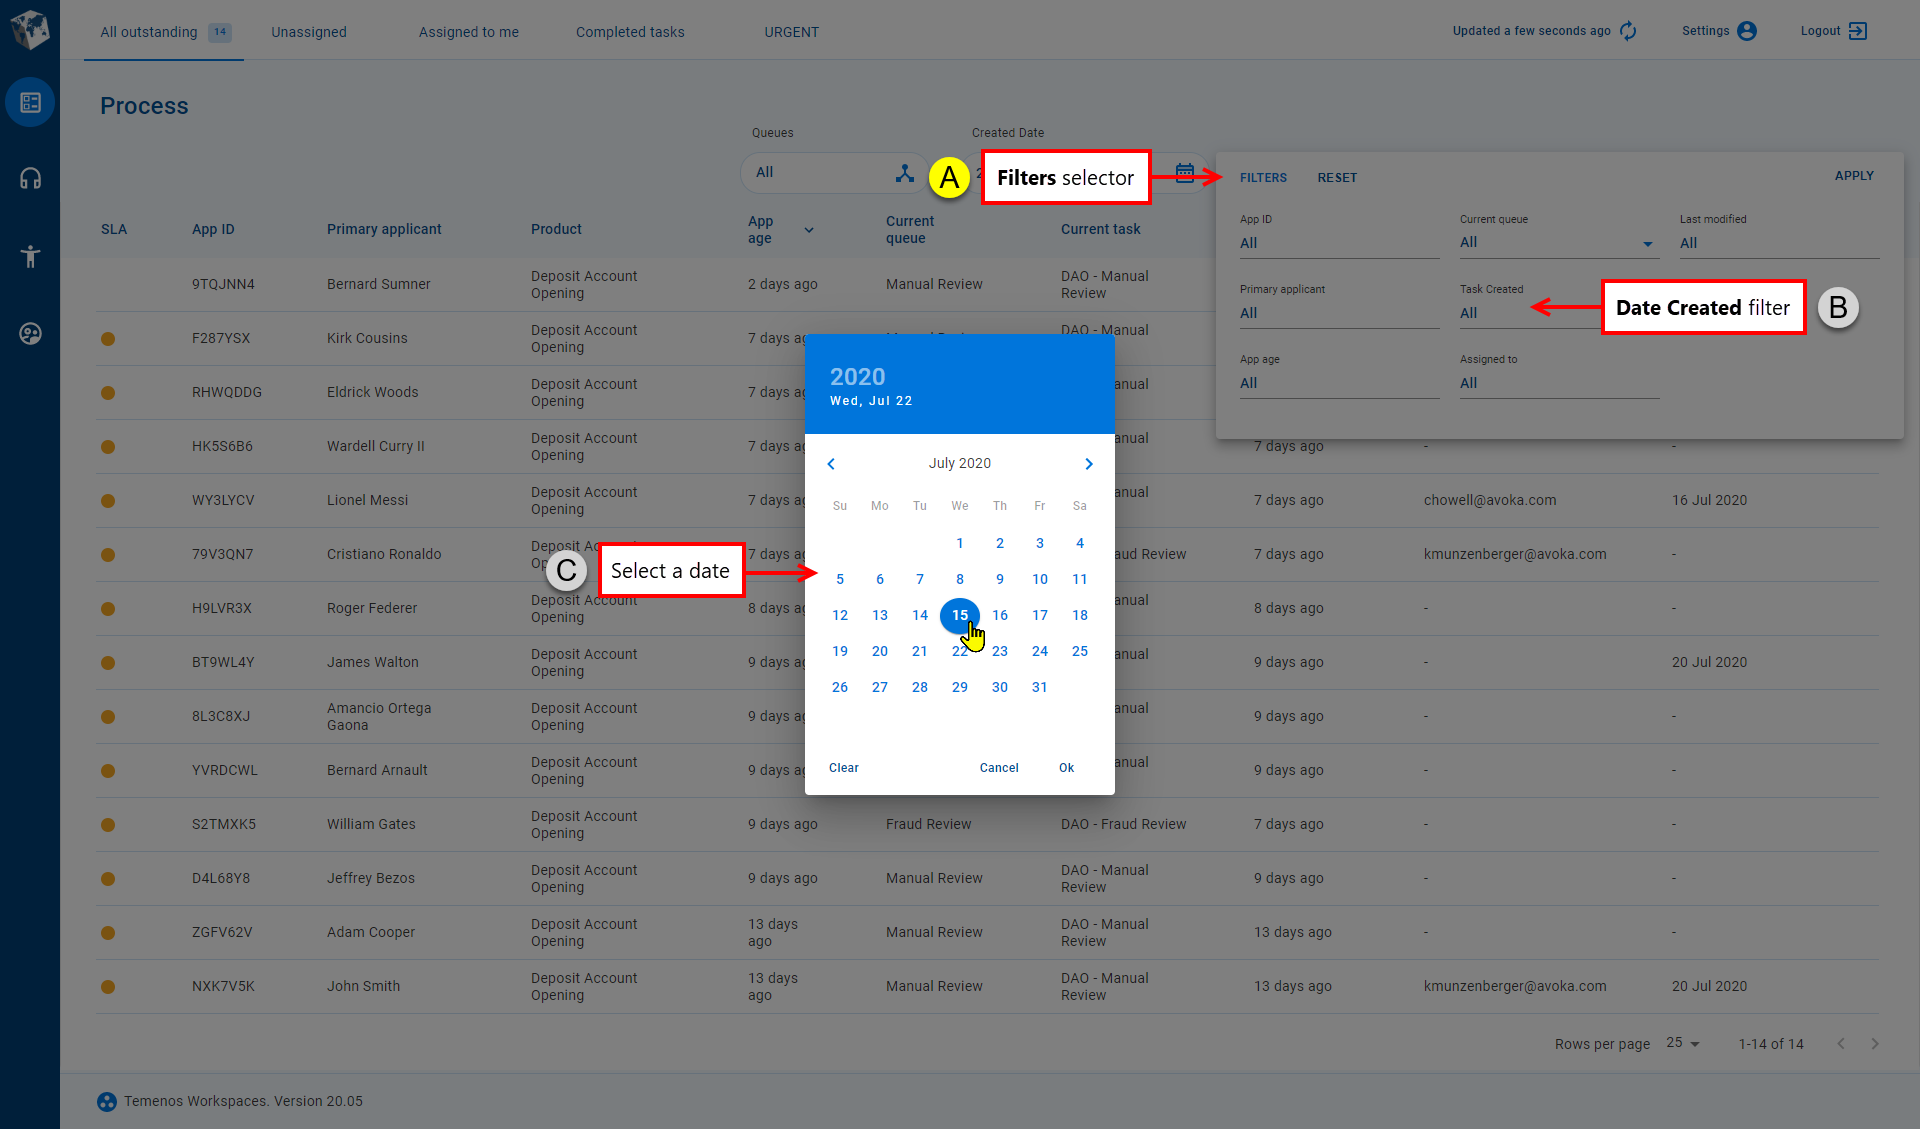
Click Filter to display the Filters selector then enter one or more filters that will help you to narrow down
the list of
tasks and make it easier to see the
task you want to release. In this example, we know that the application was created on 15 July 2020, so we'll filter on that date.
Now, you can release the task. Point your mouse at the
task you want to release. The available actions appear at the right-hand side. Click open_in_newRelease and the
task will be assigned no longer. A message confirming that you have released the
task is displayed briefly in the bottom left corner.
Alternatively, you can click the
task to display its details, then click Release on the
Details screen.
Approve an Application
This example shows you how to take a decision about a task assigned to you so that the associated application progresses in its life cycle. In this example, we'll kick off the process to send an application for a fraud check then save without submitting so that we can go and find some information we need for the supporting note. Finally, we'll resume and complete the decision process.
Follow the steps in the previous example to claim a task. Note that you could replace the search with any options that help you to locate the task. You can skip this step if you've just done it or if the task you want to act on is already assigned to you.
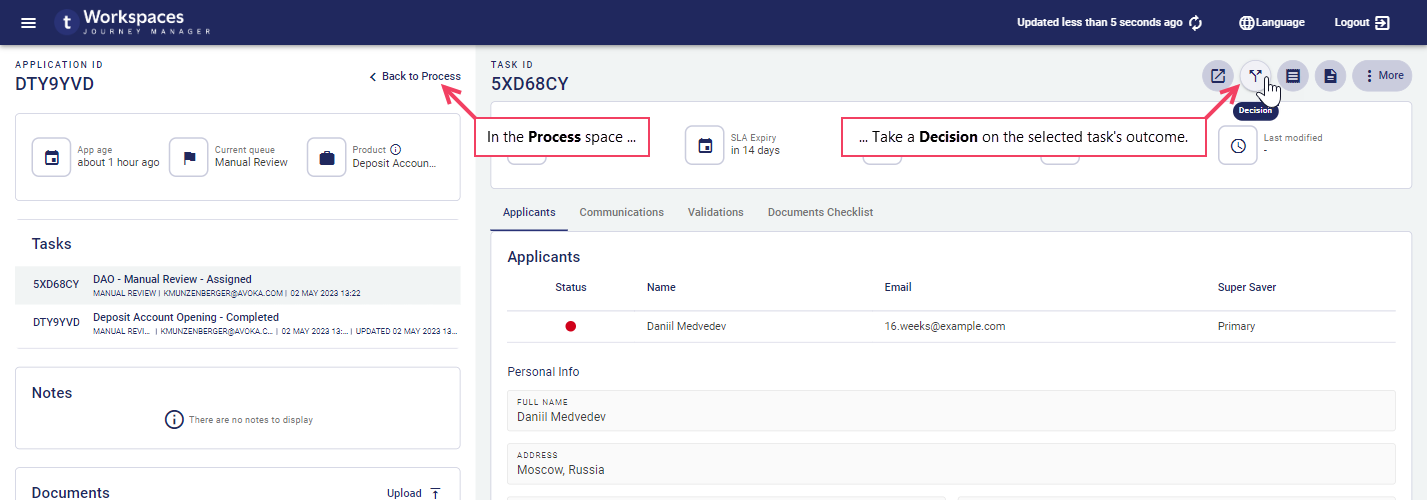
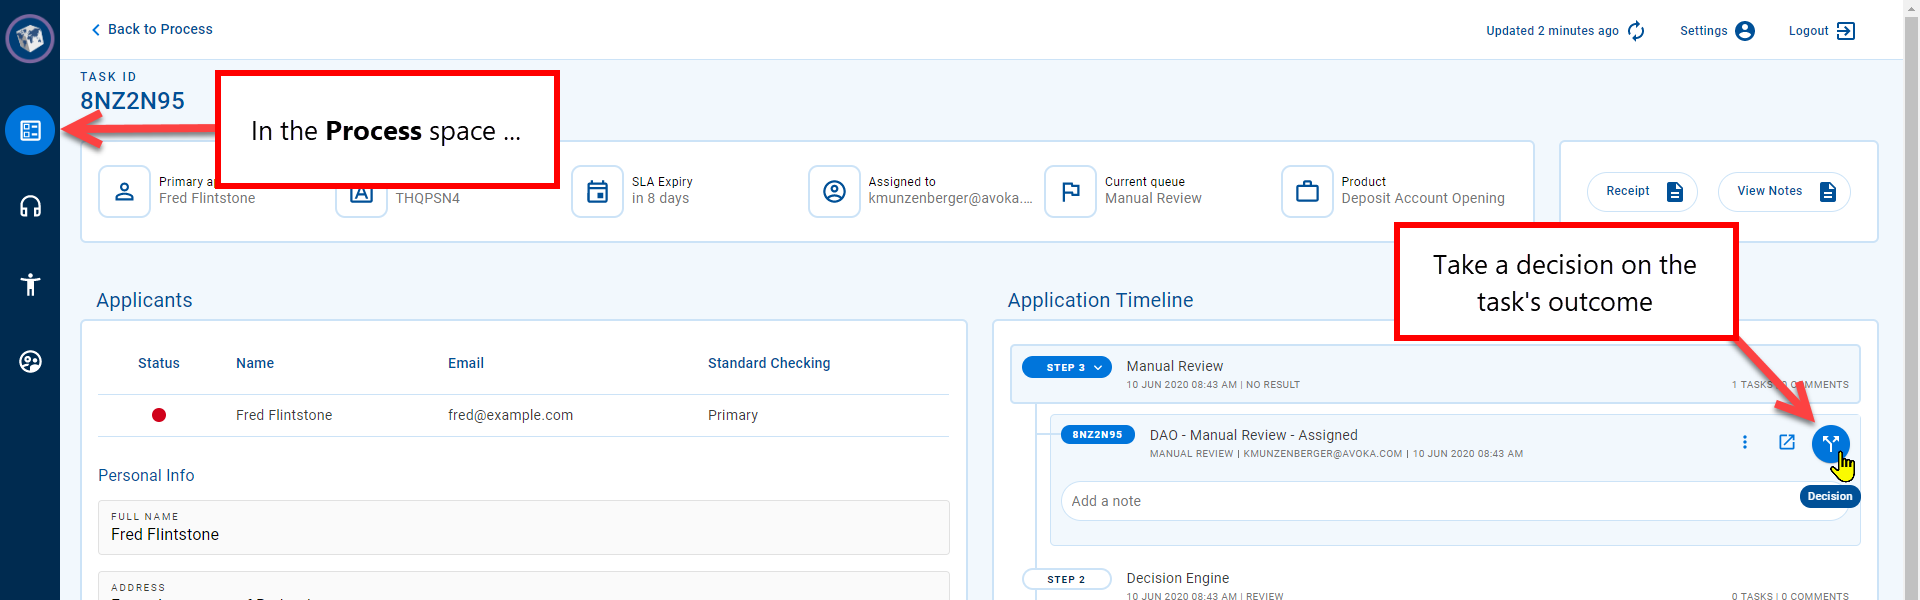
Click the task to display it's application details then click call_splitDecision to display the Decision window.
call_splitDecision is located in the Actions group.
call_splitDecision is located within the selected task in the application timeline.
The Decision button is located in the Action panel.
Notice that the Choose a Decision box is empty. Select an option in the Choose a Decision list that matches the decision we want to take; in this case, Fraud Check. We need to include information in our note to support the decision but can't recall the exact details, so click Save and close the Decision window, returning to the Details screen.
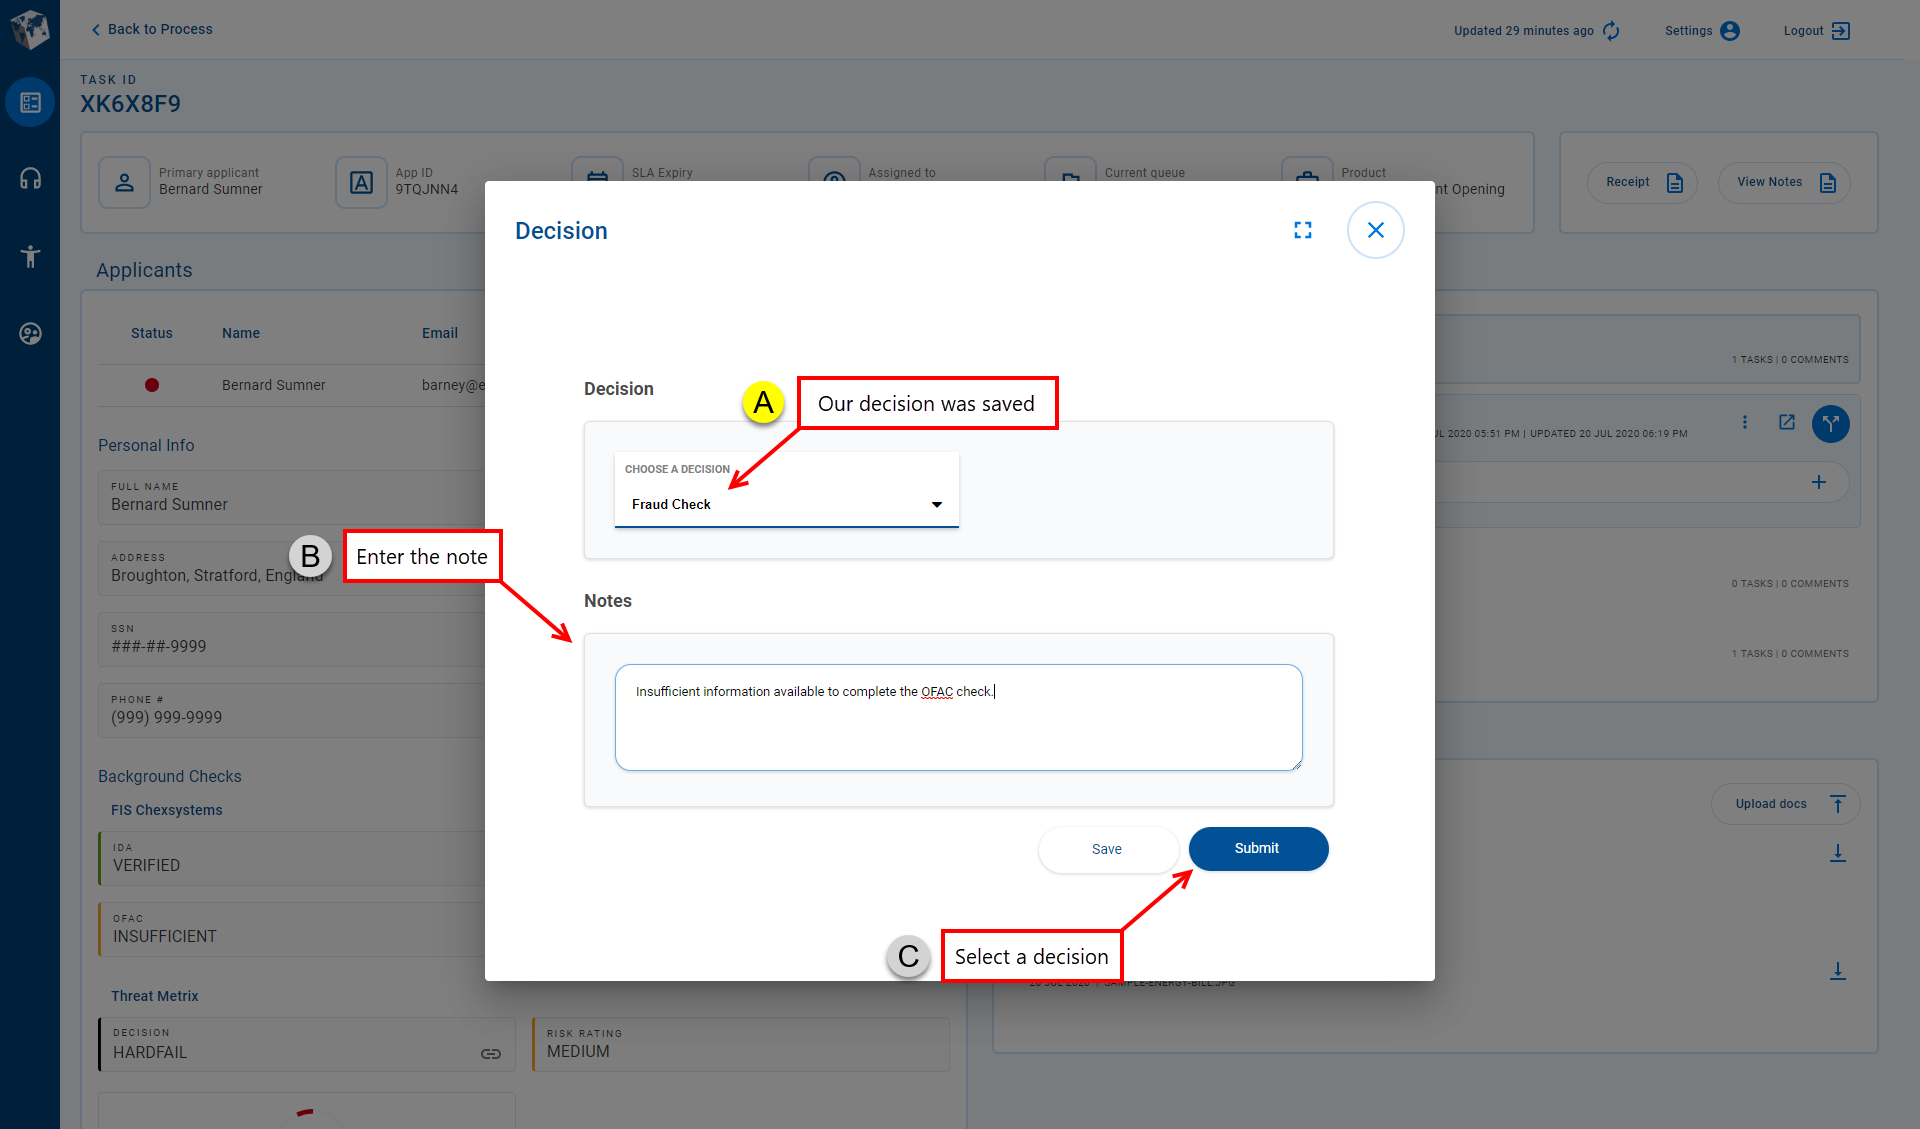
With the Decision window closed, we can find the application details we need to support our decision. Once we've found the supporting information, click Decision to display the Decision window again. Notice that the Choose a Decision box still has the value Fraud Check that we selected previously. Enter the note supporting our decision, then click Submit.
After submitting the decision, Workspaces returns to the List screen where the task may not be available because it may no longer satisfy the active search or filter criteria; for example, it may be on a different queue.