Journey Workspaces demo examples
WorkspacesThis topic relates to Journey Workspaces | Workspaces UserIncludes bank staff, helpdesk, relationship managers, and managers | This feature relates to the 23.10 release
The Journey Workspaces demo video Workspaces: An Application Journey follows an application journey through several stages, demonstrating many standard features as well as some custom processes. While the standard features are described in the Workspaces user guide, this topic presents step-by-step instructions for some custom processes that are described in the demo video and which may be configured in your Workspaces portal.
Examples for the following processes are provided below.
Example: Request information from applicant
An application can be configured to allow it to be submitted without entering all of the required information. Allowing an incomplete application to be submitted generally reduces the friction experienced by the applicant while filling out the application which improves the chances of the application being submitted successfully. However, this improved customer experience is balanced by the need for application processing staff to review applications for missing information and request that information from applicants.
This example shows how to send an application back to an applicant, requesting them to provide more information required for application processing. In this example, we locate an application on the List screen and view its details where we identify that some required documents are missing. Then, we create a request for more information, sending the application back to the applicant so that they can provide the information we need.
The instructions below follow the steps shown in the Workspaces demo video when demonstrating how to request information from an applicant during initial processing.
- Login to Workspaces and select the Review space.
- Locate an application of interest in the item list, and select it to view it on the Details screen.
- Review the application details, noting that some background checks have failed. Further, there is an
 action badge on the Documents Checklist tab indicating attention is required here.
 - Select the Documents Checklist tab.
Note that several required documents are not available, so we need to ask the applicant to upload them. Before we can do that, we need to take ownership of this task.
- Click to assign the task to yourself.
You can skip this step if the task is already assigned to you.
- Click then from the dropdown list select Request Customer for Information. The Request Customer for Information modal window is displayed.
- From the Choose the Applicant dropdown, select an applicant. Additional fields appear, from which you can select the information you need from the applicant.
- From the Documents Request section, select the options for the required documents; for this example, select the first four options.
- From the Additional Information section, select the options corresponding to the required information; for this example, select the following:
- Request for time spent with current employer
- Request for marital status
- In the Notes box, enter instructions to assist the applicant in completing this request for information.
- Click Submit.
The modal window closes and Workspaces returns to the List screen. A message is displayed at the bottom of the screen indicating whether this action was successful.
On returning to the List screen, note that the application is no longer available in the All outstanding view. This is because it no longer satisfies the criteria imposed by that view. In fact, it is no longer available in the Review space; instead, it is now available in the Information Requests space.
- Login to Workspaces and select the Review space.
- Locate an application of interest in the item list, and select it to view it on the Details screen.
- Review the application details, noting that some background checks have failed. Further, there is an action badge on the Documents Checklist tab indicating attention is required here.
- Select the Documents Checklist tab.
Note that several required documents are not available, so we need to ask the applicant to upload them. Before we can do that, we need to take ownership of this task.
- Click to assign the task to yourself.
You can skip this step if the task is already assigned to you.
- Click to display the Decision modal window.
- Click the Choose a Decision box, select Request for Information from the list, then enter information in the Notes box describing what information you need from the applicant.
For this example, enter the list of missing documents in the Notes box along with the instruction to upload them.
- Click Submit.
The modal window closes and Workspaces returns to the List screen. A message is displayed at the bottom of the screen indicating whether this action was successful.
On returning to the List screen, note that the application is no longer available in the All outstanding view. This is because it no longer satisfies the criteria imposed by that view. In fact, it is no longer available in the Review space; instead, it is now available in the Document Requests space.
After the request for information is submitted, the following occur:
- a JM account is created for the applicant using the applicant's email as the account login name and with the default password
- the application is assigned to the applicant
- an email is sent to the applicant informing them of their application's progress and including details for accessing their application in Journey Applicants
Example: Review checklist
Some applications are complicated, requiring a lengthy review process, or simply configured with a lot of steps in which case it's handy to have a to-do list as a reminder of which application processing activities have been done and which are outstanding. In the Workspaces demo video, a custom review checklist feature is demonstrated that let's you create and maintain a custom checklist for activities related to application processing.
This example shows how to use the custom review checklist feature that's configured in the default Workspaces template on which your Workspaces portal may be based. In this example, we locate an application on the List screen and view its details where custom actions like the review checklist are available. We'll see how to create a review checklist and how to use it to keep track of application processing activities.
The instructions below follow the steps shown in the Workspaces demo video when demonstrating the review checklist while completing application processing.
- Login to Workspaces and select the Review space.
- Locate an application of interest in the item list, and select it to view it on the Details screen.
- Click , and select Review Checklist from the list of custom actions.
The Review Checklist modal window is displayed with fields for the status of activities relating to personal details, background checks, and attachments, and a text field for any remarks.

- Select appropriate values for the Personal Details, Background Checks, and Attachments fields, and enter other relevant information in the Remarks box.
- Click then close the modal window. Workspaces returns to the Details screen.
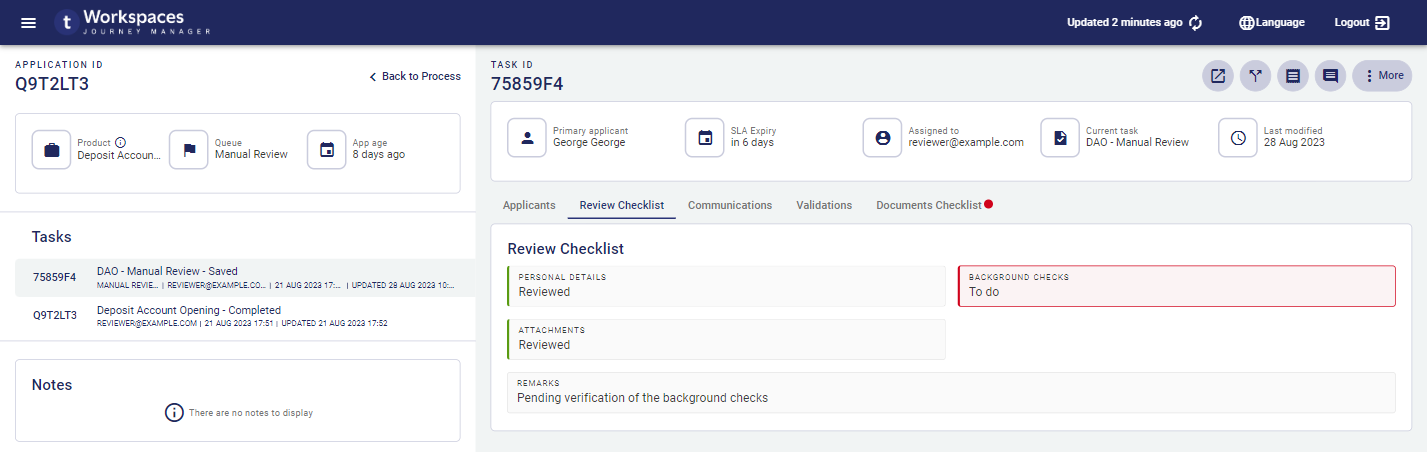
When you save the review checklist, a new Review Checklist tab is created on the Task pane.
- Select the Review Checklist tab

The information entered on the Review Checklist modal window is available here, using the same color-codes used elsewhere to indicate positive and negative states. In this example, Personal Details and Attachments are shown in green indicating review is complete while Background Checks is shown in red indicating this is outstanding and there's more to do for these.

The Review Checklist tab is persistent, meaning it will continue to appear here even if you logout of the current Workspaces session and come back later.
Example: Re-run background checks
Application processing often relies upon the outcomes of various background checks. Some of these checks are used to verify information entered by the applicant while others count towards or against the assessment of an applicant as being a suitable borrower or debtor. Regardless of the purpose of these checks, their outcomes can change throughout the course of application processing, in particular after information is added to or changed in a submitted application. This necessitates the ability to run the background checks again to determine whether the outcomes of any checks have changed.
The Workspaces demo video demonstrates a custom action that let's you re-run background checks while processing an application. This custom action is configured in the default Workspaces template on which your Workspaces portal may be based, and this example shows how to use it. In this example, we locate an application on the List screen and view its details where custom actions are available. We'll see how to re-run the background checks and then ascertain if any outcomes have changed.
The instructions below follow the steps shown in the Workspaces demo video when demonstrating how to re-run background checks while completing application processing.
- Login to Workspaces and select the Review space.
- Locate an application of interest in the item list, and select it to view it on the Details screen.
- Click , and select Re-run Background Checks from the list of custom actions.
The background checks run and a message is displayed at the bottom of the screen indicating whether this action was successful. If it was successful, the Background Checks section of the Applicants tab is refreshed showing the updated background check outcomes.
- Negative background checks
- Re-run background checks
- Success message
- Positive background checks
You can re-run background checks as often as you need to throughout the application journey to ensure you're always looking at up-to-date background check outcomes.
Example: Create an ad hoc task
Sometimes, processing of an application might be shared by several reviewers. For example, while one reviewer may have primary responsibility for processing an application, they may need to offload certain activities to other reviewers, say, to meet a looming SLA or because someone else has specialist knowledge. Workspaces supports sharing of work in this way via ad hoc tasks.
The Workspaces demo video shows how to create an ad hoc task for the purpose of getting someone else to verify the documents uploaded to an application. The custom Create Ad hoc Request action is configured in the default Workspaces template on which your Workspaces portal may be based, and this example shows how to use it. In this example, we locate an application on the List screen and view its details where the custom actions are available. We'll see how to create an ad hoc task and assign it to another user.
The demo also shows how the other user verifies the documents. To learn about that process, see Example: Complete an ad hoc task.
The instructions below follow the steps in the demo video, showing how to create an ad hoc task while completing application processing.
- Login to Workspaces and select the Review space.
- Locate an application of interest in the item list, and select it to view it on the Details screen.
- Click , and select Create Ad hoc Request from the list of custom actions. The Create Ad hoc Request modal window is displayed.
- In the Task section:
- From the Type dropdown list, select Document Verification.
- From the Assignee dropdown list, select another user (such as
[email protected]). - Select an optional Due Date, say, tomorrow.
- In the Documents Checklist section, select all documents.
- In the Notes box, enter instructions for the verifier.
- Click Submit. The modal window closes, returning to the List screen.
The verifier can find the new ad hoc task assigned to them in the Workspaces Ad hoc Requests space.
Example: Complete an ad hoc task
Sometimes, processing of an application might be shared by several reviewers. For example, while one reviewer may have primary responsibility for processing an application, they may need to offload certain activities to other reviewers, say, to meet a looming SLA or because someone else has specialist knowledge. Workspaces supports sharing of work in this way via ad hoc tasks.
The Workspaces demo video shows how to complete an ad hoc task for document verification. In the Ad hoc Requests space of the default Workspaces template (on which your Workspaces portal may be based), the Decision standard action is configured to handle ad hoc tasks, and this example shows how to use it. In this example, we locate an application on the List screen and view its details where we'll use the Decision action to complete the ad hoc task.
- Login to Workspaces and select the Ad hoc Requests space.
- Locate the application of interest in the item list, and select it to view it on the Details screen.
- From the actions group, click . The Decision modal window is displayed.
- In the Documents for Review section, scroll through the list of documents. For each document:
- Review the document's content.
- Select the Mark as verified checkbox.
- Optional: In the Notes box, enter a comment for the reviewer who raised the ad hoc task.
- Click Submit. The modal window closes, returning to the List screen.
.