Journey Maestro Management Dashboard
MaestroThe UI design product. |
Form Builder Platform Developer | 23.04This feature was updated in 23.04
Maestro comes with the Management Dashboard allowing you to easily and quickly perform day-to day tasks. The Management Dashboard is the first page where you land after a successful login to Maestro.
The Management Dashboard consists of the following sections and tabs that group related functionality:
The Management Dashboard is always of the latest version of Maestro, so it includes all capabilities. This is different to designs within a project that can be of earlier releases of Manager.
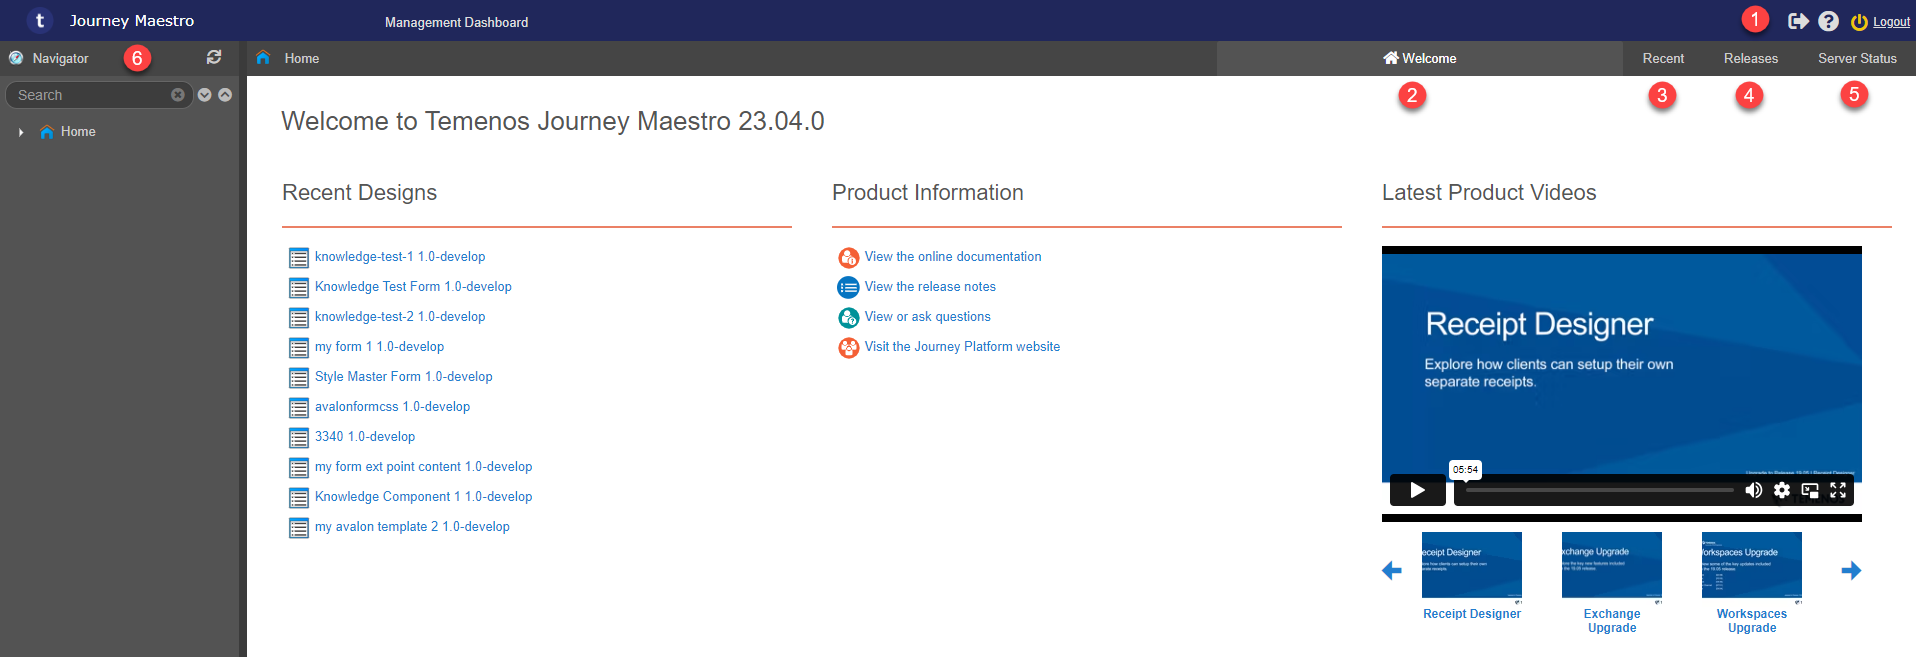
Screen Header
The screen header displays some useful information, including:
- Product name: Journey Maestro
The Screen Header provides you with the following actions:
- : logs you out of Maestro.
- : displays the following help options:
- About Journey Maestro: shows the product information including a version.
- API Guide: redirects you to the Temenos Journey Manager documentation web site.
- API Reference: shows the Maestro API reference documentation shipped with this product version. The same documentation may be available on the documentation web site. However, we recommend using the local version of the documentation as it is tailored to your Maestro version.
- Online Help: redirects you to the Temenos Journey Manager community web site.
- Keyboard Shortcuts: lists the available keyboard shortcuts for Windows and macOS.
Action Windows macOS Cut CTRL + X CMD + X Copy CTRL + C CMD + C Paste CTRL + V CMD + V Undo CTRL + Z CMD + Z Redo CTRL + Y CMD + Y Publish CTRL + P CMD + P Save Form CTRL + S CMD + S Move to Next Item CTRL + Enter CMD + Return Stop Progress / Close Dialog ESC ESC Note You can use Copy and Paste shortcuts across different forms. However, it may depend on each browser's ability to access the system clipboard. For more information, see browser compatibility.
Maestro comes with built-in documentation, which is accessible in each development environment, as well as the links to the Temenos Journey Manager documentation web site.
Welcome Tab
The Welcome tab is the default tab. It displays a welcome message, which contains the version number for the current instance of Maestro, and three columns:
| Column | Description |
|---|---|
| Recent Designs | A list of recent forms, components, templates, and receipts that you've worked on. |
| Product Information | Links to useful resources, including the documentation, community, and release notes. |
| Latest Product Videos | A carousel of product-related videos. |
Select the Welcome tab to view the following:
Recent Designs
This list displays up to 10 of the most recently viewed designs, for example, a form or component. In order to maintain optimal software performance, Maestro has the total limit of recently opened forms set to 50.
Selecting a design will direct you to the latest Version Details for that design. You can view details about the design by pointing your mouse at the design name. These details include the organization and project where the design is stored, the design name, version number, and the time and date the design was last opened.
The Recent tab displays a list of recent forms, components, templates, and receipts that you've worked on. This is the same list that is visible via the Welcome tab, but with more detail.
For each resource, the following data is displayed:
- Project
- Version
- Name
- Last Opened
Above this list, four buttons are available:
| Icon | Label | Description |
|---|---|---|
| Edit | Open the selected resource in the Maestro Editor. | |
| Show Details | Open the Version Details for the selected resource. | |
| Remove from List | Remove the selected resource from the list. | |
| Clear List | Remove all resources from the list. |
The Edit, Show Details, and Remove from List buttons are only enabled if a resource is selected
Removing resources from the list will also remove them from the Recent Designs column in the Welcome tab
Product Information
This list displays links to various online resources where you can get information about Temenos Journey Manager platform products.
Latest Product Videos
This list shows links to various online tutorial videos.
Recent Tab
Select the Recent tab to view your recent projects so you can easily go back and continue working on them.
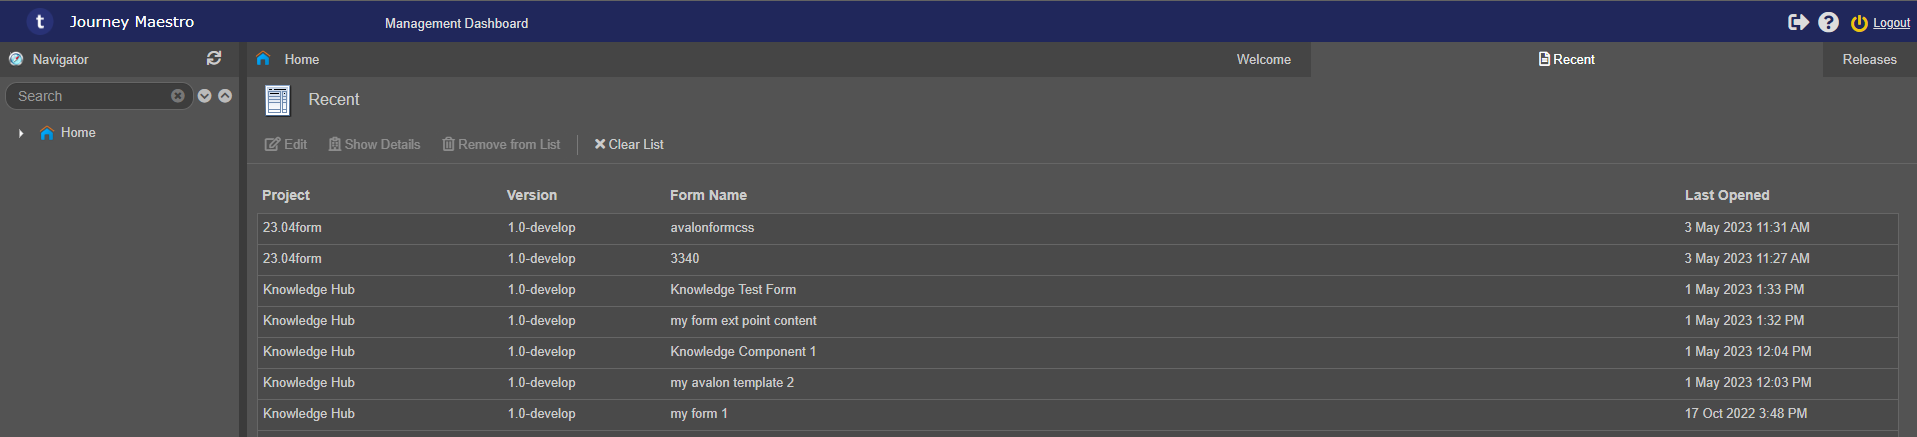
You can perform the following actions:
- Click Edit to open a selected design in the Editor window.
- Click Show Details to see a selected project's details.
- Click Remove from List to remove selected designs from the list.
Note Use Shift or Ctrl key to select multiple projects.
- Click Clear List to clear the list completely.
Release Tab
Select the Releases tab to see which releases of Maestro software were installed on your Maestro instance.
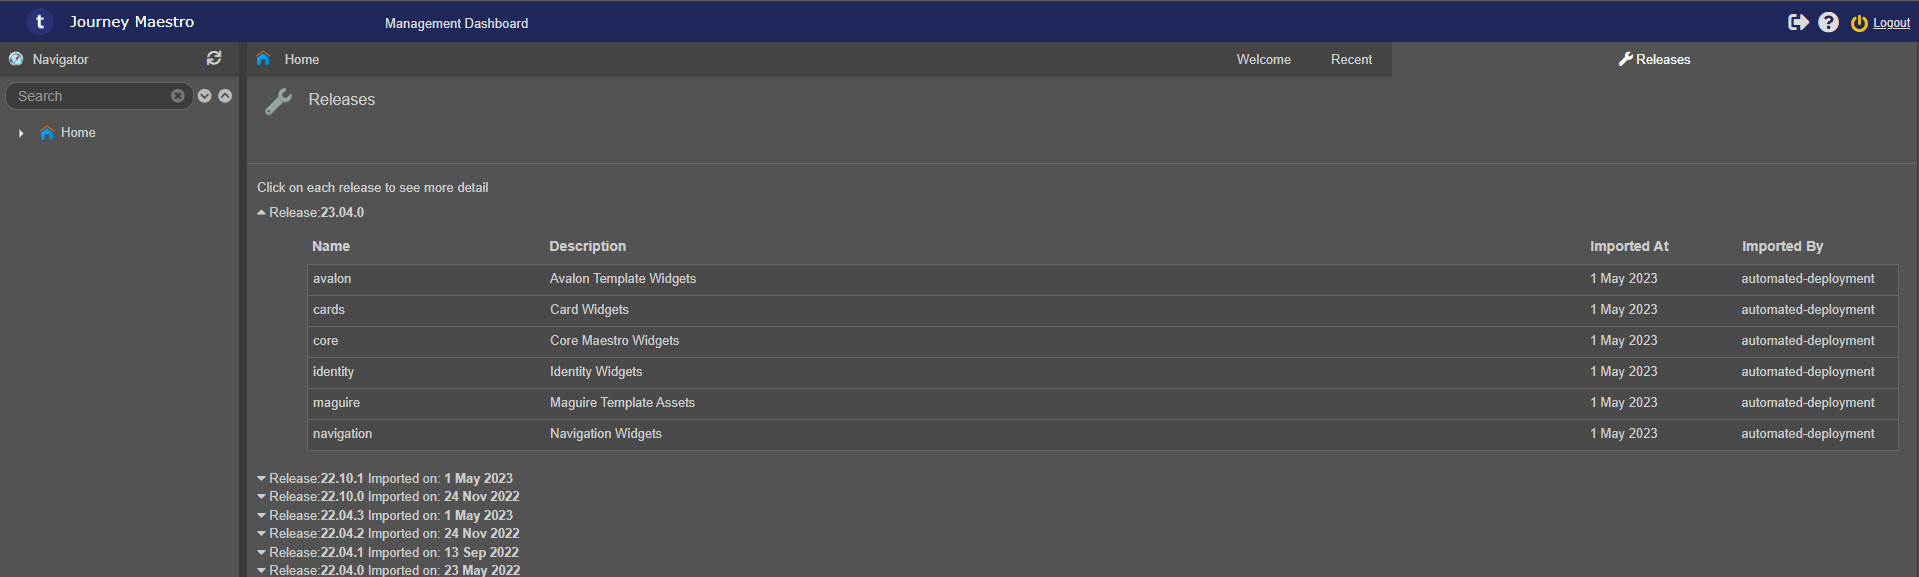
You can perform the following actions:
- Select a particular release to view detailed information on what libraries were changed. This is important for form compatibility and it helps in troubleshooting form issues.
| Icon | Label | Description |
|---|---|---|
| Import Release | ||
| Delete |
The Import Release and Delete buttons will only be visible if you've been granted the Site Admin permission.
Server Status Tab
You must have the certain permissions set by an Administrator to see this section. For more information, see Administrator's documentation.
Navigator Pane
The Navigator pane displays the organizations' structure consisting of projects, libraries, their assets and resources, which is available to you. If you can't see some organizations, it is because they are not assigned to your user account.
What you see in the Navigator pane is determined by the permissions assigned to your account.
You can perform the following actions:
- Select Home to show or collapse the list of organizations.
- Type a name or a part of a name of a project, a form , or a library in the search field to quickly find it in the organizations structure.
- Click the refresh icon to reload the Navigator pane content.
- Select an organization to view and manager its projects.
- Select a project to view and manage its forms and associated resources.
- Select Forms to view and manager forms of a project.
- Select Components to view and manager components belonging to a project.
- Select Templates to view and manager templates used a project.
- Select Receipts to view and manager receipts of a project using Receipt Designer. It is a different mode in the Maestro editor that has certain things removed for receipts.
- Select Libraries to view and manager libraries and their versions used a project.
You can navigate by searching or interacting with the tree view.
Search
If you know what you're looking for, type a query into the Search input. The results will appear as you type.
Tree View
The root node of the tree view is labeled Home.
If you click the disclosure triangle to the left of this label, you will see a list of organizations you have access to.
In many cases, only one organization is configured, so only one organization will appear in the list.
Clicking the root node will return you to the home page of the Management Dashboard.
If you click the disclosure triangle to the left of an organization's name, you will see:
- a list of projects that belong to that organization
- a Libraries directory
The icon to the left of each project name indicates the project type.
| Icon | Name | Description |
|---|---|---|
| Standard | ||
| SCM Shared | ||
| SCM Private |
The Libraries directory contains organization-level libraries. These are libraries that contain resources that are accessible to all projects in the organization.
If you click the disclosure triangle to the left of a project's name, the following directories will appear:
| Icon | Name |
|---|---|
| Forms | |
| Components | |
| Templates | |
| Receipts | |
| Libraries |
The Libraries directory inside a project contains project-level libraries. These are libraries that contain resources that are accessible all of the project's forms, components, templates, and receipts. These resources are not, however, available to other projects.
The Receipts directory will only appear in projects created in Maestro 19.05 and above.
Next, learn how to save history.