Configure Form Space Properties
Journey Manager (JM) The transaction engine for the platform. | System Manager / DevOps | 23.04This feature was updated in 23.04
Manager comes with a set of standard form space properties that can be applied to all spaces that are created in this Manager instance. These properties have default values that can be configured via the Properties and Properties Edit tabs. You can use form spaces properties to override organization's properties. Subsequently, you can create form's properties to override the form space's properties.
Manager automatically sends emails to form users to notify the form has been changed. You can adjust the email format using the settings below.
Some of form space properties are used to configure Journey Space's tabs.
A form space can be set as not editable, so you can’t change its configuration. To enable this, select the Content Editable checkbox in the Space tab.
To configure the properties in the Properties tab:
- Select Forms > Form Spaces.
- Locate a form space and then click Edit.
- Select the Properties tab.
- Click Edit to configure the selected property. Check the standard properties to learn more about their functionality.
- Edit the value of the property.
- Click Save to update the changes.
To configure form space properties in the Properties Edit tab:
- Select Forms > Form Spaces.
- Locate a form space and click Edit.
- Select the Properties Edit tab to view and edit properties. Check the standard properties to learn more about their functionality.
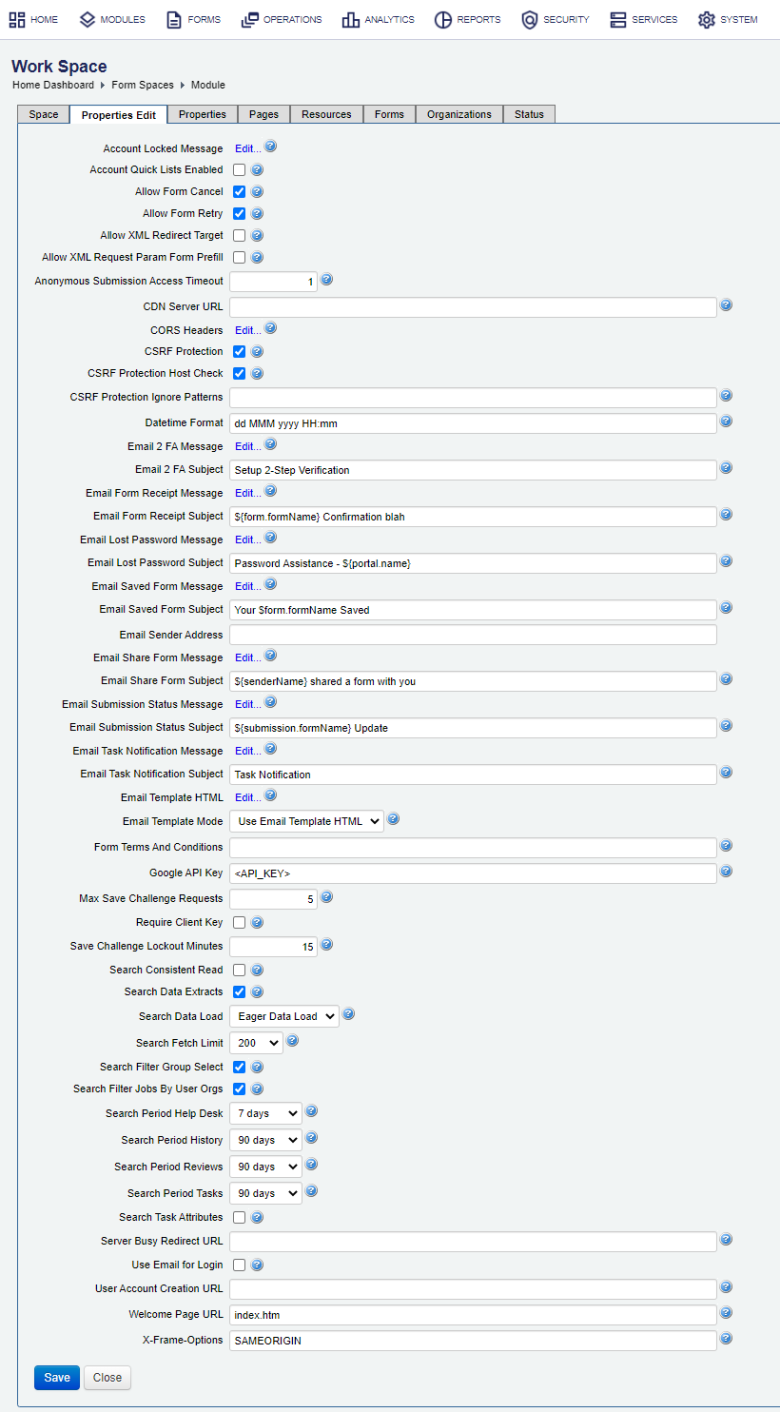
- Edit Account Locked Message, which is a message displayed at login to users whose accounts are locked.
- Select the Account Quick Lists Enabled checkbox to show Account Home Page quick selection lists and Tasks menu count. Note enabling this option can impact performance.
- Select the Allow Form Cancel checkbox to allow users to cancel a submission at the payment stage.
- Select the Allow Form Retry checkbox to allow users to go back to the form if payment has not been completed yet.
- Select the Allow XML Redirect Target checkbox to allow XML form data to specify redirect target.
- Select the Allow XML Request Param Form Prefill checkbox to allow XML request parameters, such as
xmlDataandschemaSeed, to be used in form prefill. - Edit a timeout for an anonymous user to access submitted form receipts in the Anonymous Submission Access Timeout field. After an anonymous user submits a form, Manager sends them a URL link to download a form receipt. This link will timeout after the Anonymous Submission Access Timeout period. However, if the user accesses the URL link using the same user agentUser agent is software (a software agent) that is acting on behalf of a user. One common use of the term refers to a web browser that retrieves, renders and facilitates end user interaction with Web content. (browser) with the same IP addressIP address is a unique string of numbers separated by full stops that identifies each computer using the Internet Protocol to communicate over a network., this timeout doesn't apply, because Manager re-establishes a session. In this case, the user can access the form receipt multiple times without any time restrictions. The default timeout is 15 min.
Note Check the Session Timeout option of a Security Manager used by the form space to adjust time after which a user session times out.
Alternatively, you can implement session expiry within the form logic itself independently of Manager.
- Specify an optional URL of a CDN ServerA content delivery network or Content Distribution Network (CDN) is a system of distributed servers (network) that deliver pages and other Web content to a user, based on the geographic locations of the user, the origin of the webpage and the content delivery server., which is used for caching static content, in the CDN Server URL field.
- Click the CORS Headers link to edit a list of Cross-Origin-Resource-Sharing (CORS)Cross-Origin Resource Sharing (CORS) is a mechanism that uses additional HTTP headers to tell a browser to let a web application running at one origin (domain) have permission to access selected resources from a server at a different origin. A web application executes a cross-origin HTTP request when it requests a resource that has a different origin (domain, protocol, and port) than its own origin. security HTTP header values. For more information, see CORS Headers.
- Select the CSRF Protection Host Check checkbox to enable Cross Site Request Forgery (CSRFCross-site request forgery (CSRF), also known as one-click attack or session riding, is a type of malicious exploit of a website where unauthorized commands are transmitted from a user that the web application trusts.) protection by validating the host name in a request.
- Select the CSRF Protection checkbox to enable CSRF protection by using an extra token in a request. A token is a unique secure random token that is used to prevent CSRF attacks. This is selected by default. | 21.11 This feature was introduced in 21.11.
- Specify a comma-separated list of URLs, which will be excluded from applying CSRF Protection tokens, in the CSRF Protection Ignore Patterns field. For example, if you provide the
/secure/index.htm, /secure/app/**pattern, requests to these URLs won't include random CSRF tokens.Note This option is used only if the CSRF Protection checkbox is selected.
Warning You must restart a Manager server or re-deploy this form space for the CSRF Protection and CSRF Protection Ignore Patterns changes to take effect.
- Edit date and time used in the Date Pickers in the Datetime Format field.
- Edit an email message, which is sent to a user, for 2FATwo-factor authentication (2FA), sometimes referred to as two-step verification or dual factor authentication, is a security process in which the user provides two different authentication factors to verify themselves to better protect both the user's credentials and the resources the user can access. Two-factor authentication provides a higher level of assurance than authentication methods that depend on single-factor authentication (SFA), in which the user provides only one factor -- typically a password or passcode. Two-factor authentication methods rely on users providing a password as well as a second factor, usually either a security token or a biometric factor like a fingerprint or facial scan. user account enrolment in the Email 2FA Message field.
- Edit an email subject, which is sent to a user, for 2FA user account enrolment in the Email 2FA Subject field.
- Edit an email message for form confirmation or receipt email in the Email Form Receipt Message field.
- Edit an email subject for form confirmation or receipt email in the Email Form Receipt Subject field.
- Edit a lost password reset email message in the Email Lost Password Message field.
- Edit a lost password reset email subject in the Email Lost Password Subject field.
- Edit an email message for user saved form email in the Email Saved Form Message field.
- Edit an email subject for user saved form email in the Email Saved Form Subject field.
- Edit a sender email address for generated emails and save challenge validations in the Email Sender Address field. This allows you to override the global email sender address configured on an organization's level. For more information, see Configure Organization Properties. You can also overrides this email address on a form's level by adding the Email Sender Address property to a form version.
Warning If the address is incorrect or invalid, the SMTP server will throw an error.
- Edit an email message for user shared form email in the Email Share Form Message field.
- Edit an email share form subject in the Email Share Form Subject field.
- Edit an email message for submission processing status update in the Email Submission Status Message field.
- Edit an email subject for submission processing status update in the Email Submission Status Subject field. For example,
${submission.formName} Update. - Edit an email message for task notification in the Email Task Notification Message field.
- Edit an email subject for task notification in the Email Task Notification Subject field.
- Edit an email border template HTML in the Email Template HTML field.
- Edit a location of the email HTML border template to use in the Email Template Mode field.
- Edit a form's Terms and Conditions statement the user must accept before accessing the form in the Form Terms And Conditions field.
- Edit a Google API Services Access Key in the Google API Key field.
- Edit a maximum number of save challenge requests that can be performed when returning to a saved form before a user is locked out in the Max Save Challenge Requests field. This maximum is inclusive of any attempts from other sessions for the same submission. The default is 3.
- Select the Require Client Key checkbox to append a client key of an organization, where the form is deployed, to a form render URL. This prevents unauthorized access to a rendered form when a hacker guesses a form code and uses it to generate a valid URL. | 23.04
This feature was introduced in 23.04
Warning If there is a missing or mismatching client key in the URL, Manager displays the Form Not Found error page with The form you are looking for could not be found. Please check the form name and try again. error message.
- Edit a duration (in minutes) after which a submission is locked out when the maximum number of save challenge requests has been exceeded, as per the Max Save Challenge Requests property in the Save Challenge Lockout Minutes field. If the Save Challenge Lockout Minutes is set to 0, then the submission is permanently locked out, which requires an administrator to manually unlock this submission. The default is 15.
Note You can also configure the Save Challenge Lockout Minutes property in a form version to override this form space level's property. | 21.05 This feature was introduced in 21.05.
- Select the Search Filter Group Select checkbox to enable the Groups dropdown list in the Journey Space Tasks and History tabs. This is the default option.
- Select the Search Consistent Read checkbox to search using database Consistent Read in the Task List, History, Reviews and Help Desk pages.
- Select the Search Data Extracts checkbox to search for the Submission Data extracts in Task List, History, Reviews and Help Desk pages.
- Select a data load type from the Search Data Load dropdown list, such as Eager Data Load or Lazy Data Load, to apply to certain portal pages (Help Desk). If "Lazy Data Load" is used, the page will not attempt to load result data on initial access, instead waiting for the user to initiate a search. This can help with performance on systems with large transaction volumes. "Eager Data Load" means that the page will automatically load data when initially accessed.
- Select the search results fetch limit for the Task List, History, Reviews and Help Desk pages from the Search Fetch Limit dropdown list. Default is 200.
- Select the Search Filter Group Select checkbox to show the Group Select in the Search Filter on Task, History pages.
- Select the Search Filter Jobs by User Org checkbox to enable the Job Groups dropdown list in the Journey Space Reviews tab and allows only job coordinators to see collaboration jobs that they are responsible for.
- Select the default Search Period for the Help Desk pages from the Search Period Help Desk dropdown list.
- Select the default Search Period for the History pages from the Search Period History dropdown list.
- Select the default Search Period for the Reviews pages from the Search Period Reviews dropdown list.
- Select the default Search Period for the Task List pages from the Search Period Tasks dropdown list.
- Select the Search Task Attributes checkbox to search for the Task attributes Subject, Message and Address in the Task List and History pages.
- Edit an external resource URL to redirect users to if the server is too busy to handle the form request in the Server Busy Redirect URL field. The default is the Server Busy form space page.
- Select the Use Email for Login checkbox to use the email address as the user login name for Local Manager user accounts. It's not selected by default.
- Specify an alternative user create account URL in the User Account Creation URL field.
- Edit a default welcome page URL in the Welcome Page URL field. For example,
index.htm. - Edit an X-Frame-Options HTTP header value in the X-Frame-Options field. The options can be such as:
[ NONE | SAMEORIGIN | ALLOW-FROM www.example.com ]. If blank then no 'X-Frame-Options' header will be set. For more information, see X-Frame-Options. - Click Save to update the changes.

If you are using a customized form space, some of these properties may not be implemented.
To create a new form space property in the Properties Edit tab:
- Select Forms > Form Spaces.
- Locate a form space and click Edit.
- Click New to create a new property.
- Provide a property unique name in the Name field.
- Select a property type from the Type dropdown list.
- Click Save to update the changes.
Next, learn how to a configure form space email template.