Configure a Form Version
Journey Manager (JM)
The transaction engine for the platform. |
Form Builder Platform Developer | 24.10This feature was updated in 24.10
Manager allows you to view and update configuration of a form version. A form version contains the set of versioned information for a form. To allow flexible switching between versions, almost all data related to a form is versioned. A form data configuration defines how prefill data are mapped into the form's XML schema and identifies special sections in the form. Form data configurations are crucial for pre-populating forms with property values such as a logo, attachments and contact details.
To configure a form version:
- Select Forms > Forms.
- Locate a form and click Edit.
- Select a form version and click Edit.
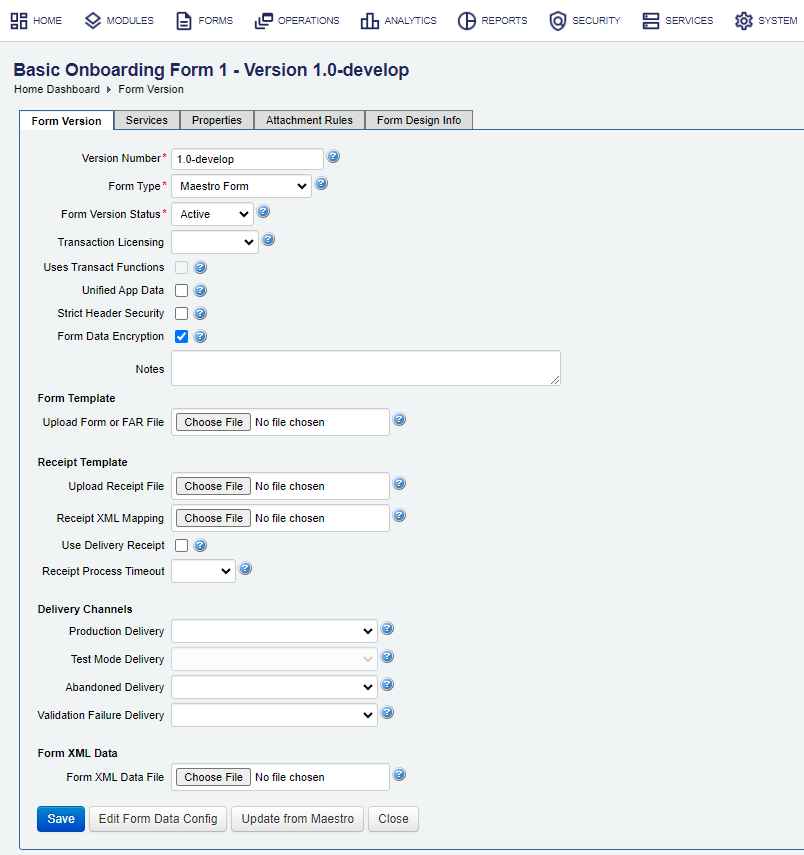
- Select the Form Version tab to view and modify the configuration.

- Update a version number of the form, which is generated by Maestro during form build, in the Version Number field.
Note We don't recommend updating the version number manually. It should be populated when you import a form version.
- Select a type of form deployed on the server from the Form Type dropdown list.
- Composer SmartForm
- Maestro Form
- JS App - refers to an Open UX form
- Dynamic PDF Form
- Static PDF Form
- Other Document
- Select a status from the Form Version Status dropdown list. A form version status can be one of the following: | 21.11
This feature was introduced in 21.11.
- Active: it is in use and readily available to all users. All functionality is allowed.
- Offline: it can't be used at all. No functionality is available, including DDS, Delivery and so on.
- Inactive: similar to Offline.
- NoRender: it doesn't allow for new or saved and resumed forms, but ongoing open sessions can be completed. DDS, submits, saves, and delivery are allowed.
Note Select the Inactive checkbox to retire a form version without deleting it.
- Select a licensing type of the form version from the Transaction Licensing dropdown list, which can be one of the following: | 22.10
This feature was introduced in 22.10.
- Billable: a form version is licensing for billable transactions.
- Non-Billable: a form version is licensing for non-billable transactions.
- Blank: both of licensing types. This is the default.
Note Knowing the licensing type of a transaction helps you with the tracking of billable transactions. For more information, see transaction licensing report.
- The Uses Transact Functions checkbox specifies whether the Transact Function API programming model is available on the server. Transact Functions allow you to apply various business rules at crucial form events, such as form opening, saving or resuming, which gives a standardized approach to handling the events. | 17.10
This feature was introduced in 17.10.
If this checkbox is not selected, the Functions tab is not shown so you can't view and configure form functions. To enable this checkbox and thus have ability to use and edit form functions, you must build a form in Maestro with the Use server side Transact Functions (requires TM 17.10 +) checkbox selected.
Conversely, if you don't require form functions in your form, you must rebuild the form with this option unselected. However, we recommend building the first form version with the Use server side Transact Functions (requires TM 17.10 +) option always selected so you can decide later whether you need it or not. This is because if you decide to add form functions to a form and import it as a new version, you may need to re-import all versions of the form because of version conflicting configurations or import the form with a new name.
- Select the Unified App Data checkbox to enable the Unified Application Data Document Model in this form version. It provides you with the fine-grained control of the output data by decoupling the client-side data from the server side. For example, you may decide not to send sensitive fields to the user's browser. | 17.10 This feature was introduced in 17.10.
- Select the Strict Header Security By Host checkbox to enforce strict matching of user session and request HTTP headers (
Referer). It is not selected by default. | 24.10 This feature was introduced in 24.10 - Select the Strict Header Security By IP checkbox to enforce strict matching of user session and request HTTP headers (
IP Address). It is not selected by default. | 24.10 This feature was introduced in 24.10 - Select the Strict Header Security By User Agent checkbox to enforce strict matching of user session and request HTTP headers (
User-Agent). It is not selected by default. | 24.10 This feature was introduced in 24.10Manager checks that requests are coming from the same User Agent and IP Address that were used in the user's last login session to a form space. Manager also check the Referer header to ensure it refers to the server instance it is accessing. This hardens the system security against man-in-the-middle attacks.
Note This configuration overwrites the Strict Header Security settings of a security manager > Configure a Security Manager.
- Select an obfuscation mode of HTML client-side form XML data from the Form Data Obfuscation dropdown list, which can be one of the following:
- None: no obfuscation is performed.
Choose this option if you need to run automated tests that require viewing and modifying the
formDatapayloads sent from the web browser to Manager during POST requests. TheformDataparameter is the XML form data starting at the<AvokaSmartForm>tag.Warning You should run such tests in the test environments only, such as SIT and UAT. Never run them in the production environments.
- Obfuscate: This is the default option, so we strongly recommend keeping this option enabled, especially in the production environment. For more information, see Security Managers Overview.
- Force Obfuscate: to obfuscate the form data regardless of the client agent type. This is important because some clients, such as Postman or embedded browsers, receive the data in clear text format, so it must be obfuscated to make it secure. | 24.10 This feature was introduced in 24.10
This obfuscation is an additional security hardening to the standard TLSTransport Layer Security (TLS) is a cryptographic protocol designed to provide communications security over a computer network. transport encryption. For more information, see Data Protection.
Note Prior to Manager 24.10, you select the Form Data Encryption checkbox to obfuscate HTML client-side form XML data, which is the same as the Obfuscate option in the dropdown list above.
- None: no obfuscation is performed.
Choose this option if you need to run automated tests that require viewing and modifying the
- Type the comments relevant to this form version in the Notes field.
- Click Upload Form or FAR File to deploy a form template file in one of the following formats: PDF, XDPXML Data Package (XDP) format is a file format developed by Adobe Systems for packaging PDF data into XML files; contains the entire PDF document contents including form and template data; may also include character-encoded sections for binary content., and FAR.
- Click Upload Receipt File to deploy the receipt templates file in one of the following formats: PDF, XDP, and FAR.
- Click Upload Signature File to deploy the template file (PDF or XDP) to be presented to users for signatures. If not specified, the receipt file is used.
- Click Receipt XML Mapping shows how receipt XML data is mapped to AcroFormAcroForms are the original PDF forms technology that accepts input in both Forms Data Format (FDF) and XML Forms Data Format (XFDF). Many 3rd party vendors support AcroForms. fields using XQueriesXQuery is a specification for a query language that allows a user or programmer to extract information from an Extensible Markup Language (XML) file or any collection of data that can be XML-like.. You can use this in overlay receipts.
- Select the Use Delivery Receipt checkbox to specify a separate delivery of a PDF receipt where ReceiptMode is set to Delivery. This enables delivery PDF receipt to display additional Office Use Only data, which is not printed on the user's PDF copy of the receipt.
- Select a timeout for the PDF receipt rendering from the Receipt Process Timeout dropdown list. By default, no timeout is enforced.
- Select a delivery channel from the Production Delivery dropdown list that will be used to deliver successful submissions for this form version if the form version is not in the test mode.
- Select a delivery channel from the Test Mode Delivery dropdown that will be used to deliver successful submissions for this form version if the form version is in the test mode.
Note This dropdown is enabled if the form is in test mode, that is the Test Mode checkbox is selected.
- Select a delivery channel from the Abandoned Delivery dropdown list to deliver abandoned submissions.
- Select a delivery channel from the Validation Failure Delivery dropdown list to deliver submissions with data validation errors.
- Click Form XML Data File to upload a form XML seed data file, containing the data structure and the XML schema, to generate a blank seed XML file to be used in the form.
- Click Save to update the changes.
- Click Edit Form Data Config to configure form version data mapping.
- Click Update from Maestro to update the published form version using Maestro.
- Click Save to update the changes.
Next, learn how to configure functions for a form version.