Import Forms
Journey Manager (JM) The transaction engine for the platform. | Platform Developer | 23.10This feature was updated in 23.10
Manager allows you to export and import a current form version or all versions of a selected form. After you build a form in Maestro, you usually deploy it to Manager using this import functionality.
You can also use this functionality to:
- Rollback one or several forms
- Re-create one or several forms in another Manager
- Promote one or several forms to other environments
- Migrate forms from one environment to another
Manager allows you to import a form as an application. The main difference between these imports is an archive file format that contains application XML configuration for applications or form XML configuration for forms.
Manager runs a virus scanning service before an import file is processed, so the antivirus service must be properly configured and enabled. If a virus is detected, the import operation fails and a corresponding record is added to the Error Log. | 23.04 This feature was introduced in 23.04
You can import a form using one of following options:
Import Using UI
To import a form:
- Select Forms > Forms, and then click Import Form.
- Click Choose File and choose a form archive ZIP file.
- Click Upload to upload the file.

- Select the Global Form checkbox if you want to import a form as a global form. | 23.10
This feature was introduced in 23.10
Warning The experimental Global Forms feature has been temporarily disabled while we continue improving it. This feature will be disabled in releases starting from 24.10 and going back to 23.10.
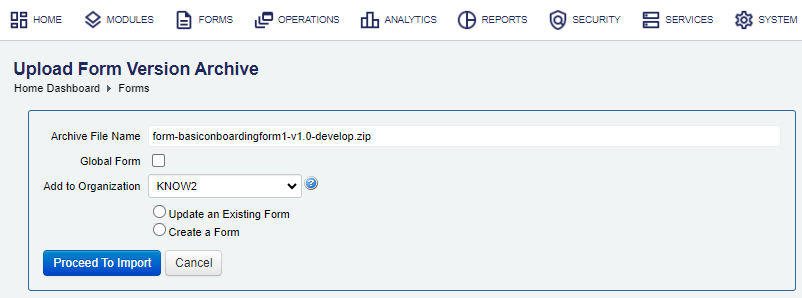
- Select an organization to add the form to from the Add to Organization dropdown list, or leave it blank.
Note The Add to Organization dropdown list is shown only if you have access to more than one organization.
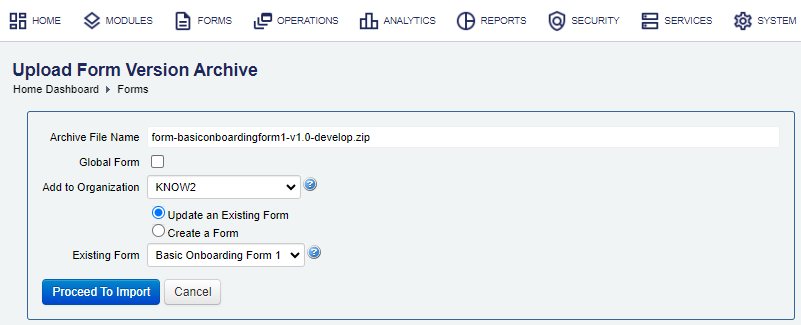
- Select the Update an Existing Form checkbox, if the form already exists in Manager and you want to update it with the new version.

The additional field is shown where you need to:
- Select a form name you want to update from the Existing Form dropdown list.
- Select the Create a Form checkbox if the form doesn't exist in Manager, so it will be created.

The additional field is shown where you need to:
- Update a form code in the New Form Code text field, which uniquely identifies the form across all the organizations in the current server environment. Manager automatically prefills the form code.
Note The form code is an alphanumerical string that can't include spaces.
- Update a form code in the New Form Code text field, which uniquely identifies the form across all the organizations in the current server environment. Manager automatically prefills the form code.
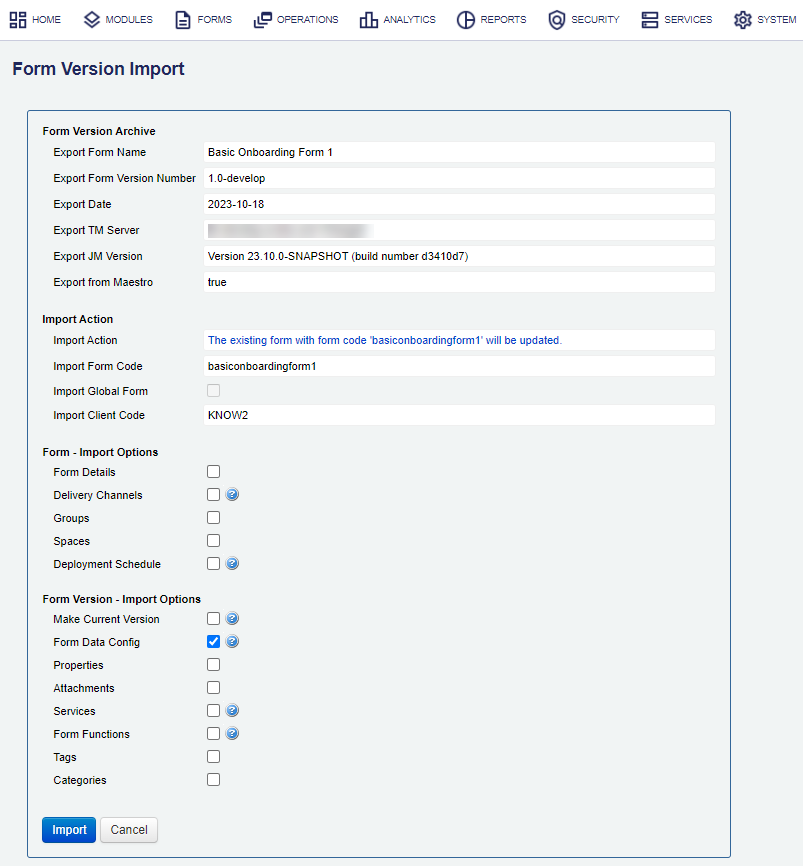
- Click Proceed To Import to review and adjust the import options before you actually import the form.

- Select the appropriate Form – Import Options, which are associated with all versions of the form. They are all selected by default.
- Select the Form Details checkbox to import form details.
- Select the Delivery Channels checkbox to associate form's delivery channels with any existing organization's delivery channels with the same name.
- Select the Groups checkbox to import the list of groups the form allows access from.
- Select the Spaces checkbox to import the list of form spaces assigned to the form.
Warning If you import a form with form spaces assigned to it, which don't exist in a target environment, these form spaces won't be automatically assigned to the form and will be ignored. In this case, you will need to import the missing form spaces and assign them to the form manually.
- Select the Deployment Schedule checkbox to remove all currently scheduled form version deployments and replace them with the deployment schedule included in the import archive file. The history of the past deployments will be preserved.
- Select the appropriate Form Version – Import Options, which are applied to a selected version of the form, normally the current version.
- Select the Make Current Versioncheckbox to set this form as the current version of the form.
- Select the Form Data Config checkbox to import all form versions form data configuration.
- Select the Properties checkbox to import form properties.
- Select the Attachments checkbox to import attachments.
-
Select the Services checkbox to import services, which will override the services used by this form version in the target system.
Note The services are referenced by a name and a version and must exist in the target system prior to the import, otherwise they can't be imported.
- Select the Form Functions checkbox to import form functions used by the form version. The existing form functions on the target server will be updated with that of from the imported archive. | 19.11
This feature was introduced in 19.11.
Note The form functions are referenced by a name and a version and must exist on the target server prior to the import, otherwise they can't be imported.
- Select the Tags checkbox to import tags.
- Select the Categories checkbox to import categories.
- Click Import to complete the process.
Note If the Create a New Form option was selected during the import process, and there was a form naming conflict, that is a form with the same name already existing on the server, the form will be renamed, and a message will be displayed in the Detail Message tab.
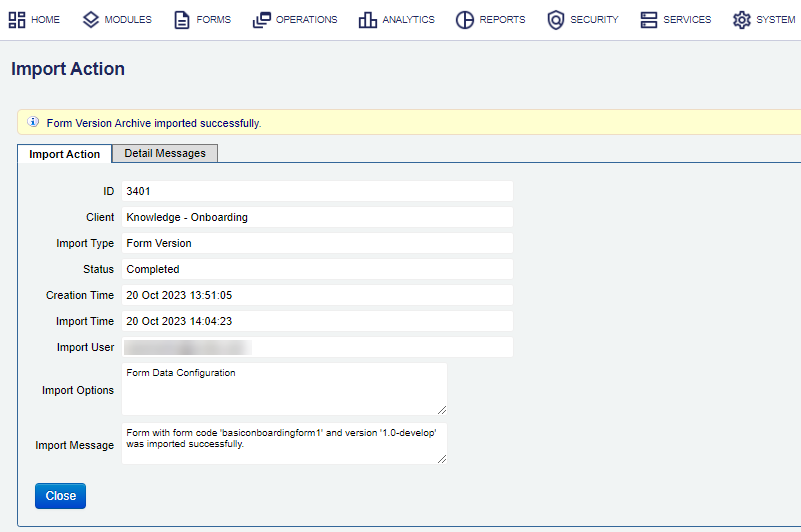
- Check the import status and message in the Import Action tab.
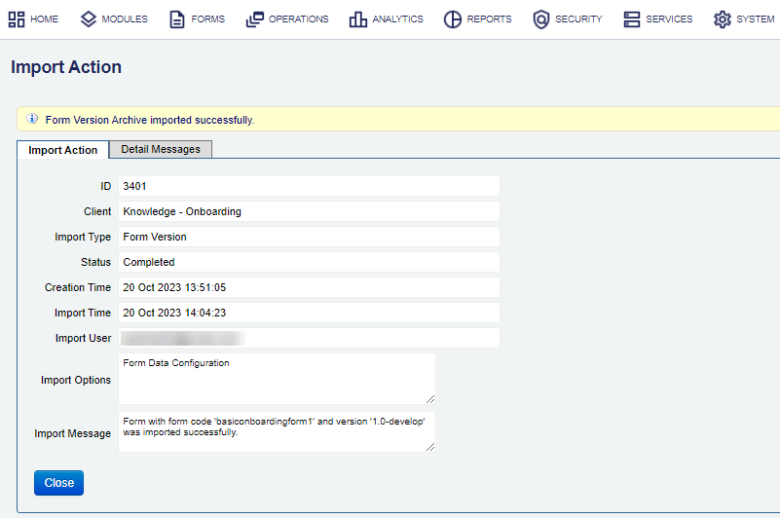
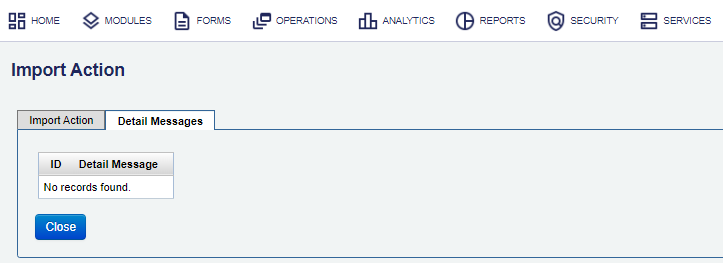
- Select the Detailed Messages to see whether there were any errors or warnings during the import.

- Click Close.

If errors are sever, you may want to update Manager configuration to fix the error and import the form again.
You should check the list of forms to verify the imported form has been added, as well as the form's configuration is correct, for example, all form spaces are assigned to the form.
You can check the Audit Log and Error Log for successful and failed import operations respectively, whilst the Import Log shows all import operations.
You can also import Maestro forms using the Maestro dashboard.
When importing a form that has come from a more recent version of Manager, you may get an IllegalArgumentException error. To resolve this error:
- Log onto Manager you have imported the form into.
- Select Forms > Forms and locate the form.
- Click the Current Version of the form and change the Form Type to Composer Smart Form . This allow you to render this form correctly now.
Import Using SDK
The Journey Manager SDK Maven plugin provides the tm-sdk:archive-deploy goal to import a form.
Import Using API
The Journey Manager REST API provides the endpoint URL to import a form.
To call this REST API, you need:
- HTTP Request
- Both HTTP and HTTPS protocols are supported:
http(s)://<JM_SERVER>/manager/secure/rest/archive/v1/- Parameters
--header ‘Authorization: Basic <USE-NAME-AND-PASSWORD-BASE64-ENCODED>’- an HTTP header containing'username:password'encoded as Base64Base64 is a binary to a text encoding scheme that represents binary data in an American Standard Code for Information Interchange (ASCII) string format..--form ‘archiveFile=@“/Users/my-form.zip”’- a path to an archive file to be imported.--form ‘importOptions=“FORM_DEFINITION,DELIVERY_DETAILS,FORM_SPACES”’- a comma-separated list of import options to perform. The option names are the same as described in the Import Using UI section but they use an underscore, for example,FORM_SPACESfor Spaces.- Response
- If successful, this operation returns the following response with a HTTP
200 OKstatus code. - Example
curl --location --request PUT ‘https://<JM_SERVER>/manager/secure/rest/archive/v1/’ \
--header ‘Authorization: Basic <USE-NAME-AND-PASSWORD-BASE64-ENCODED>’ \
--form ‘archiveFile=@“/Users/my-client.zip”’ \
--form ‘importOptions=“FORM_DEFINITION,DELIVERY_DETAILS,FORM_FUNCTIONS,FORM_GROUPS,FORM_SPACES,CURRENT_VERSION,\
DEPLOYMENT_PLAN, FORM_DATA_CONFIGURATION,ATTACHMENTS,PROPERTIES,VERSION_SERVICES,METADATA,CATEGORIES,\
COPY_FROM_LATEST_VERSION”’
Next, learn how to export forms.