Configuration Service
Journey Manager (JM) The transaction engine for the platform. | System Manager / DevOps | 24.04This feature was updated in 24.04
Manager provides a functionality enabling you to quickly and easily reconfigure a server instance by uploading a configuration file containing all relevant information. The configuration file is a JSONJSON (JavaScript Object Notation) is an open standard file format and data interchange format that uses human-readable text to store and transmit data objects consisting of attribute–value pairs and arrays. file with a flat structure defining server's properties as name / value pairs. The Configuration Service consumes this file and runs all configuration tasks that it defines.
The Configuration Service comes with several template files, which you can use to create your own configuration deployments. As you upload the JSON configuration file, the Configuration Service parses it and runs import operations for each section of configuration, such as form spaces, organizations, forms, service connections and so on. This means that you need to have correct import permissions assigned to your account.
Currently, the Configuration Service comes with the following template files:
- Template version (2.1) - | 24.04 This feature was introduced in 24.04
- Template version (2.0) - | 23.10 This feature was introduced in 23.10
- Template version (1.1) - | 23.04 This feature was introduced in 23.04
- Template version (1.0)
Create Entities
Originally, the Configuration Service was designed to update only existing configurations; there was no functionality to create new ones. However, starting from 24.04, the Configuration Service allows you to create new entities by using the template version 2.1. At the moment, it is limited to service parameters only, albeit, future releases might add ability to create more entities via the Configuration Service.This means that you need to install a Manager instance and configure it prior to being able to use the Configuration Service.
To create a new entity for serviceParameters, you must use a new flag createOrUpdate that can be defined in 2 scopes: global and entity scopes.
- Global scope: the
configurationsobject to define it as a global parameter across the whole file:"version": "2.1", "configurations": { "createOrUpdate" : "false", "manager": { - Entity scope: the
serviceParametersobject to overrides the global parameter set above:"services": [ { "serviceName": "My Service 2", "versionNumber": "1.0.0", "serviceParameters": [ { "name": "Service parameter name (String)", "description ": "Service parameter description", "bindParameter": "false", "readonly ": "true", "required ": "true", "clearValueOnExport ": "true", "unitTest": "false", "value": "Service parameter value", "createOrUpdate": "false" } ] } ] ...
The following logic applies when using the createOrUpdate parameter:
- The local
createOrUpdateparameter defined on the entity level takes precedence over the global parameter. - The global parameter is used if there is no local
createOrUpdatedefined on the entity level.
Then for the serviceParameters only, if it has the createOrUpdate parameter and set to true, then:
- If the service parameter exists then it will be an update operation.
- If the service parameter doesn't exist, then it will be a create operation that will also require the presence of type parameter under the service parameter values.
- If the service parameter of type
List, an addition parameter calledlistValuesis required to set the initial value of the list option. For example,label1:value1|label2:value2, the value of a parameter must be set to a value from thelistValues, such asvalue1orvalue2. The snippet of the configuration is shown below:{ "name": "Service parameter type (List)", "'escription ": "Service parameter description", "bindParameter": "false", "readonly ": "false", "required ": "true", "clearValueOnExport ": "true", "unitTest": "false", "createOrUpdate": "true" "type": "List", "ListValues": "1: test1|2: test2", "value": "1" }
You can upload and deploy the Configuration Service file using one of following options:
To deploy the Configuration Service file , you must have the REST Configuration Service API permissions correspondingly.
Let's look at each of them in more detail.
Deploy Using UI
To upload and deploy a Configuration Service file via Manager:
- Select System > Configuration Service.
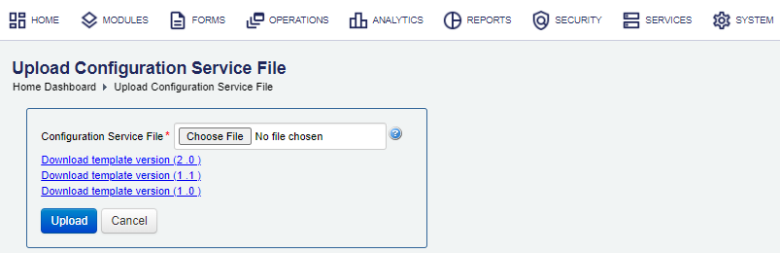
- Click a template link, for example, Download template version (2 .1), to view and download a template configuration service JSON file.
- Create your own specific configuration by populating the template file. If you wish to create new configurations for service parameters, see Create Entities.
Note Make sure all JSON tags are properly formatted and closed, so there are no validation errors during the uploading process.
- Click Choose File to select a configuration file you. The supported file formats are ZIP and JSON.
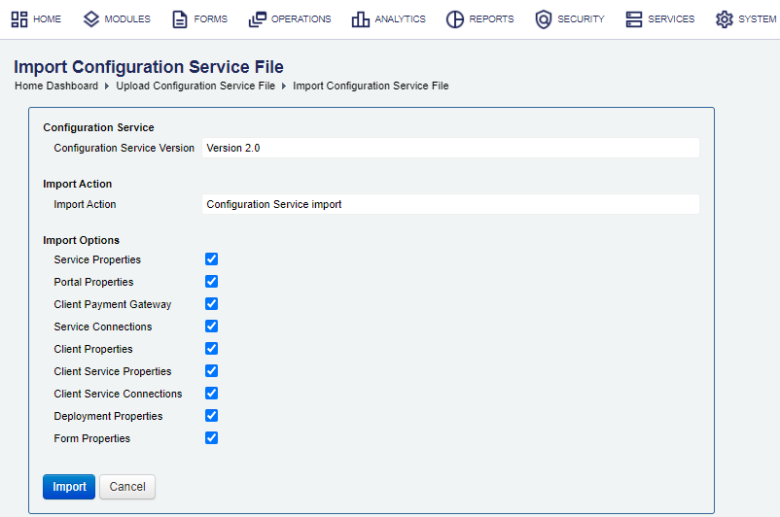
- Click Upload to start the uploading process. Manager validates the JSON file and shows a list of import options so you can choose what part of the configuration file to upload.
If the configuration file is not valid, the following error message is shown: Error loading import file: Import file is not a valid json file.
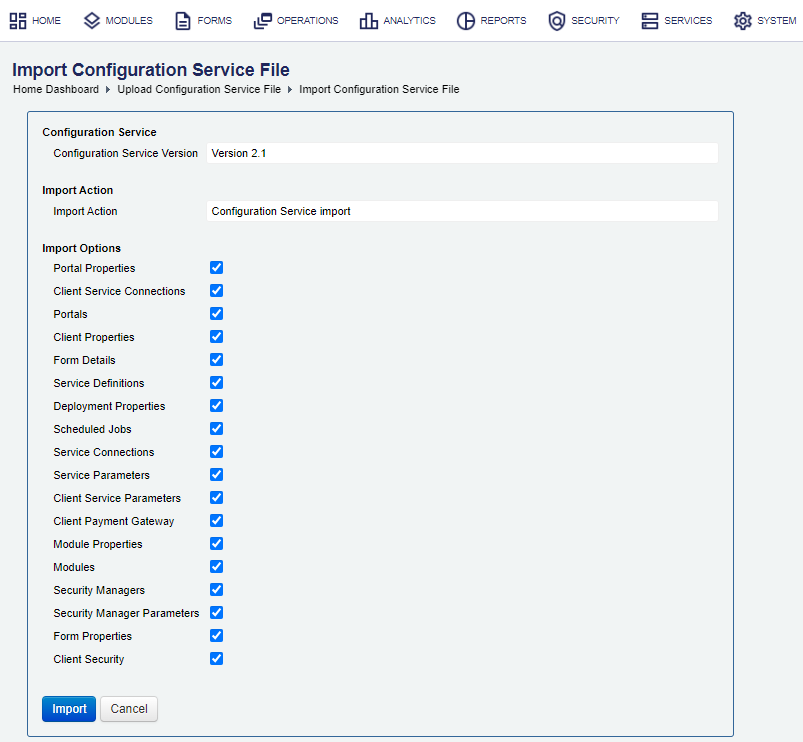
- Clear Portal Properties to exclude form spaces' properties from the import. For more information, see import form spaces.
- Clear Client Service Connections to exclude organizations' service connections from the import.
- Clear Portals to exclude organizations' form spaces from the import.
- Clear Client Properties to exclude organizations' properties from the import. For more information, see import organizations.
- Clear Form Details to exclude form details from the import.
- Clear Service Definitions to exclude service definitions from the import.
- Clear Deployment Properties to exclude deployment properties from the import.
- Clear Scheduled Jobs to exclude organizations' scheduled jobs from the import. | 24.04 This feature was introduced in 24.04
- Clear Service Connections to exclude service connectionss from the import. For more information, see import service connections.
- Clear Service Parameters to exclude services' parameters from the import. For more information, see import services.
- Clear Client Service Parameters to exclude organizations' service parameters from the import.
- Clear Client Payment Gateway to exclude client payment gateways from the import.
- Clear Module Properties to exclude module properties from the import.
- Clear Modules to exclude modules from the import. The configuration section of the template JSON file defines the following options:
"modules": [ { "moduleName": "Module Name", "moduleContextPath": "http://tm-server/module/", "description ": "", "Security Manager": "", "moduleProperties": [ { "name": "module property name", "value": "test", "description ": "" } ] } ] - Clear Security Managers to exclude organizations' security managers from the import.
- Clear Security Manager Parameters to exclude organizations' security manager's parameters from the import.
- Clear Form Properties to exclude form version properties from the import.
- Clear Client Security to exclude organizations' security configuration from the import. The configuration section of the template JSON file defines the following options:
"clientSecurity": {
          "overrideSystemDefaultBrowserSupportPolicy": "false",
          "enableInternetExplorer10": "false",
          "enableInternetExplorer9": "false",
          "enableInternetExplorer8": "false",
          "overrideSystemDefaultCSP": "false",
          "organizationCSPHeader": ""
}
| 24.04 This feature was introduced in 24.04
- Clear Scheduled Jobs to exclude scheduled jobs from the import.
- Click Import to process the file in accordance to the selections above.
- Review the import action status and the import message for any errors. Click Detail Messages to see more information.
- Click Close. It opens the Import Actions UI, so you can review the latest import log records.

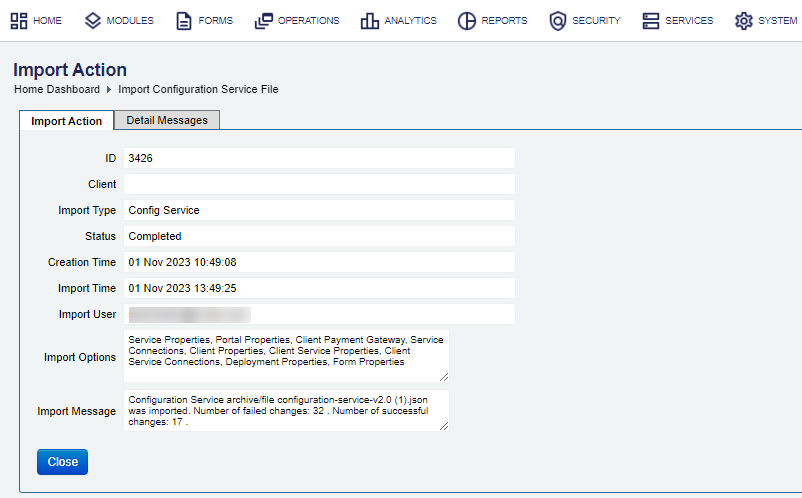
In case of an error, you need to identify a root cause, update the configuration file accordingly and try to run the import again.
Deploy Using SDK
The Journey Manager SDK Maven plugin provides the tm-sdk:configuration-service-archive-deploy goal to upload and deploy a Configuration Service file.
Deploy Using API
The Journey Manager REST API provides the endpoint URL to upload and deploy a Configuration Service file.
To call this REST API, you need:
- HTTP Request
- Both HTTP and HTTPS protocols are supported:
http(s)://<JM_SERVER>/manager/secure/rest/configuration-service/v1/- Parameters
-
--header ‘Authorization: Basic <USE-NAME-AND-PASSWORD-BASE64-ENCODED>’- an HTTP header containing'username:password'encoded as base64. -
--form ‘archiveFile=@“/Users/my-configuration-service-v2.0.json”’- a path to a Configuration Service file to be uploaded and deployed. -
--form ‘importOptions=“CLIENT_PROPERTIES,PORTAL_PROPERTIES,FORM_PROPERTIES,SERVICE_PARAMETERS,SCHEDULED_JOBS”’- a comma-separated list of import options to perform. The option names are the same as described in the Deploy Using UI section but they use an underscore, for example,DEPLOYMENT_PROPERTIESfor Deployment Properties.The complete list of import options is shown below:
PORTALS PORTAL_PROPERTIES CLIENT_PROPERTIES FORM_PROPERTIES SERVICE_PARAMETERS CLIENT_SERVICE_PARAMETERS SERVICE_CONNECTIONS SERVICE_DEFINITIONS CLIENT_SERVICE_CONNECTIONS DEPLOYMENT_PROPERTIES CLIENT_PAYMENT_GATEWAY CLIENT_SECURITY MODULES MODULE_PROPERTIES SECURITY_MANAGERS SECURITY_MANAGER_PARAMETERS SCHEDULED_JOBS FORM_DETAILS - Response
- If successful, this operation returns the following response with a HTTP
200 OKstatus code.{ “archiveName”: “config-service.json”, “importMessage”: “Configuration Service archive/file config-service.json was imported. Number of successful changes: 11 .“, “importStatus”: “Completed”, “importTime”: “2024-02-07T10:28+1100" } example with warnings { “archiveName”: “my-configuration-service-v2.0.json”, “detailMessages”: [ “Portal not found : [Work Space]“, “Service definition for service name [Amazon Submission Data Storage] not found”, “Service definition for service name [Amazon Submission Data Storage] not found”, “Service definition for service name [Amazon Submission Data Storage] not found”, “Service connection for service connection name [Amazon KMS] not found” ], “importMessage”: “Configuration Service archive/file my-configuration-service-v2.0.json was imported. Number of failed changes: 5 . Number of successful changes: 11 .“, “importStatus”: “Completed”, “importTime”: “2024-02-06T14:38+1100" } - Example
curl --location --request PUT ‘https://<JM_SERVER>/manager/secure/rest/configuration-service/v1/’ \
--header ‘Authorization: Basic <USE-NAME-AND-PASSWORD-BASE64-ENCODED>’ \
--form ‘archiveFile=@“/Users/my-configuration-service-v2.0.json”’ \
--form ‘importOptions=“CLIENT_PROPERTIES,PORTAL_PROPERTIES,FORM_PROPERTIES,SERVICE_PARAMETERS, \
CLIENT_SERVICE_PARAMETERS,SERVICE_CONNECTIONS,CLIENT_SERVICE_CONNECTIONS,DEPLOYMENT_PROPERTIES”’
Next, learn how to create a server node.