Transaction Processor Service
Journey Manager (JM) The transaction engine for the platform. | System Manager / DevOps | 18.11 This feature was updated in 18.11.
Manager comes with the Transaction Processor service that plays an important role in the transaction life cycle by performing the following steps:
- Abandonment
- Receipt generation
- Delivery
- Task expiry
- Transaction history creation
- Data purging
The Transaction Processor service is called by the Transaction Processing scheduled job.
We recommend seeking advice from the Client Services team before changing this service configuration.
To configure the Transaction Processor service:
- Select Services > Core Global Services.
- Select the Transaction Processor from the Type dropdown list to show all services of this type.
- Locate the service and click Edit.
- Check the standard service settings.
- Select the Parameters Edit tab to view and edit the configuration.
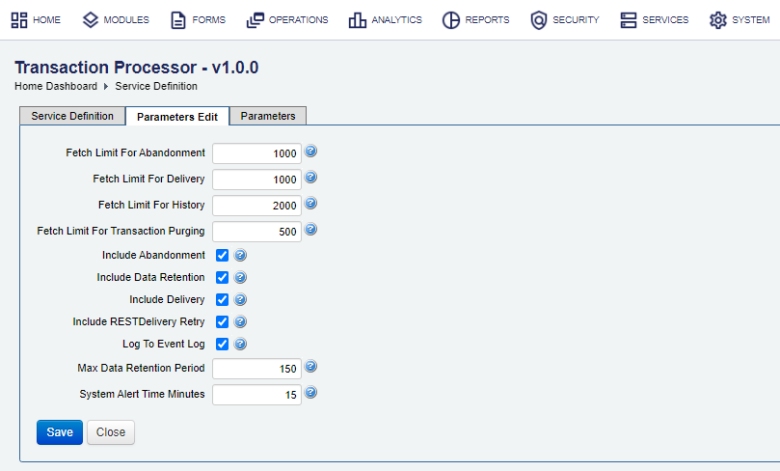
- Edit the maximum number of records to consider for each abandonment type in the Fetch Limit For Abandonment field. The default is 1000.
- Edit the the maximum number of records to consider for each delivery type (normal vs abandoned submission delivery) in the Fetch Limit For Delivery field. The default is 1000.
- Edit the maximum number of records to process for transaction history creation in the Fetch Limit For History field. The default is 2000.
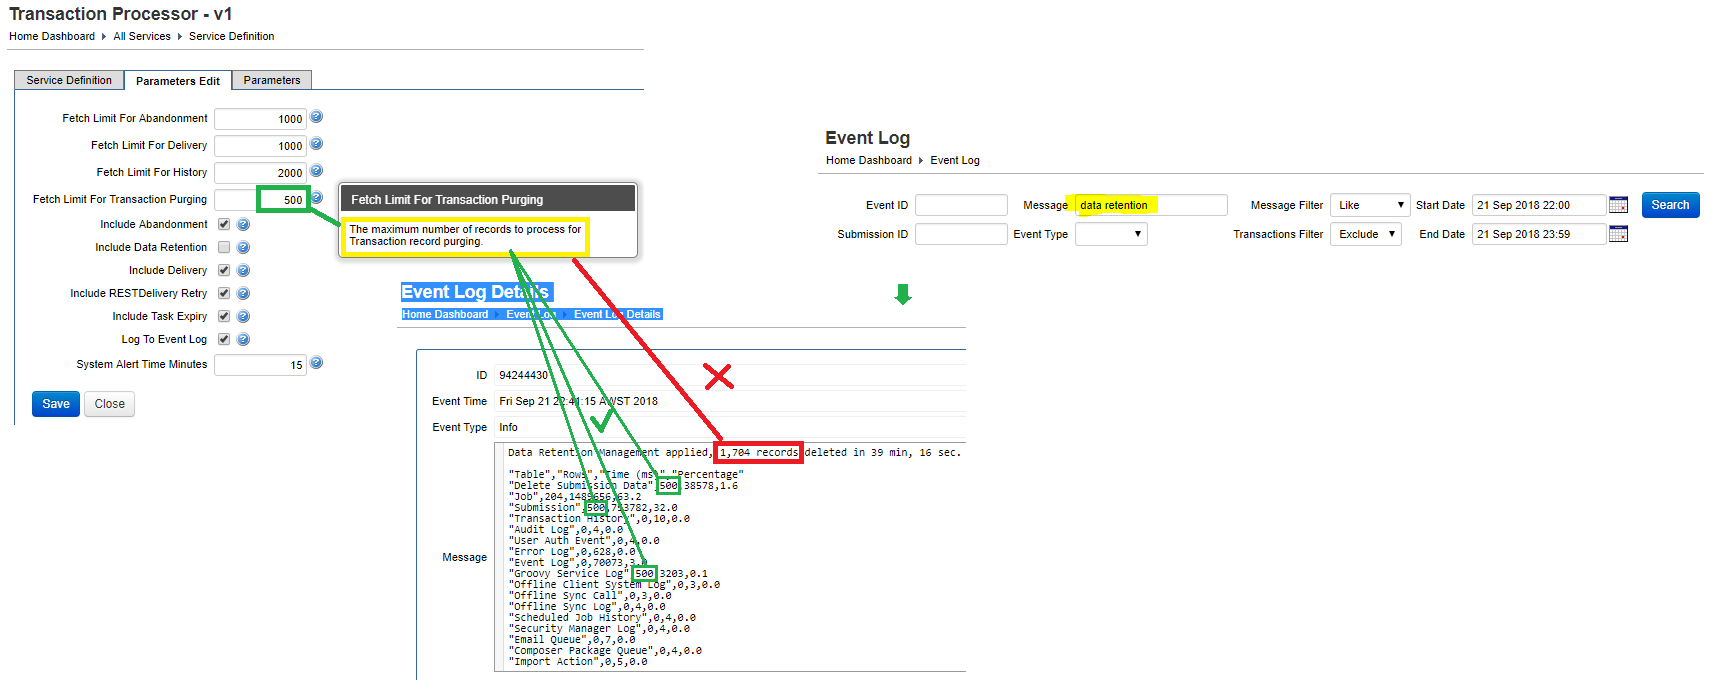
- Edit the maximum number of items to be purged per each category: submissions, collaboration jobs, transaction history, error logs, and so on in the Fetch Limit For Transaction Purging field, which is. The default is 500.
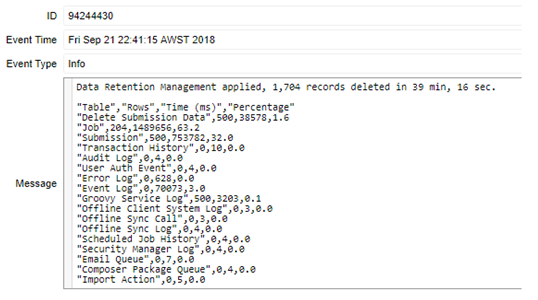
It is important to understand that, for each category, the full hierarchy is purged. This means that:
- For a submission - all related error logs are purged.
- For a collaboration job - all related submission are purged.
The fetch limit only applies to the top level of the category. So in the example of submissions, 500 independent submission may be purged, but if collaboration jobs are purged, then the actual number of submission will be higher.
Open the event log and search for events using data retention key word to see the actual number of purged transactions of each category, as shown below.

This is also illustrated below.

- Select the Include Abandonment checkbox to turn on the abandonment process. It is selected by default.
Note If you clear this checkbox, transactions that should be abandoned will not be processed.
- Select the Include Data Retention checkbox to turn on the data retention process, which executes the Data Retention Management service. It is selected by default.
Note We don't recommended turning off data retention as no data will be purged. However, you can do it for a short period of time to troubleshoot transaction processing issues.
- Select the Include Delivery checkbox to turn on the delivery process. It is selected by default.
- Select the Include RESTDelivery Retry checkbox to turn on delivery. It is selected by default.
- Select the Include Task Expiry checkbox to turn on task expiry. It is selected by default.
Note If you clear this checkbox, transactions that should be expired will not be processed.
- Select the Log To Event Log checkbox to log the results of the transaction processing to the event log.It adds two entries to the event log - one for the Transaction Processor and one for data retention, which includes timing information relating to the performance of the operations. It is not selected by default.
Note Disable logging unless you need to troubleshoot transaction processing issues.
- Edit the maximum period of time, in seconds, allocated for data retention purging in the Max Data Retention Period field. The default is 150 seconds. This allows the Transaction Processor to limit the amount of time it spends on data retention processing. That is, when purging takes longer than expected, the Transaction Processor will stop, move onto other tasks, and continue at a later time. This ensures that purging data does not affect other parts of the Manager system. | 18.11 This feature was introduced in 18.11.
- Edit the number of minutes that the system monitoring job will use when determining whether system alerts need to be raised about the transaction processing service in the System Alert Time Minutes field. The default is 15 minutes.
- Click Save to update the changes.

Next, learn how to view core global services.