Transaction Status
Journey Manager (JM) The transaction engine for the platform. | System Manager / DevOps | 18.11 This feature was updated in 18.11.
Manager allows you to check and modify a status of a transaction, so you can correct a transaction flow. When Manager creates a transaction, it assigns it a status based on the current progress of the transaction.
To check a transaction status:
- Select Operations > Form Transactions.
- Locate a transaction and click View.
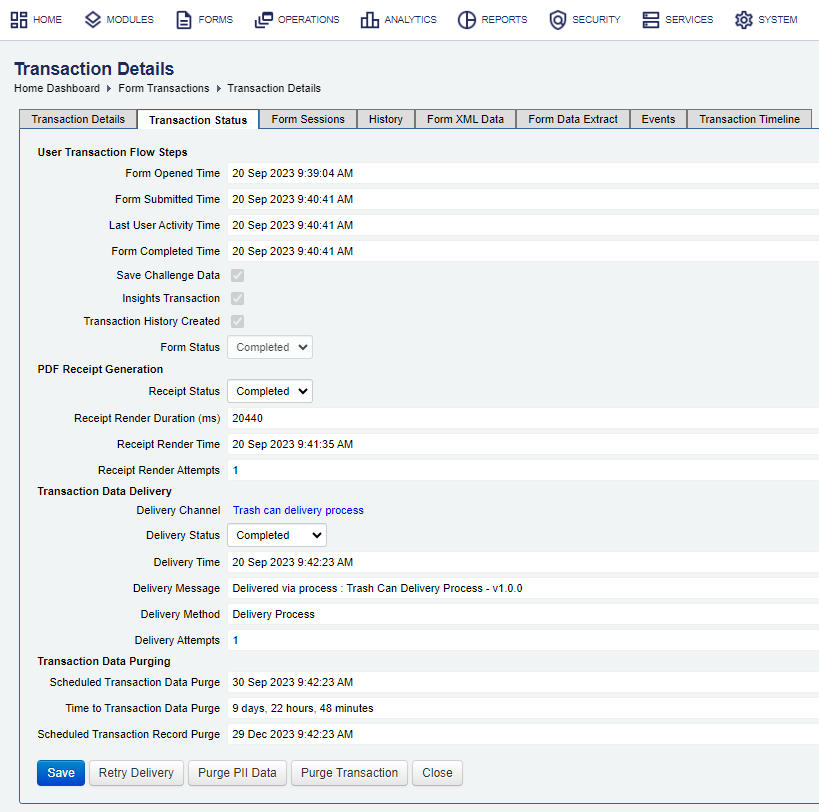
- Select the Transaction Status tab to view relevant form's, receipt's, and delivery's properties that depend on a current status of a form.
A different set of properties is shown for the same transaction as its status changes. This is illustrated below:
- User Transaction Flow Steps
- This section lists the essential steps of a form's submission life cycle, including a form status that you can adjust depending on a transaction status as per the form transactions list.
- PDF Receipt Generation
- This section shows information relevant to a receipt generated for the form. If the receipt has not been generated, this section is not shown.
- Transaction Data Delivery
- This section shows details of a delivery process that is used to send transaction data obtained during form's submission.
- Collaboration Job
- This section shows collaboration job's details if a transaction is a part of a collaboration job. If the transaction is not part of a collaboration job, this section is not shown.
- Transaction Data Purging
- This section shows whether a transaction and its data have been purged or date when it will happen.
- The date and time when a form was opened in the Form Opened Time field.
- The date and time when the form was submitted or initially saved by the user in the Form Submitted Time field.
- The date and time of the form last activity, such as viewing or rendering, in the Last User Activity Time field.
- The date and time when the form was completed in the Form Completed Time field.
- The Save Challenge Data is selected for this form so users can resume form applications using the Save Challenge.
- Whether this is an Insights transaction in the Insights Transaction field.
- Whether the transaction history was created for this transaction in the Transaction History Created checkbox.
- Update the transaction status in the Form Status field with one of the following option available depending on the current transaction status:
Current Form Status Available Form Status Assigned Abandoned Opened Abandoned Saved Abandoned Submitted Abandoned Completed You can not change the Form Status Abandoned Saved Expired You can not change the Form Status - The PDF receipt status under the PDF Receipt Generator section, which can be one of the following:
- Ready: a receipt is waiting to be allocated to a receipt generator.
- In Progress: a receipt is in a receipt generator's queue.
- Completed: a receipt has been generated.
- Error: there is an error during receipt generation. A retry may fix it.
- Error - No Data: there is no XML data available to generate a receipt.
- Click a link in the Delivery Channel field to view the configuration of a delivery channel used by this transaction.
- The Delivery Status of the transaction under the Transaction Data Delivery section. You can manually update the delivery status of the transaction depending on the transaction type and its current status.
- Completed: a transaction has been successfully delivered, based on the configured delivery channel.
- Undeliverable: a delivery is not possible. Check the error logs for further details of the error.
- Not Ready: a transaction is not ready for delivery yet. This is the start state before a transaction has been completed by the user. Generally, the receipt render service will kick the transaction from this state to the Ready state when the receipt is rendered.
- Not Required: a delivery is not required. It may be that this form is part of a collaboration job and the delivery is to be handled separately say as a consolidation of the transaction details from all the associated forms.
- Ready: a transaction is ready to be delivered. A transaction will be marked as Ready until the delivery channel is processed, or it may remain marked as Ready if a delivery channel is not configured.
- In Progress: a delivery has been started but is waiting to be completed.
- Paused: a transaction delivery is paused. This transaction's status can be changed by some other means, for example by a Groovy Scheduled Task.
- Error: a transaction delivery has failed and is waiting to be retried.
- Sent Email: a secure email has been sent and now a transaction is waiting for the user to log in and process it.
- Pending: a transaction delivery is pending.
- The form's delivery time in the Delivery Time field.
- The Delivery Message field to see an additional information on how the form was delivered.
- What delivery method was used for this form in the Delivery Method field, for example, Delivery Process.
- How many delivery attempts it has taken to deliver a form in the Delivery Attempts field.
- Click a collaboration job number in the Collaboration Job field to view the collaboration job details. This is only applicable if this form is configured to be used with collaboration jobs.
- The collaboration job status in the Job Status field.
- If the Transaction Data Deleted checkbox is selected, then the PII data was purged.
- The Actual Transaction Data Purge and Scheduled Transaction Data Purge times tell you when the transaction was purged.
- The Scheduled Transaction Record Purge time to see when the transaction data record is due to be deleted.
For example, from the transaction details below we can tell that the PII data was purged (the Transaction Data Deleted is selected) a few minutes after it had been scheduled to be purged (the Actual Transaction Data Purge and Scheduled Transaction Data Purge). Also, the transaction data record is due to be deleted on 7 October 2024 (the Scheduled Transaction Record Purge).
Note that after 7 October 2024, this transaction along with its submission details will no longer exist. Only a transaction history record remains, which contains some details about the transaction.

- Click Abandon to mark a transaction to be purged. For more information, see Abandon a Transaction.
- Click Retry Delivery to retry a form delivery for completed forms where delivery has not been completed and submission data is available. Attempts to deliver the submission to the current delivery details set up in the form. This can be used to retry delivery, for example, after changing delivery details. For submissions with email delivery, this action can also be used after delivery has been completed.
- Click Purge PII Data to purge only PIIPersonally Identifiable Information (PII) is information about an individual that can be used to distinguish or trace an individual‘s identity, such as name, social security number, date and place of birth, mother‘s maiden name, or biometric records; and any other information that is linked to an individual.
In Europe, PII is known as personal data. data of this transactions. Active transactions will be abandoned, if they are not already abandoned. | 18.11
This feature was introduced in 18.11.
Note This action is not available if the transaction is a part of a collaboration job, such as a review task, and the transaction PII data has been purged from the system.
-
Click Purge Transaction to purge this transaction immediately. Active transactions will be abandoned, if they are not already abandoned. | 18.11
This feature was introduced in 18.11.
Note This action is not available if the transaction is a part of a collaboration job, such as a review task, and the transaction PII data has been purged from the system.
Tip You can purge PII data and transactions in bulk.
- Click Save to update the changes.
Note This action is not available if the transaction PII data has been purged from the system.
Transaction properties are grouped into the following sections:
User Transaction Flow Steps
Check the following properties:
PDF Receipt Generation
Check the following properties:
Transaction Data Delivery
Check the following properties:
A delivery status can be one of the following:
Collaboration Job
Check the following properties:
Transaction Data Purging
Check the following properties:
You can use Fluent API to retrieve transaction status details, for example, a transaction's Last User Activity Time.
import com.avoka.tm.query.*

def txn = new TxnQuery()
    .setTrackingCode("1234567") // change for your transaction
    .firstValue()

txn.timeUserLastModified
Next, learn how to track submissions.