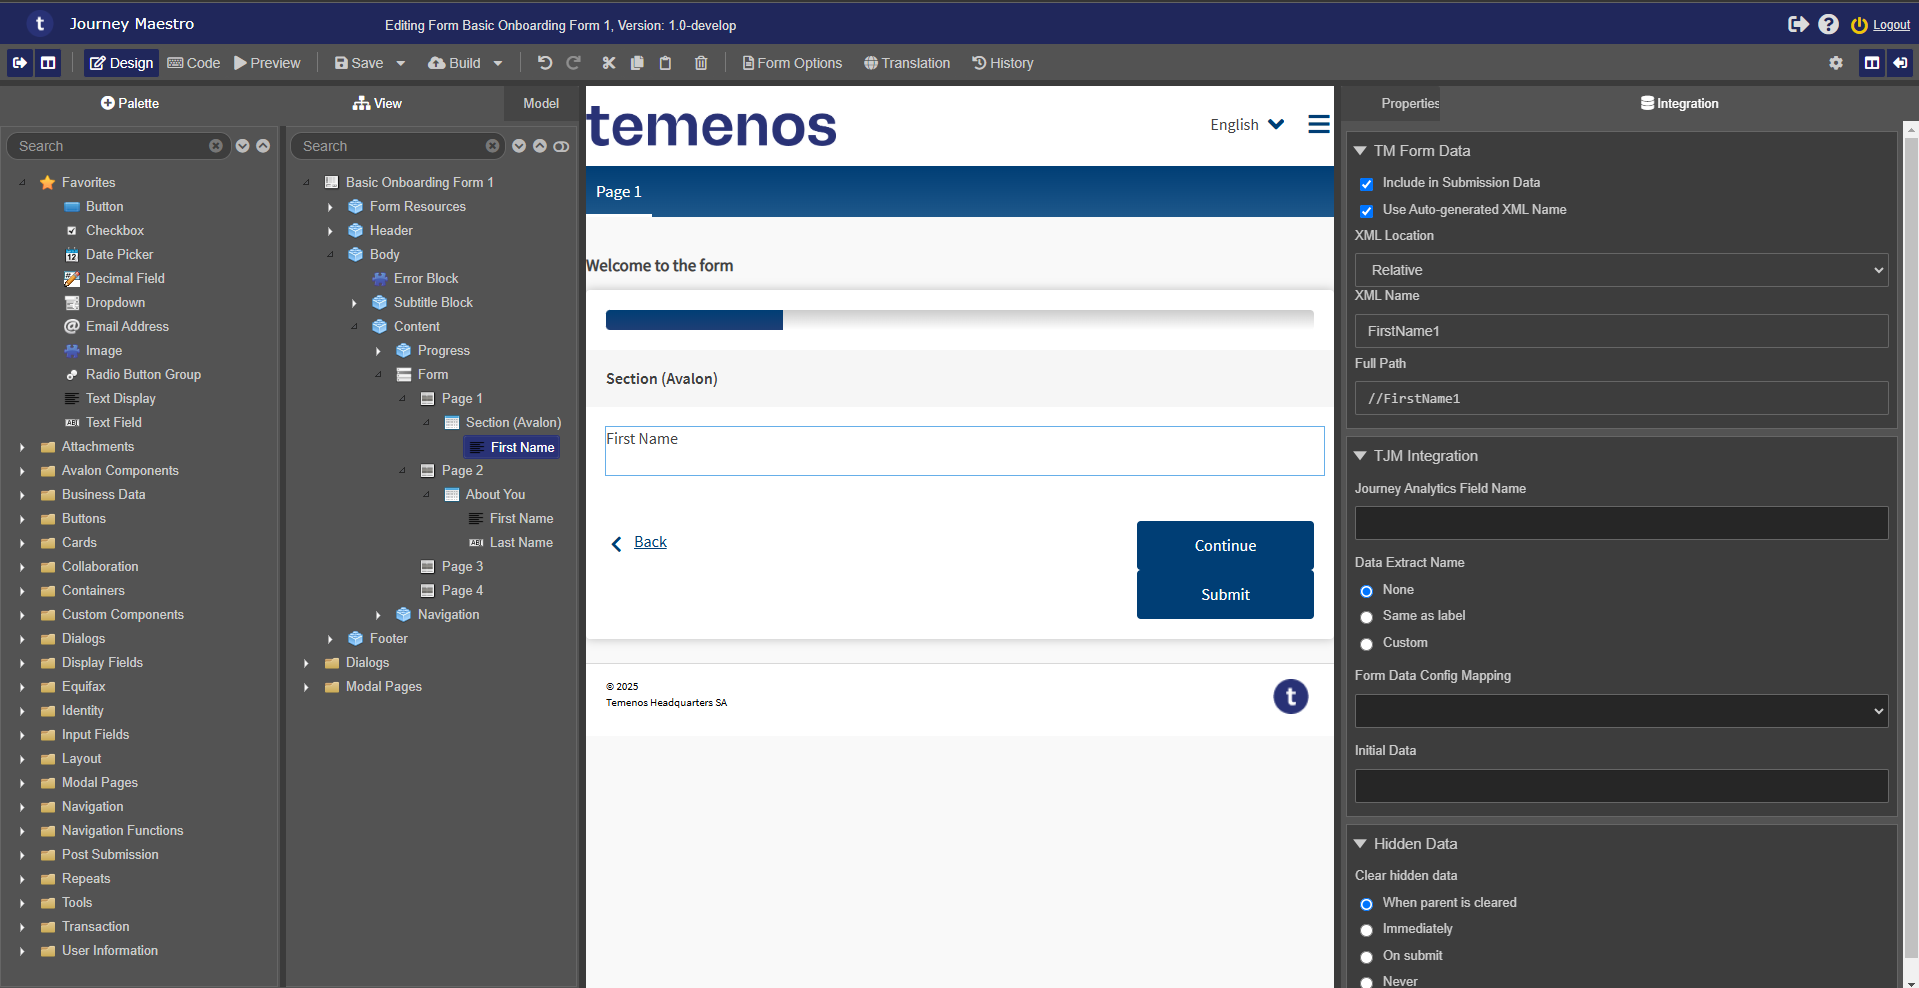
Integration Pane
MaestroThe UI design product. | Form Builder | 18.05 This feature was updated in 18.05.
The Maestro editor comes with the Integration pane that allows you to configure how a form can be integrated with other various modules of the Temenos Journey Manager, mainly Journey Manager.
Prior to Maestro 17.10, the Integration pane was known as the Data pane, which included Field Reference ID that is now called ID and resides in the Properties tab.
To configure a form or a template in the Integration pane:
- Open a form or a template in the Maestro editor and select the Integration tab to see the integration options.

The Integration pane is broken down into the following sections:
- TM Form Data
- Transact Integration
- Hidden Data
- Select the Include in Submission Data checkbox to include the component's data in the submission XML.
Note Clear the Include in Submission Data checkbox to adjust the relative positions of the component and all its children but keep them in the submission data.
- Select the Use Auto-generated XML Name or the Use Entity XML Path checkbox to generate the XML Location, XML Name and Full Path properties based on the ID of the component, for example,
//AboutYou/FirstName.Clear the Use Auto-generated XML Name or the Use Entity XML Path checkbox to edit the XML Location, XML Name and Full Path properties manually,Note You can't see this option unless the Include in Submission Data checkbox is selected.
Note If the selected component is associated with an entity, for example,
aboutYou_firstName, the Use Entity XML Path option is shown instead of the Include in Submission Data option. - Select an XML location of the component from the XML Location dropdown list, which can be one of the following:
Note You can't see this option unless the Include in Submission Data checkbox is selected.
You can't edit this option unless the Use Auto-generated XML Name or the Use Entity XML Path checkbox is selected.
- Relative - when the component is dragged between sections and blocks, it assumes a hierarchy relative to its location and thus break the data model enforcement.
- Absolute - to guarantee the location of the XML data upon submission of the form, you must ensure that in all cases, other than inside repeating elements, where the component is not associated with an entity, that the XML location is set as Absolute.
- System Data - to place the data element in the SFMData/SystemProfile section of the XML.
- Not Stored - to remove the component and all its children from the XML. This is mainly useful for container elements.
Note If you want to readjust relative positions of the component and all its children without removing them from the submission XML, clear the Include in Submission Data instead.
If you want to exclude the component from both the submission XML and the form HTML layout, select the Exclude checkbox in the Properties tab.
- Define a custom XML name for the component in the XML Name field, which can be a single level name, for example,
FirstName, or you can create additional structure in the XML using a two-level name, such aspersonalDetails.FirstName orpersonalDetails/FirstName.Note You can't see this option unless the Include in Submission Data checkbox is selected.
You can't edit this option unless the Use Auto-generated XML Name or the Use Entity XML Path checkbox is selected.
You can't edit this option if the Not Stored location is selected.
- View the complete XML path for the component in the Full Path field. This field is not editable.
Note You can't see this option unless the Include in Submission Data checkbox is selected.
- Provide a field name in the Transact Insights Field Name field that is used for integration with Journey Analytics. If there are multiple fields in a form with the same label, for example, First Name, and the Insights Field Name is not set, Journey Analytics will combine the data for all fields with the same label.
Note By default, Journey Analytics captures data through the field label, if the Transact Insights Field Name field is not filled out with a unique identifier.
- Select a name of the submission data extract field in Journey Manager from the Data Extract Name, which can be one of the following:
- None: to exclude the component in the data extract. This is the default option.
- Same as label: to include the selected component in the data extract and it uses the component’s label name as the extract name, for example Save and Close, in the Manager.
- Custom: select this option to include the selected component in the data extract and provides a text field for you to enter a component name to be used in Manager. Enter a component name, for example, Save and Close.
For more information, see submissions data extract.
- Select one of the following options from the Data Extract Options section:
- Searchable: the whole data extract value can be used for as search criteria in the Manager. | 18.05 This feature was removed in 18.05
- Publish: is used by Collaboration Jobs in conjunction with the Subscribe option. This is an alternative mechanism to share data between tasks in a Form Bundle - Job Step.
- Subscribe: it consumes the publish event using the published value. This is an alternative mechanism to share data between tasks in a Form Bundle - Job Ste.
- Select a system value that is used in Journey Manager processes from the Form Data Config Mapping dropdown list, which can be one of the following:
- Contact Email
- Contact Phone
- Save Challenge
For more information, see create save challenge.
- Specify a default value to be displayed when the form is loaded in the Initial Data field.
Note You can't see this option unless the Include in Submission Data checkbox is selected.
You can't see this option if the selected component can't hold data.
- Select one of the following options from the Clear hidden data section to define whether data entered into a component is cleared when the component is hidden or not:
- When parent is cleared: use the parent's clearing rule.
- Immediately: as soon as the component is hidden. For repeat components, such as Repeat and Repeating Block Template, this will remove all elements from the repeat and not just clear the contents of the children. In case, you want to keep the structure of the repeating data but clear its elements, you need to create a JavaScript, which sets an instance count to 1 and clears the children, and add it to a
onChangerule for a radio button. - On submit: when the form is submitted.
- Never: don't discard the data regardless of the component's visibility. This is the default option.
- Click Save to update the changes in the form or the template.
TM Form Data
This section allows you to configure the data that is sent to Journey Manager. The configuration options vary depending on the data structure of a selected component. For more information, see form XML data payload.
Transact Integration
This section allows you to configure how default values are defined for a component and how to set up submission data extract mappings to be used in Journey Manager.
Hidden Data
This section allows you to configure the behavior of form data in an item when it is hidden by a visibility rule. The clear hidden data property only checks for visibility on the parent level of the component. It does not check for visibility on the children level of the component if this level is made visible. For the hidden data property to function correctly, the current block which contains the component in the form must be hidden.
Next, learn about the Code View.