Form XML Data Payload
MaestroThe UI design product. | Form Builder | All versions This feature is related to all versions.
Each Journey Maestro form has an XML data payload, which is the XML layer that represents data pertinent to a form as well as user's input into the form. This XML is used to pass data between Manager and a form application and for external systems integrations. The XML layer is created when you build a form when most components are added to the XML layer by default, except for pages, sections, blocks, and data fields. For more information, see data model overview.
The form XML data payload is an XML document with a flat structure that includes only components, but not the hierarchy they belong to. That is, when you add a component to a form, its ID is auto-generated in a way it's unique across the form. When you add another component, even with the same Label, its generated item's ID will be different. This is reflected in the form XML data payload.
Let's illustrate it with a form which has 2 TextFields - First Name and Surname - that are used in 2 different sections of the form - About You and Co-Applicant.
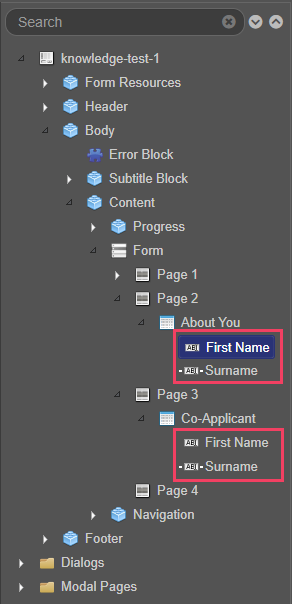
The default, an XML tag is based on the item's ID, which can't be the same in two different items. When adding the second First Name item, its ID is automatically set to firstName_1, which means its XML tag is //FirstName_1. The resulting form XML data payload looks like this:
<AvokaSmartForm>
   ...
   <FirstName/>
   <Surname/>
   <FirstName_1/>
   <Surname_1/>
   ...
</AvokaSmartForm>
Even though the Maestro editor never allows two items in the same form to have the same ID, the user can manually change the binding path for any item. However, care should be taken not to duplicate binding paths, as this can lead to data loss. For example, if you decide to change the binding path of the second item to //FirstName in the Integration pane, this will result in the duplicate bindings error message while building the form.
The Maestro editor allows you to check for duplicate data bindings as well as resolve them while in design mode.
The structure of the form XML data changes depending whether you set blocks to Include in Submission Data or not, which adds layers to the structure. In this example, we selected the Include in Submission Data checkbox of the About You and Co-Applicant Section components, so the new structure looks like this:
<AvokaSmartForm>
   ...
   <AboutYou>
       <FirstName/>
       <Surname/>
    </AboutYou>
    <Coapplicant>
        <FirstName_1/>
        <Surname_1/>
    </Coapplicant>
   ...
</AvokaSmartForm>
If you would like to have the second elements as FirstName and Surname as well, they just have to be in different parents inside the XML, namely a binding path of //AboutYou/FirstName and //Coapplicant/FirstName. In this case, the XML structure is shown below:
<AvokaSmartForm>
   ...
   <AboutYou>
      <FirstName/>
      <Surname/>
   </AboutYou>
   <Coapplicant>
      <FirstName/>
      <Surname/>
   </Coapplicant>
   ...
</AvokaSmartForm>
Also, you can easily achieve this by using entities so the item's ID are like these AboutYou_FirstName and Coapplicant_FirstName, which is the easiest way to handle this binding.
Next, learn about component data binding.