MaestroThe UI design product. |
Template Designer | 21.11
This feature was updated in 21.11.
Maestro allows you to create and add new form options to a template. Usually, a Template Designer creates form options with some default values in a template and group them logically under various categories, so a Form Builder can easily find them. Then, when a form option is not needed any longer, a Template Designer can delete it.
When you create a new form option in a template, Maestro adds it to a template JSON file.
Note
Compare this to brand's Item Properties where you can set component's properties differently for each brand.
Add Properties
To add a component's property to Form Options in a template:
Select a component in the Design mode and click the Properties tab.
Right click on a non-rules property you want to add, for example, Label or Hide Section Header, and select Add to Form Options.
For rules properties, right click on the Create Rule button and select Add to Form Options.
Note
You also have a choice of adding a component's property to brands. However, if you've already added the property to Form Options, you can't add it to brands. You must remove it from Form Options first.
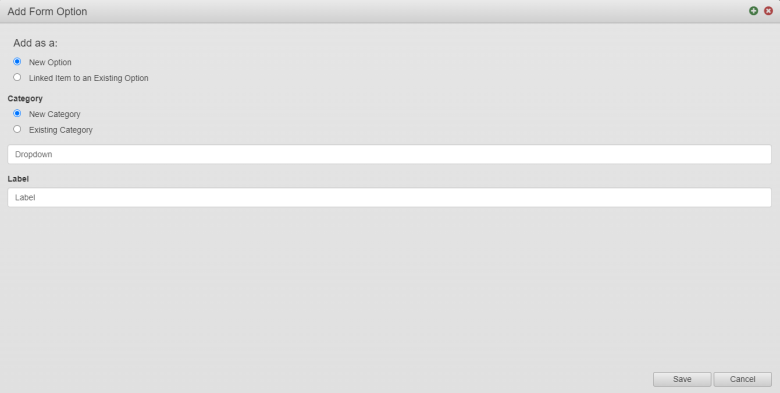
Select how you want to add a property from the Add as a radio button group:
New Option to add as a new property. You can use this option in most cases.
Linked Item to Existing Option to add as linked to an existing property and then select an existing property from the Select Existing Option dropdown list. You can use this option if the property you are adding needs to be linked to another property that has already been added, for example, an image component used to show the logo in the form might have the Image property linked to other instances of the image component used to show the logo on modal pages. This allows you to create 1 form option which will update the property of multiple components.
Select a category to use for the property from the Category radio button group:
New Category to create a new category for the new property and type a category name in the field.
Existing Category to add a new property to the already existing category and then select an existing category from the dropdown list.
Note
Different templates may have different categories to group form options.
Note
Adding categories help you group and navigate properties, especially, when there are many of them.
Type a name for the property in the Label field.
Select the Inverted Data checkbox to turn a negative property into a positive option. For example, if you add the Exclude property (which is a negative) to Form Options, you could select Inverted Data which would turn it into an Include option from within the Form Options window.
Click Save. The property is added to Form Options, where you can edit it.
Click Save in the Maestro toolbar to save the template.
Click Publish to make the template changes to be available to forms that use it.
Note
The template changes may not be available to a forms depending on where the extension points are in the template - anything that's inside the extension point (that can be changed in the form) can't be updated by the template
Remove Properties
If a property has already been added as a form option, then you'll have the option to remove it. The default Avalon and Maguire templates have form option created for you, so you can only remove them, not to add them.
Note
When you delete a form option, Maestro removes it from the template JSON file.