Shared Organization Library
MaestroThe UI design product. | Form Builder | 20.11 This feature was introduced in 20.11.
Journey Maestro allows you to create and use libraries containing forms resources, such as components, within a single or across multiple Maestro environments. Each library has a scope or a library level that determines which forms have access to that library's resources. Maestro always has 3 library levels - release, organization, and project libraries.
Maestro version 20.11 has introduced a concept of shared organization libraries, which are centralized organization libraries that can be shared across other organizations. They can even be shared across all organizations in an environment making these libraries global. The shared library is then used by projects within these organizations. From the client's source project, a shared library is similar to a release library with a fine grained control over where this library is shared and used. One of the main advantages of a shared organization library is that you can develop a new library in your own specific organization, make some changes to it and push the changes to other organizations and projects where the library is used.
Shared organization libraries can be used as:
Shared
One client that has multiple organizations wants to share assets across one or more of those organizations. Your company has different business units that each use a different Maestro organization. You are developing and maintaining common components that can be used by all business units.
Global
A site administrator wants to share assets globally across all organizations. You run a Maestro multi-tenanted environment and want to provide your clients with common templates that are centrally maintained.
Shared organization libraries provide the following functionality:
- Share a tagged organization library with one or several other organizations
- Share a tagged organization library globally
- Allow organizations to manage the use of shared libraries in their projects
- Allow projects to manage the use of shared libraries in their project library list
- Restrict removal of libraries that are in use
- Add new permission levels to share and un-share libraries. If you have access to an organization that the library has been shared with, then you can access the library when the form editor loads.
When you can use the offline build tool, which supports non SCM projects, with shared and global organization libraries, a client will download them and use them within the build. Thus, sharing libraries needs to be carefully considered, so people don't get libraries that shouldn't have been shared with them.
How to Share Organization Libraries
You can use a separate organization where you develop libraries you want to share. Then, you tag them and share as required.
You can share only tagged read-only organization libraries.
You can't share a library with the source client.
To share a library:
- Open an organization, in this example it is Shared Libraries Demo, where you develop libraries you want to share.
- Select a library. This can be a library of components, for example, the second-components.
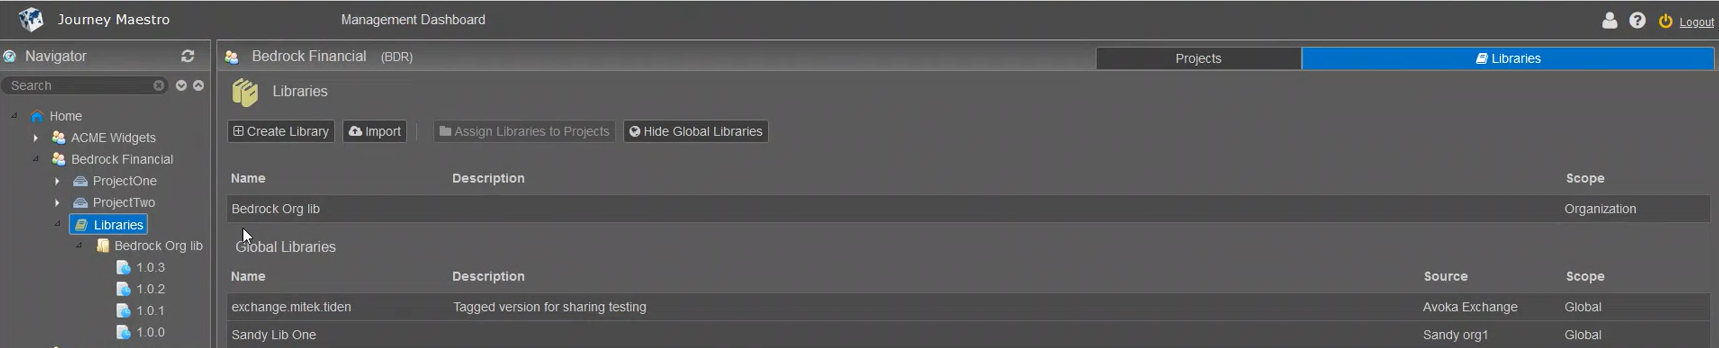
- Open an organization you want to share this library with, for example, Bedrock Financial.
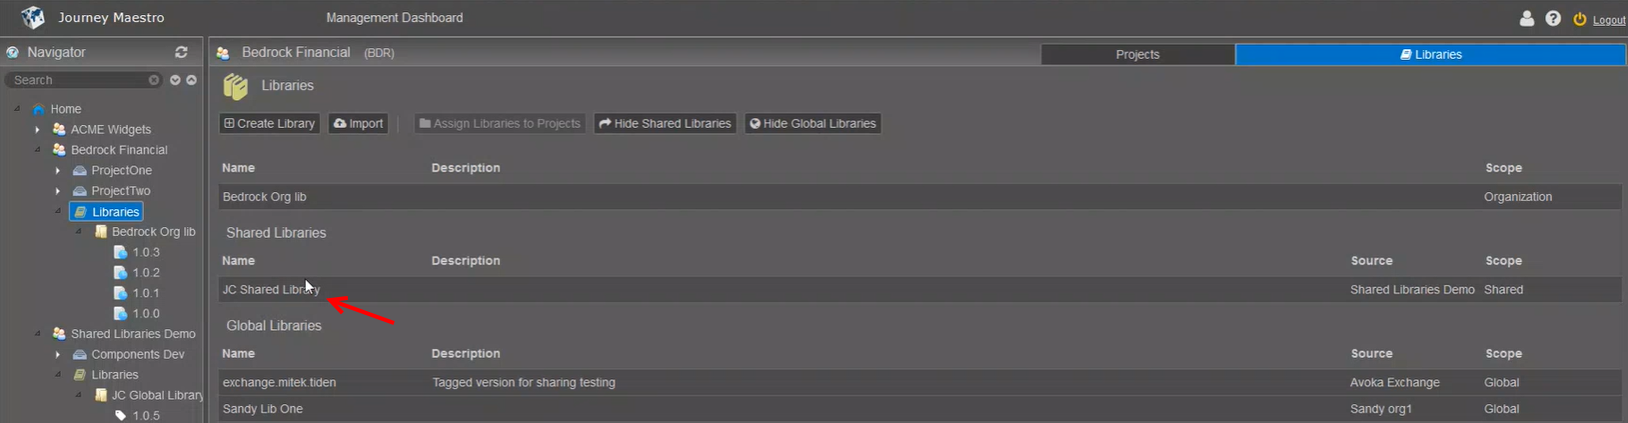
- Select the organization's libraries to view all libraries used by this organization. In this example, there are 2 global libraries but there are no shared libraries in the list.
- Open the Shared Libraries Demo > Libraries and select your library to share, for example, JC Shared Libraries.
- Select a version of a library you want to share with the Bedrock Financial organization, for example, version 1.0.2.
- Tag the library, so it becomes read-only making it more secure to share.
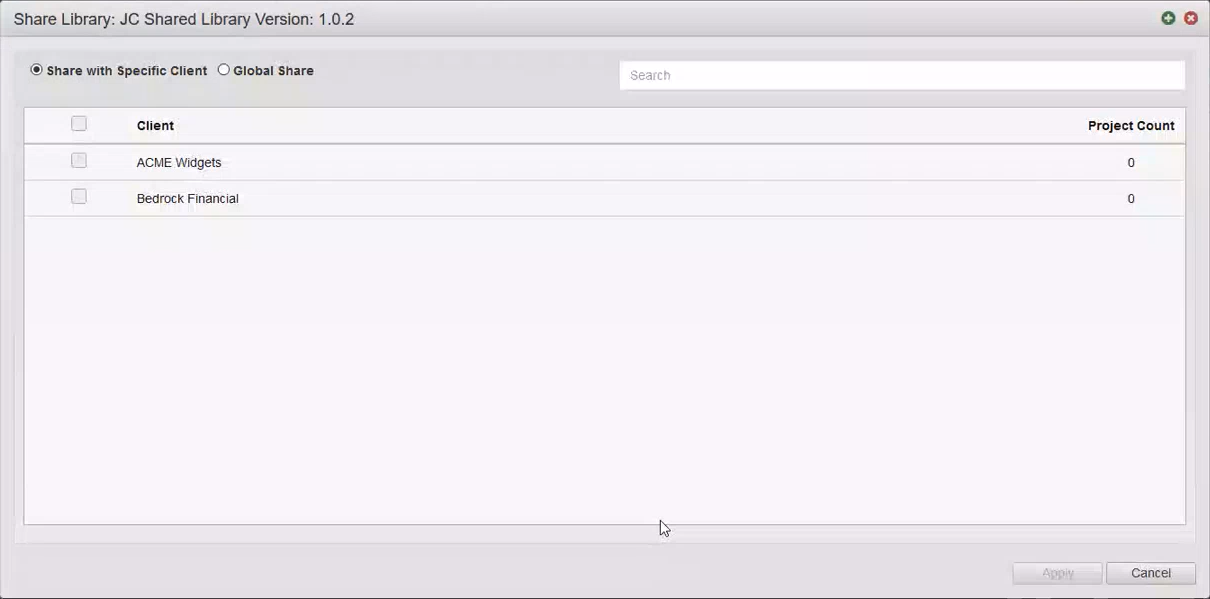
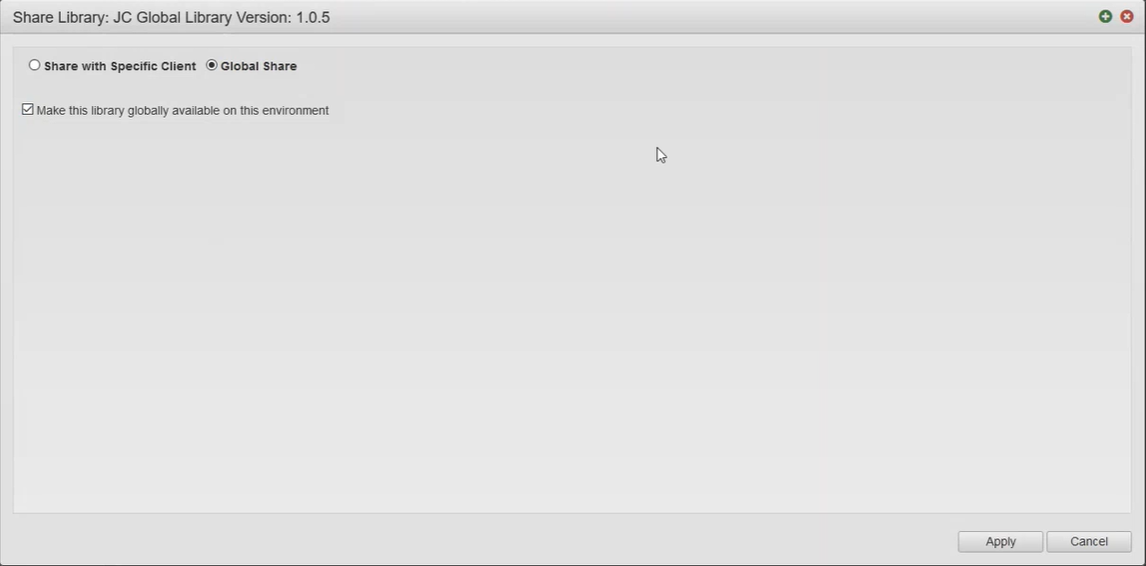
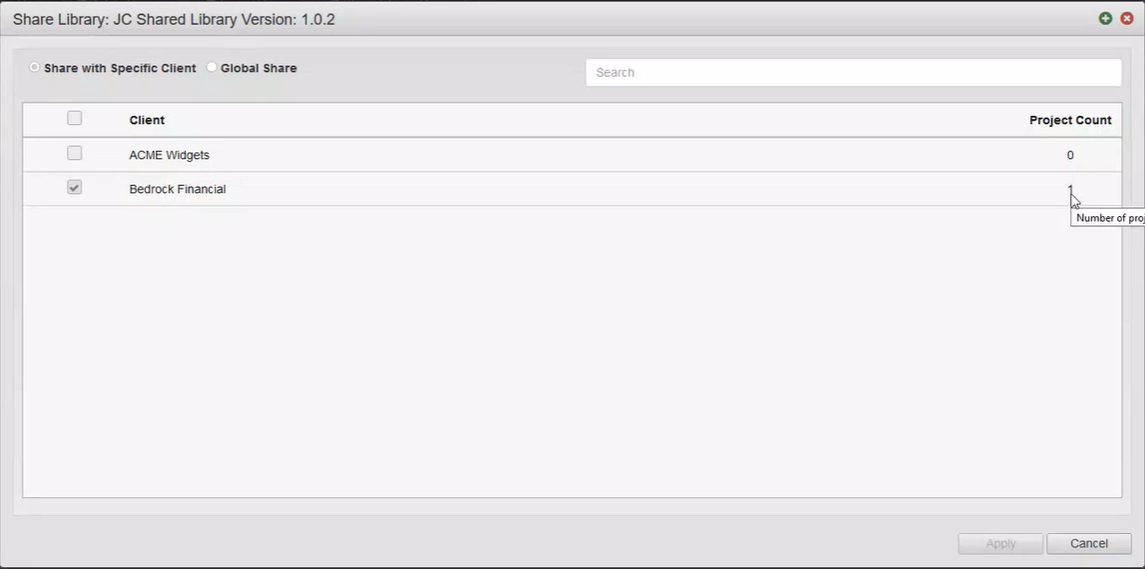
- Click Share Library Version to specify how and with whom to share the library.
- Select the Share with Specific Client option to share with specific organizations.
- Select one, several, or all organizations from the Client column to share the library with. Use the search bar to look for organizations you want to share the library with, for example, Bedrock Financial.
- Alternatively, select the Global Share option and select the Make this library globally available on this environment checkbox to share it with all organizations globally.
- Click Apply to share the library with the selected organizations.
Note You still need to assign the shared library to a project or projects under the selected organizations.
- Go back to the Bedrock Financial organization and select Libraries to check the new shared library is added to the list of available libraries.
- Click Assign Library to Projects to choose projects to assign the library to.
- Select a library from the dropdown list, for example, JC Shared Library 1.0.2.
Note Select Library Not Used to un-assign the library.
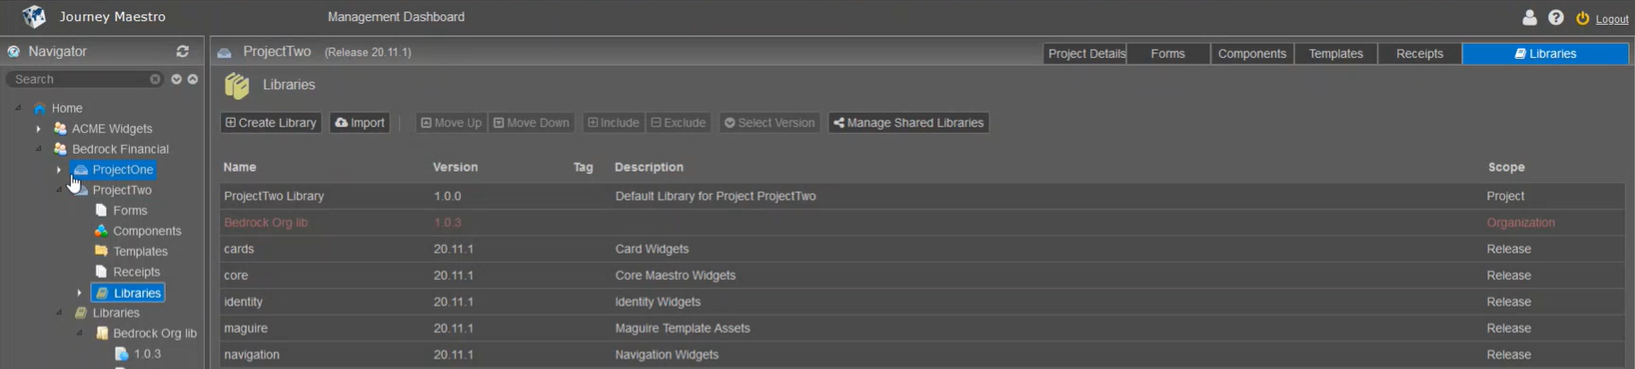
- Select a library version from the Version dropdown list for a project you want to share it with. For example, select version 1.0.2 for ProjectTwo.
- Select the Include checkbox to include this library.
- Click Next to review the changes and confirm the sharing options.
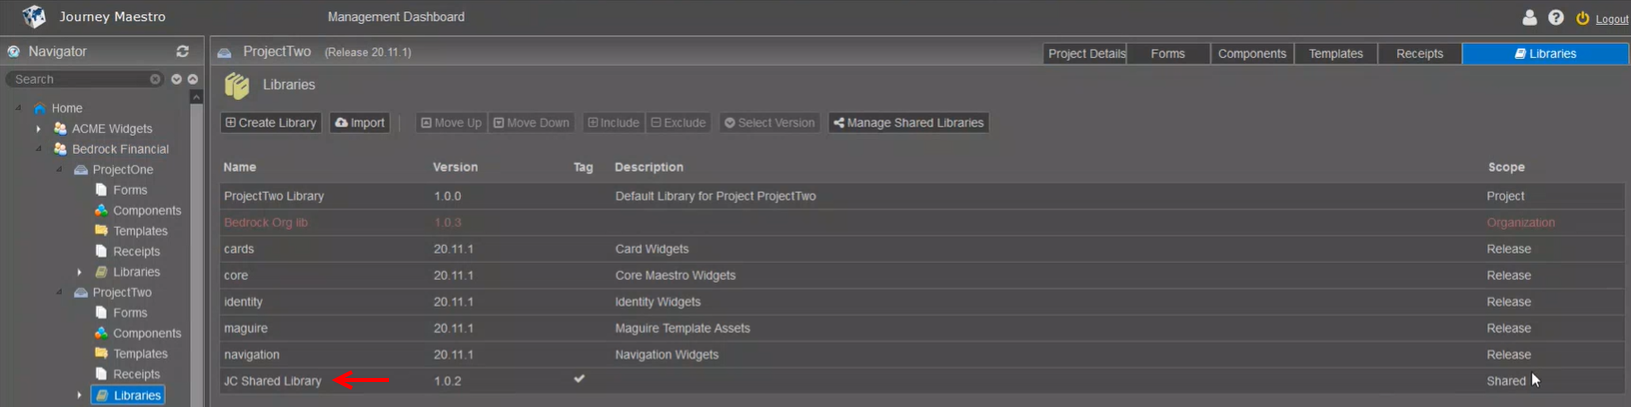
- Click Apply to assign the library to the project. Check the shared library is added to the list of available libraries of this project.
- Drag and drop the JC Shared Library to change its order in the list of libraries. Alternatively, you can scroll through the list using the Move Up and Move Down buttons.
- Open the Shared Libraries Demo > Libraries > JC Shared Libraries and click Share Library Version to see in how many projects it is used.
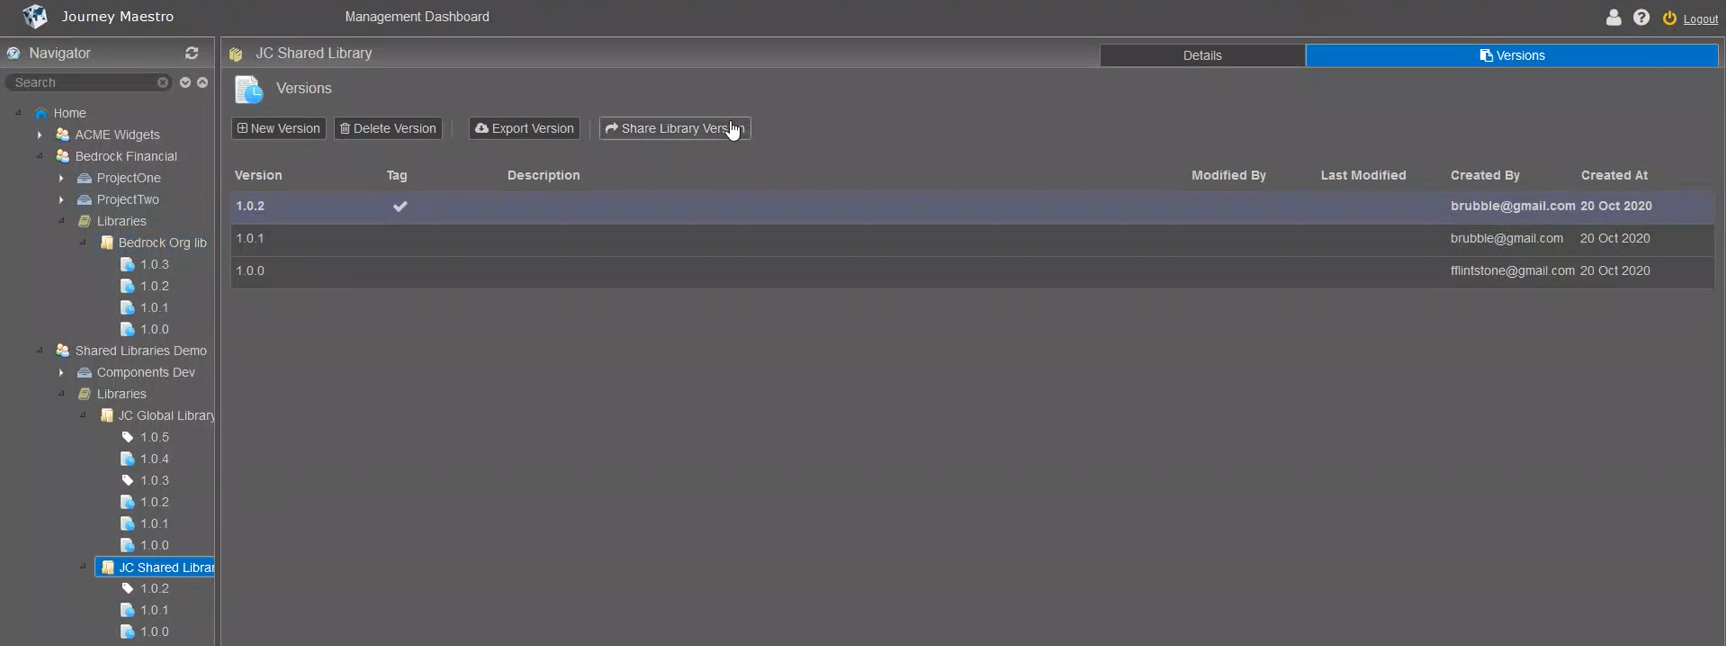
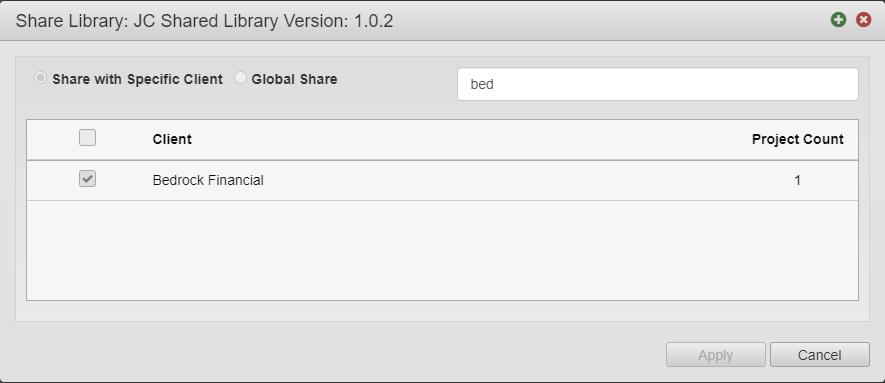
You can see the number of projects that use this shared library in the Project Count column. In this case, there is only 1 project that uses it.
This means the JC Shared Library can be used in this organization, but it still needs to be assigned to projects. You can open a project, for example, ProjectTwo, and select Libraries to see that this shared library is not in there yet.
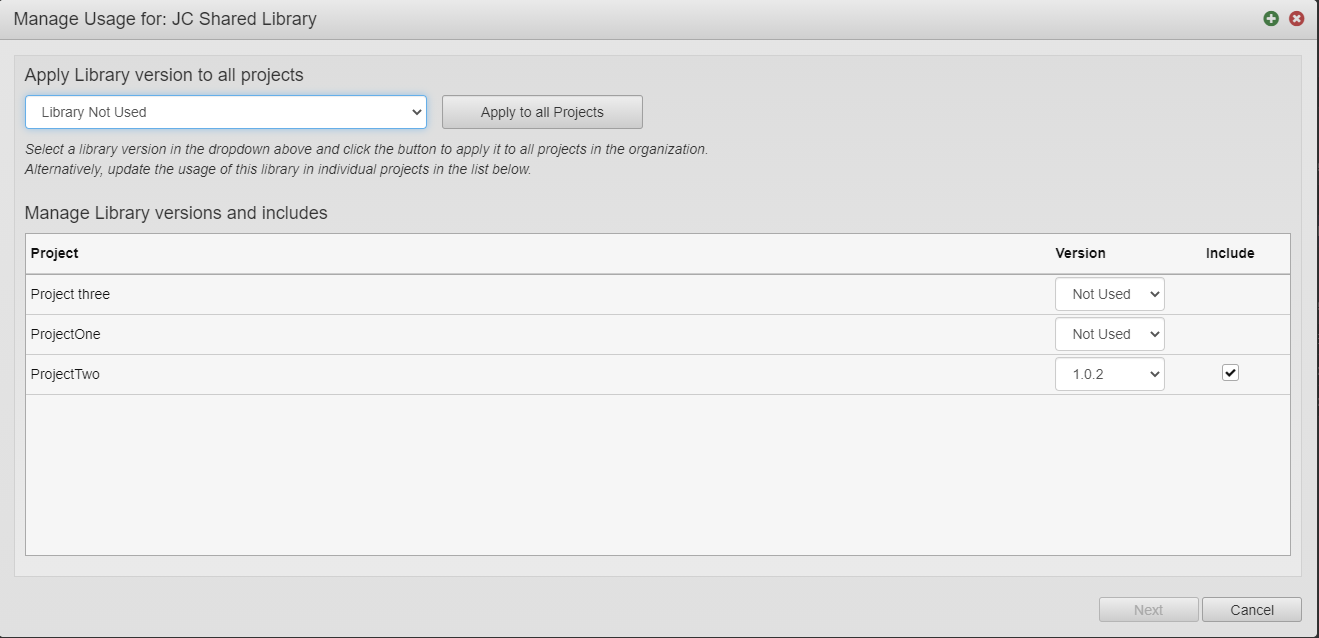
If you want to assign the library to all projects in the list, click Apply to all Projects.
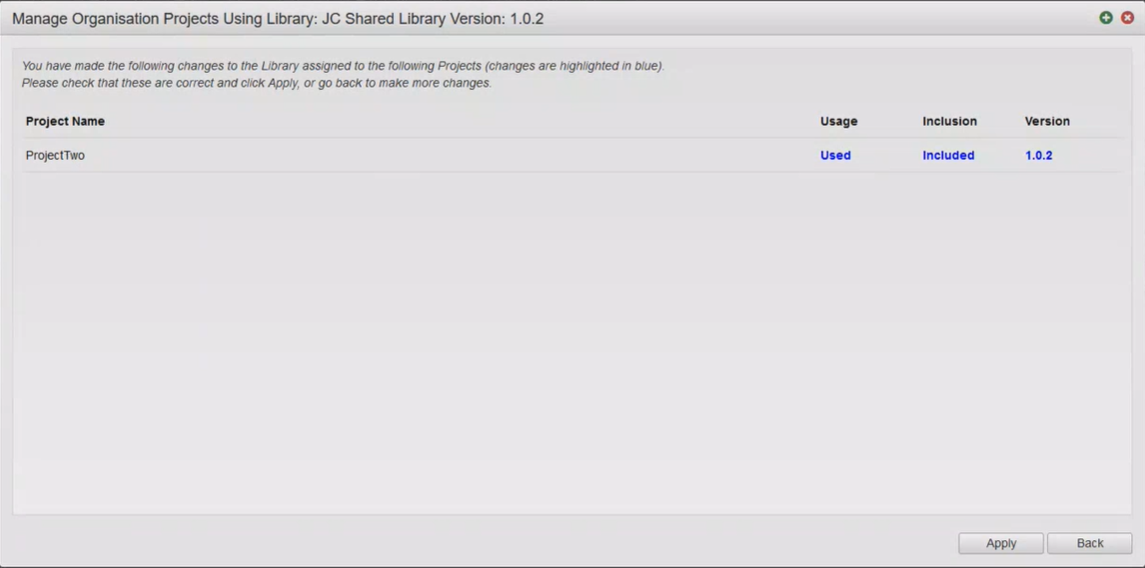
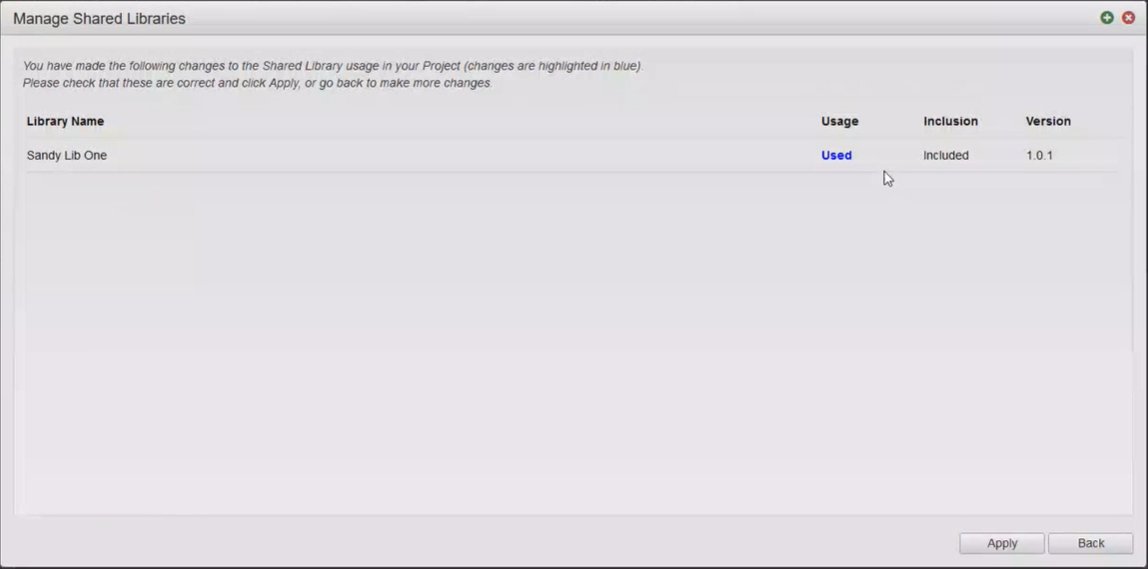
The changed libraries are shown in blue.
Now, you have a centralized shared library that is shared across the Bedrock Financial organization and it's applied to a project library, so you can use the library in your forms.
You can't remove the shared library from the organization by clearing the checkbox if there are projects within this organization that use it. You need to remove it from the projects first.
Manage Shared Organization Libraries
To manage shared libraries with individual projects:
- Open an organization.
- Select a project and click Libraries.
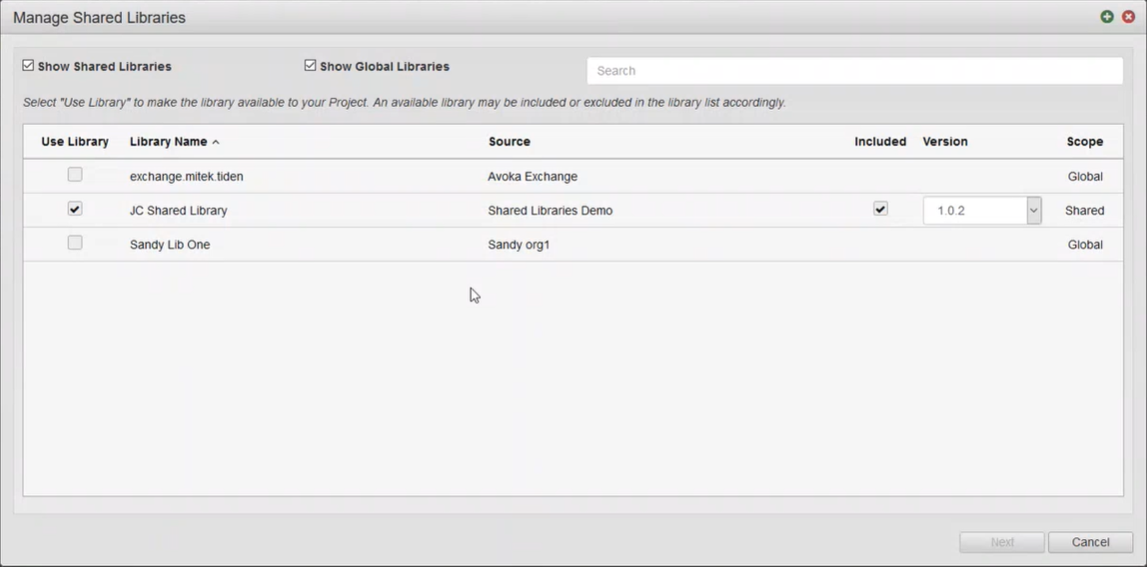
- Click Manage Shared Libraries to manage shared libraries from the project.
- Select the Show Shared Libraries and Show Global Libraries checkboxes to filter the list of shared libraries.
- Select the Use Library checkbox to make use of a shared library.
- Check the name of the library in the Library Name column. Different shared libraries can have the same names, so check the Source column to see where the library is coming from.
- Select or clear the Included checkbox to include or exclude a shared library.
- Select a library version from the Version dropdown list.
- Check the scope of a shared library in the Scope column, which can be:
- Global - Any new organizations created after that will inherit this shared (global) library. You can check the scope of the lib is set to global to confirm this lib is globally shared.
- Shared
- Click Next to review and confirm the changes you have done to the library configuration.
- Click Apply.
- Check the shared library configuration changes in your project.
Exclude Shared Organization Libraries
To exclude the shared library:
- Open an organization
- Select a project and click Libraries.
- Select a shared library and click Exclude. Th.e excluded library doesn't move down the library list, as it used to do prior to this release.
Un-share Global Organization Libraries
As discussed above, you can share organization libraries across all organizations, which makes them global libraries. Sometimes you need to un-share them. Un-sharing when it is shared with specific clients is about unticking the checkboxes in the list, libraries that are included in projects will be read-only until no more projects have them included, if they are excluded then they can be unshared. However, you can't un-share a library with specific clients that you don't have access to.
To stop using the global organization library:
- Open an organization.
- Select a project and click Libraries.
- Click Share Library Version.
- Select the Global Share option.
- Clear the Make this library globally available on this environment checkbox to remove shared library from all organizations.
- Click Apply.
You can't un-share the global library if there are projects that use it. You need to remove it from the projects first.
Add Sharing Permissions
You need to have the following permissions set up in Manager to be able to share libraries:
- Library Share
- Library Share Global
When you add sharing permissions to users on multi-tenanted Maestro environments, make sure users can't and don't share content between competitor organizations as it may cause leaks or conflicts of intellectual property.
To add the permissions:
- Log onto Journey Manager.
- Assign the following permissions to a role you use to develop or administer Maestro forms.
- Library Share - most developers can have this permission.
- Library Share Global - only admins, for example, the Maestro Global Lib Admin role, should have this permission, because incorrectly shared library can cause leak of intellectual property.
Next, learn about library versions.