Receipt Headers and Footers Customization
Journey Manager (JM) The transaction engine for the platform. | System Manager / DevOps | | 17.10 This feature was introduced in 17.10.
Manager allows you to add and customize headers and footers of a form's receipt, which can be a PDF file. The headers and footers may include static content, such as HTML, as well as dynamic data extracted from the form, such as tracking codes. There are several steps you need to follow to enable and customize the receipt.
Enable a Render Receipt Service
To customize the headers and footers for a receipt, you must select a relevant Render Receipt service, such as the Dynamic PDF Receipt 2 service, for the form version you're working with. This is not to be confused with the legacy Dynamic PDF Receipt service which has fewer customization options.
To enable the Render Receipt service:
- Open a form version in Manager.
- Select the Services tab.
- Select Dynamic PDF Receipt 2 from the Receipt Render Service dropdown list. For more information, see Form Version Services.
- Click Save to update the changes.
Now, all PDF receipts of this form will be generated using this service. You won't, however, notice any difference from the default receipt generation until the receipt's properties are modified.
Update Receipt Properties
When the Dynamic PDF Receipt 2 service is enabled, there are several default properties defining the default behavior of the service. However, you can always override them to implement your specific design of headers and footers.
To override the properties:
- Navigate to a form version's Properties tab and click New.
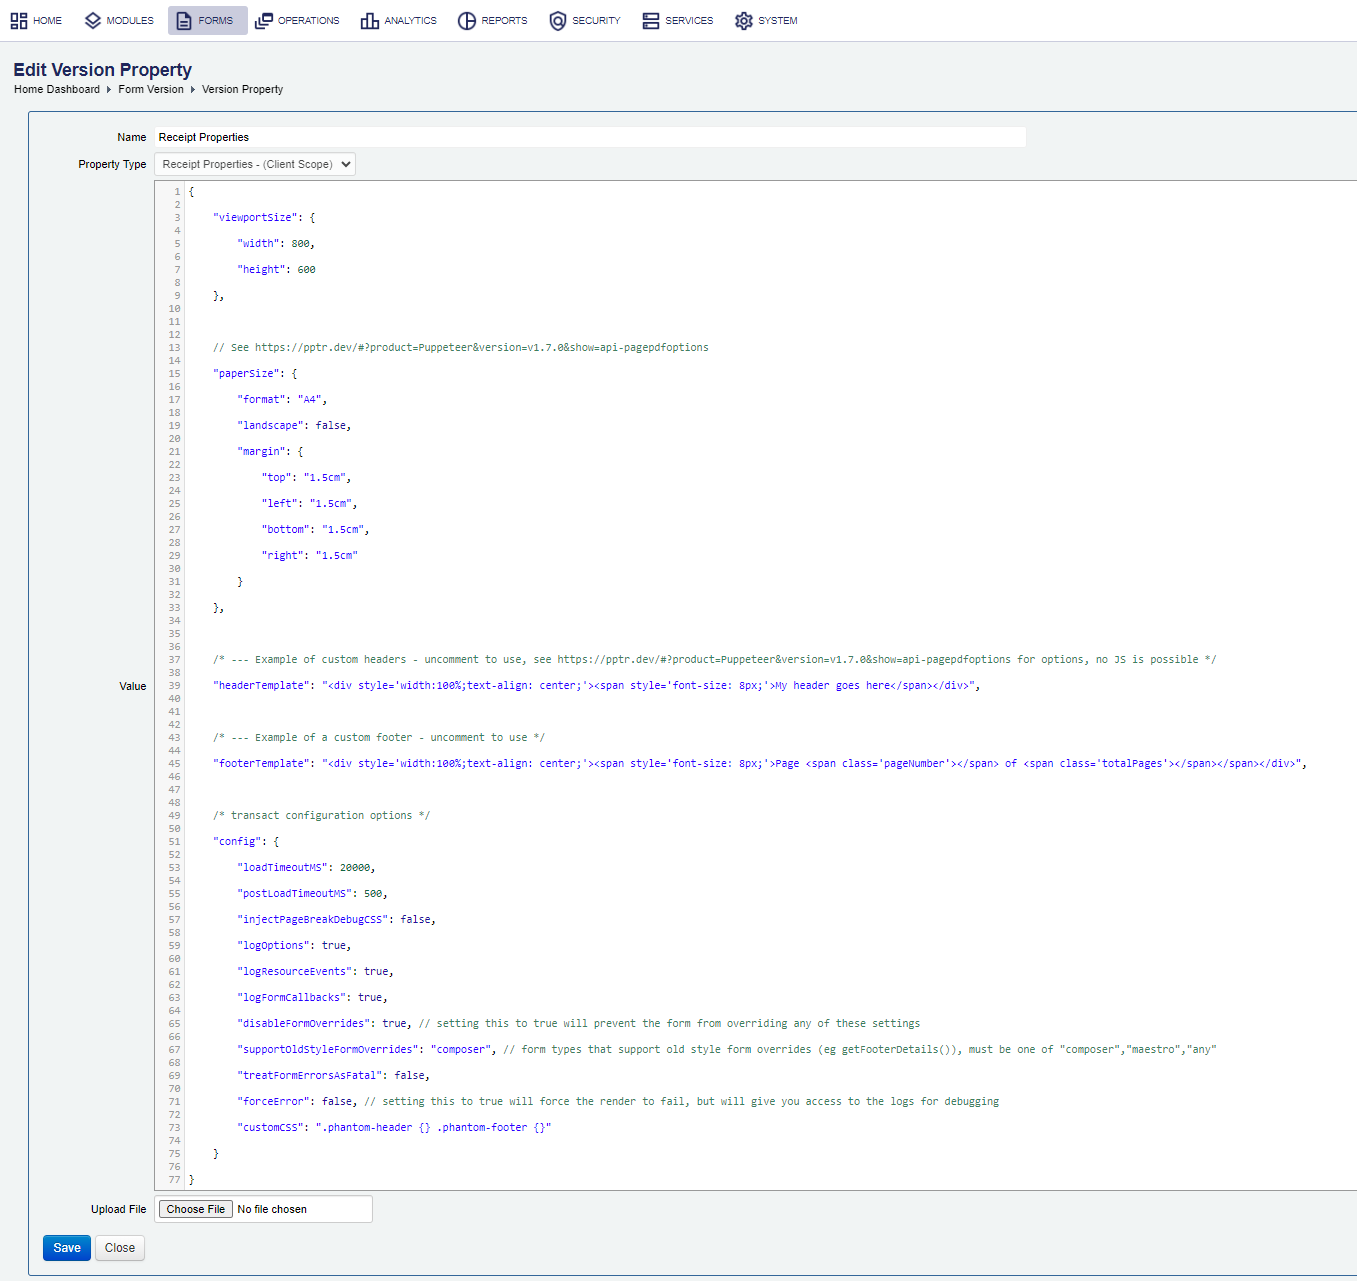
- From the Property Type dropdown, select Receipt Properties - (Client Scope). For more information, see Form Version Properties.
- Edit the JSON file defining the form's receipt configuration in the Value field depending on your requirements.

- Click Save to update the changes.
Let's look at the specific example of how to enable custom headers and footers for a receipt:
- Update the
paperSizeobject'sheightproperties. By default, these property's values are set to0cm, which means the header and footer won't be visible. Change this to a larger value, such as3cm:"header": { "height": "3cm" }, "footer": { "height": "3cm" } - Uncomment the
headersandfootersproperties:"headers": [ { "pageFilter" : "*", "template": "<h1 class='phantom-header'>Default Header</h1>" },{ "pageFilter" : "1", "template": "<h1 class='phantom-header'>First Page Header</h1>" } ], "footers": [ { "pageFilter" : "*", "template": "<p class='phantom-footer'>Page ${page} of ${numPages}</p>" } ],These properties are used to define the default content inside the headers and footers. The
pageFilterproperties can be used to include headers or footers on all pages, or on specific pages.Note Due to a PhantomJS bug, it won't render any
<img>tags in the header or footer unless the same image is present in the main receipt area. The image can be hidden on the main receipt area; it just needs to be there in Maestro for the header and footer image to render. - Return to the form's Dashboard tab.
- Click the Form Test Render icon.
- Submit some test data via the form.
- Return to the Dashboard tab.
- Click the View PDF Receipt icon for the latest transaction.
You should see that the generated receipt contains the customized header and footer that we defined via the Receipt Properties. Here, for instance, we can see the h1 element that has been added to the first page of the receipt:

Customize Receipts with JavaScript
All of the properties available via the Receipt Properties can be overwritten by the form that generates the receipt. You might, for instance, like to include the reference code of a form in the footer of a receipt. This requires the form to affect how the receipt is generated. Forms can optionally use JavaScript to control the content and styling of headers and footers. You may want to do this for example to inject calculated or dynamic content in the header or footer.
To enable this functionality:
- In Manager, return to the form version's Properties tab.
- Click Receipt Properties.
- Within the Value field, change the
disableFormOverridesproperty tofalse: - Click Save to update the changes.
"disableFormOverrides": falseThen, to use this feature, create a form load rule that contains the following function:
window.phantomReceiptCallback = function(actionName, data) {
	// code goes here
};
This function executes multiple times while a receipt is generated and provides us with two parameters:
actionNamedata
Each time the function executes, the actionName parameter contains the name of one of the customizable properties, such as format or margin. Using a conditional, we can return a new value, thereby overriding the value of the property.
value from the JSON options file
A few examples are shown below:
- Change the receipt orientation to "landscape":
if (actionName === "orientation") { return "landscape"; } - Change the height of the header to "3cm":
if (actionName === "headerHeight") { return "3cm"; } - Add the form's tracking code to the footer:
if (actionName === "footer") { // Get the tracking code from a Composer form // var trackingCode = sfc.getPhaseValue("TrackingCode"); // Get the tracking code from a Maestro form var trackingCode = Form.getSystemData("TrackingCode"); return "<p>Tracking Code: " + trackingCode + "</p>"; } - More options:
window.phantomReceiptCallback = function(actionName,data) {
if (actionName=="orientation") {
	// return either "landscape" or "portrait" or fall
	// this action is only invoked once per form
}
if (actionName=="format") {
	// return the paper format eg "A4","letter",etc or fall
	// this action is only invoked once per form
}
if (actionName=="margin") {
	// return a JSON object defining the margin eg {"top": "0.5cm","left": "0.5cm","bottom": "0.5cm","right":"0.5cm"} or fall
	// this action is only invoked once per form
}
if (actionName=="headerHeight") {
	// return the header height  eg "1cm" or fall
	// this action is only invoked once per form
}
if (actionName=="footerHeight") {
	// return the footer height  eg "1cm" or fall
	// this action is only invoked once per form
}
if (actionName=="header") {
	// return the header template string eg "<p>This is the header</p>" or fall
	// you can specify the tokens ${page} and ${numPages} in the template you are returning and they will be replaced appropriately
	// you can access the current page and number of pages programmatically by using data.pageNum and data.numPages respectively
	// this action is invoked for every page on the form
}
if (actionName=="footer") {
	// return the footer template string eg "<p>Page ${page} of ${numPages}</p>" or fall
	// you can specify the tokens ${page} and ${numPages} in the template you are returning and they will be replaced appropriately
	// you can access the current page and number of pages programmatically by using data.pageNum and data.numPages respectively
	// this action is invoked for every page on the form
}
// NOTE: always return the value defined in Manager, if not explicitly overriden as above
return data.defaultValue;
// this is the value from the JSON options file
The data parameter is an object with the following structure:
{
	"pageNum": 1,
	"numPages": 2,
	"defaultValue": "portrait"
}
The pageNum property contains the current page number of the receipt. One way to use this property is to display different content on the first page of a receipt:
if (actionName === "footer") {
	if (data.pageNum === 1) {
		return "<p>This appears in the footer on the first page.</p>";
	} else {
		return "<p>This appears in the footer on every other page.</p>";
	}
}
The numPages property contains the total number of pages in the receipt. This is commonly used in the footer, in conjunction with the pageNum property:
if (actionName === "footer") {
	return "<p>Page " + data.pageNum + " of " + data.numPages + "</p>";
}
The defaultValue property contains the value of the property that was defined in Manager, via the Receipt Properties. If, for instance, you give the orientation property a value of "portrait" via the Receipt Properties, the defaultValue property will contain that same value.
This property should always be returned at the bottom of the function:
window.phantomReceiptCallback = function(actionName, data) {
	if (actionName === "orientation") {
		return "landscape";
	}
	return data.defaultValue;
};
This ensures that the function never returns undefined.
For all of the properties, the function expects a string to be returned, except for the margin property, which expects an object with string values:
if (actionName === "margin") {
	return {
		top: "1.5cm",
		left: "1.5cm",
		bottom: "1.5cm",
		right: "1.5cm"
	};
}
After making changes to this function: save the code, build the form, and update the form via Manager. Any submissions from this form will use this function when generating the receipt.
Next, learn more about receipt's headers and footers.