Add Google Tag Manager to a Maestro Form
MaestroThe UI design product. |
Form Builder Template Designer | All versions
This feature is related to all versions.
Template Designer | All versions
This feature is related to all versions.
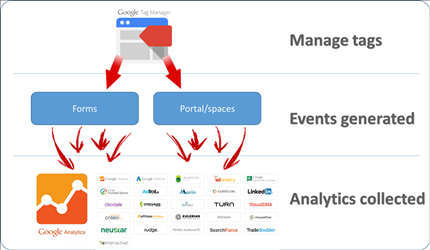
When you create an onboarding web application using Maestro, it has a Maestro form with a single-page architecture; that is, all the content exists in a single rendered HTML page, but the user navigation flow is controlled through hide and show logic of different sections, also known as logical form pages. When a form user accesses, fills and finally submits or abandons the form, it's important to know when it happens. Google Tag Manager (GTM) allows you to collect this information so you can have control over your digital marketing and analytics software.
Whilst providing a better user experience, any standard Google Tag Manager (GTM)Google Tag Manager (GTM) is a tag management system (TMS) that allows you to quickly and easily update tracking codes and related code fragments collectively known as tags on your website or mobile app. configurations, which utilize page views to track web-site traffic, will stop tracking the user movements once the form is opened, meaning none of the in-form navigation will be tracked.
To go around this constrain, you must correctly configure GTM in a Maestro form so virtual navigation events are tracked for user navigation. Additionally, you need to understand what events will be created in GTM as a user navigates through a live Maestro form, and how they can be captured as tags to generate analytics data.
To enable a Maestro form to send virtual navigation events, you need to:
- Obtain a GTM widget for the Google Analytics framework that can be used in a test or a production environment.
Note The GTM widget is not part of the Maestro standard components, so you may need to build it yourself.
Alternatively, you can use our Journey Analytics product, which is fully integrated with Maestro forms.
- Import the GTM widget as a library into Maestro. You do it once per each Organization.
- Add the GTM widget to the relevant forms in Maestro. You do it once per form.
- Connect the form to GTM in Manager. You do it once per form per Manager instance.
Let's look at each step in details.
Import the Library into Maestro
The GTM widget is a connector between any Maestro form and Google Analytics, via Google Tag Manager. The main purpose of having the connector that goes via GTM, instead of using GA directly as the core product can do, is to enable customers to take the GTM solution and adapt it, if needed, to integrate into other Analytics engines, or use it as a starting point to gather more fine grained information.
To import the GTM widget:
- Log into Maestro.
- Import a GTM library into Maestro.
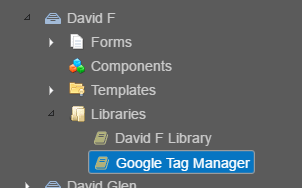
- Check that Google Tag Manager entry appeared in the Libraries folder, as shown below.

Add the GTM Widget to a Form
To add the GTM widget:
- Create a new form or open an already existing form.
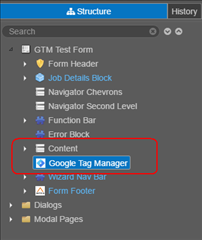
- In the Palette pane, locate the Analytics folder, and the Google Tag Manager widget inside.
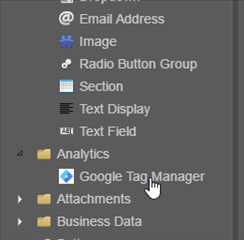
- Drag this Google Tag Manager widget to the top level of the form in the structure panel. It is recommended to place it immediately after the Content element in the structure panel.

- With the Google Tag Manager element selected in the Structure panel, expand the Configuration menu in the Properties panel.
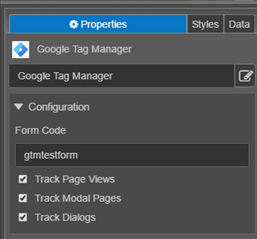
- Provide an unique form identifier in the Form Code field, which is passed to GTM to identify this form as separate to any other forms using the same GTM container. Alternatively, you may leave this field blank, so the default
form-codeassigned by Manager will be used. - Select the Track Page Views checkbox so section-level navigation will be sent to GTM as page change events. This is selected by default.
- Select the Track Modal Pages checkbox so any modal pages, such as Submission confirmation page, Saved confirmation page or any custom modal windows, will be sent to GTM as page change events. This is selected by default.
- Select the Track Dialogs checkbox so the opening of a dialog, such as Save challenge dialog, Are you sure dialogs, or any other custom dialogs, will be sent to GTM as a page change event. This is selected by default.
- Click Save and then build and publish the form.


Configure Manager to Enable Analytics
As mentioned before, a Maestro form is built using a single-page architecture, where all of the content added to the form in the Maestro tool is rendered in a single HTML page. However, the actual form content only forms part of the user-experience picture.
Landing pages, Save and Resume pages, Attachments pages and Submission Complete pages that may be presented to the user before or after they have filled in the form. These pages are also critical to deriving useful data from an analytics engine, and therefore need to be included in the GTM implementation.
Manager maintains global versions of these pages that are used by all forms by default, so it becomes important to be able to identify which form the page has been opened for. For the most part this can be achieved by using the formCode URL request parameter that is required to open the form, however for some of the post-form pages, such as Submission Complete, Attachments, Save Confirmation, this parameter is not provided. In these cases GTM has been setup to look for a form code within the HTML of the page that's been rendered, by finding a hidden element with the id of submission_formCode. The pages do not automatically include this hidden element, so you need to add it manually.
To add the HTML element to a form:
- Log into Manager.
- Select System > Form Spaces.
- Find the form space that contains the form you would like to add GTM capability to, and click on the name of the space.
- Find the page to be updated, and click Edit.
- Select the Pages tab.
Note You need the Portal Edit permission to be able to edit the page.
-
Place the following HTML code inside the page content. The location is not critical:
<input type="hidden" name="formCode" id="submission_formCode" value="$form.formCode"/>Note Do not put this code inside any conditional logic that has the markup such as
#if ($session.emailed). - Click Save.
- Repeat the same updates to the all pages that need to be tracked.
Connect the Form to GTM in Manager
You need to configure a form in Manager with the correct GTM container configuration, including a JavaScript.
To add the GTM container script to the form:
- Select Forms -> Forms and locate a form you want to track.
- Click Edit and select the Page Tracking tab to enable page tracking.
- Select the Use Form Page Tracking checkbox.
- Select the Inside HEAD in the Page Script Include Position dropdown list. Keep the Tracking Script Template blank.
- Paste the GTM script in the Form Page Tracking Script text field to enable tracking of the form.
Note You can find the GTM script from your Google Tag Manager account by selecting Admin > Install Google Tag Manager. For more information, see how to set up and install Tag Manager.
- Click Save to update the changes.
Configure Additional Pages
Manager has the ability for a form to maintain its own version of these pages - so that different content may be displayed to the user for a particular form. However, this setup is optional, and if not configured, the default pages referred above are used.
Every time a form is being enabled for GTM it is therefore necessary to check whether any custom pages have been configured, and to edit these.
To configure additional pages:
- Select Forms -> Forms and select the relevant form by clicking on its name.
- Locate the current version, which is selected as default, and click the Properties link.
- In the list of properties, if you see an entry for any of the relevant pages, they will need to be edited. The list of possible entries that will require editing are:
- HTML Confirmation Page
- HTML Saved Page
- If they exist, click on the name of the relevant property
- Place the following HTML inside the page content. The location is not critical, but ensure it is not inside any conditional logic (with markup such as
#if ($session.emailed):<input type="hidden" name="formCode" id="submission_formCode" value="$form.formCode"/> - Click Save.
Content Security Policy (CSP) Settings
GTM, by its very nature, relies on the use of third party JavaScripts, so you must adjust the Content Security Policy (CSP)Content Security Policy (CSP) is a computer security standard introduced to prevent cross-site scripting (XSS), clickjacking and other code injection attacks resulting from execution of malicious content in the trusted web page context. CSP provides a standard method for website owners to declare approved origins of content that browsers should be allowed to load on that website—covered types are JavaScript, CSS, HTML frames, web workers, fonts, images, embeddable objects such as Java applets, ActiveX, audio and video files, and other HTML5 features. For more information, see https://www.w3.org/TR/CSP/ at the organization level in Manager. This needs to be done for every organization that contains forms using GTM.
To configure CSP:
- Open your organization security configuration.
- Select the Override System Default checkbox.
- Add the following policy values in the Organization CSP Header field:
‘unsafe-eval’‘unsafe-inline’tagmanager.google.comwww.googletagmanager.comwww.google-analytics.com: it is required if you use Google Analytics with GTM.
For example, CSP Header might look like this:
script-src 'self' 'unsafe-inline' 'unsafe-eval' www.googletagmanager.com tagmanager.google.com; object-src 'none'. - Click Save.
This configuration will allow the form to connect to GTM. However, depending on the GTM implementation, there may also be additional CSP adjustments. For example, if the GTM container is to send data to Google Analytics, then the host name of the GA server (www.google-analytics.com) will be also required. Similarly, if we use any other server-send data (like for GA), we will need to add host name of that particular server.
Configure a GTM Account
Once you have done all the steps above, the form will begin sending events to GTM when users open and navigate it. At this point, the GTM administrator needs to create their own container to use these events and send information to their chosen analytics engine. For more information, see which events are created, and what other relevant information is set in the data layer for these events.
Alternatively, Temenos has created a GTM container that is pre-configured to listen for these events, and act accordingly. By default, this container sends a page-view to Google Analytics, but could easily be adapted for other analytics engines.
You need a GTM account to use Google Analytics and Google account is mandatory to use GTM
To create a GTM account:
- Go to https://tagmanager.google.com/
- Click Create Account if you do not already have a Google account, otherwise, log in to your Google account, so you can access the GTM home page.
- Click Create Account to create a Tag Manager account.
For more information, see Google documentation.
Import the Maestro GTM Container
The Maestro GTM Container is designed to run in isolation – the tags pre-configured within it will only produce page views for Maestro forms and their related pages. For this reason, it is safe to use either option for importing the container into GTM – either merge it into an existing container, or create a new one.
If you are choosing to merge it into an existing container, care should be taken that existing tags and triggers do not adversely affect the Maestro form pages. Additionally, if new tags are being created for Maestro forms, correct use of triggers should be maintained to ensure that the tags only fire in the correct places – not in other pages that may be connecting to the same GTM container.
It is also recommended that if the GTM container for Composer forms has been or is still being used, then the Maestro container must be installed separately.
To import the GTM container:
- Log in to GTM
- Select the Accounts tab and choose a container to import into. You may need to create a new container if required.
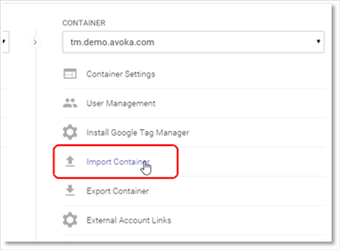
- Select the Admin tab and click Import Container in the Container section.

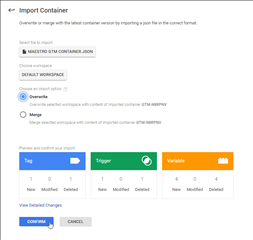
- Under Select File to Import, select Choose Container File and navigate to the Maestro container file on your PC. You can also use the example of Maestro GTM container file.
- Select whether to use an existing Workspace or create a new one.

- Select to either overwrite the existing container (for new containers only) or merge it.
- Click Confirm.
Configure GTM to connect to Google Analytics
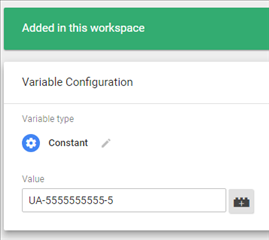
- Select Container -> Variables > Google Analytics Id as a variable.

- Enter the Google Analytics Tracking Id in the Value field.
- Verify that page views are being sent to the correct Google Analytics account.

Specify the Virtual Page View URL Location
You also need to configure a meaningful URL location for each form page views that the downstream analytics engine (GA) can use to correctly associate the views with a business process, as well as implementing Goals, Funnels, and so on.
For example, if the form is a credit card application, then when the user navigates to the About You section of the form, rather than a page-view in GA on the location /aboutyou/, it could be more informative for it to be something like this: /cards/credit/application/aboutyou/.
For this reason, a look-up table has been provided in our pre-designed Maestro GTM that links the form code to a user-defined URL.
It's important that this configuration is correct, otherwise, the form will never send page-views to Google Analytics.
To configure the virtual page view URL:
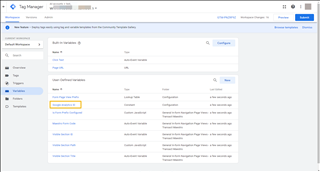
- Select Workspace > Variables > Form Page View Prefix.
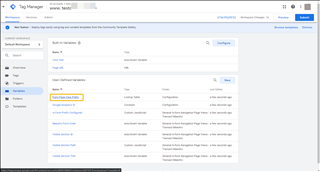
- Click inside the Variable Configuration section to allow editing, and add a row to the Lookup Table.
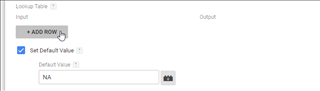
- Type the form code In the Input field.
- Enter the page view prefix in the Output field. This prefix will be used for all Page Views generated by this form, and is a unique path that will identify the form in the Analytics engine.

- Click Save to save the variable.
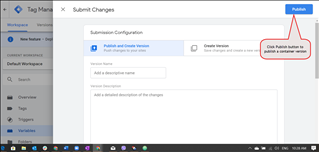
- Click Submit to apply the changes after all changes have been made.
- Click Publish to publish the updated version of container. You also might need to create and publish a new version of a container.

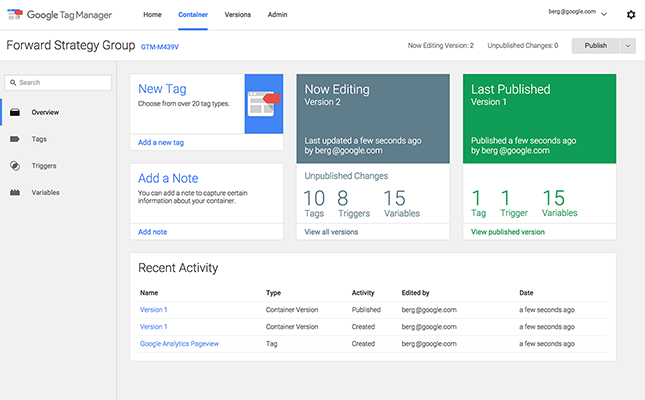
- Select the Versions tab to see all published containers and all associated traffic from forms.
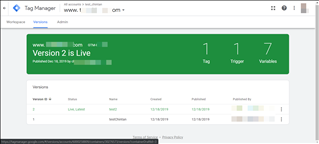
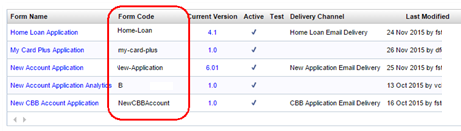
- Log in to Manager and select Forms -> Forms to see the form codes for all published forms in that environment:


Once published, traffic on that form will generate the new page views, which will be sent to Google Analytics.

Now, you have completed all necessary GTM related configuration.
The following sections include some useful information for GTM administrators that may be wishing to maintain the container, or make changes going forward.
Navigate and Locate Items in GTM
A folder structure has been setup inside the container to group relevant items together. By navigating to the Folders section (in the left-hand menu structure) items can be located a little more easily. The folder structure consists of the following folders:
- Configuration - Maestro Page Views - contains variables that relate to the changeable configuration. In particular, the Form Page View Prefix variable that an administrator needs to edit to add or change a form's analytics settings is located here.
- General In-form Navigation Page Views - Maestro - contains Variables, Triggers and Tags that are involved in generating the page views for in-form navigation - such as registering to receive custom events when a user changes sections, as well as the variables that resolve the section name from the custom event, to be used in the page view Tag.
- Specific Page Views - Maestro - contains Variables, Triggers and Tags for the page views that are to be generated for all pages outside of the actual Maestro form - such as confirmation pages, attachments pages and landing pages.
In-form Page Views
To enable page views to be generated as a user navigates through the Maestro form, a few key GTM elements have been configured.
- Register Page Change Form Events (Tag)
- Custom HTML tag type
- Injects some JavaScript that utilizes the Maestro libraries to detect when a user has changed pages, and sends a custom event to GTM - the custom event contains information relating to which section has been opened.
- Fires on Document Ready, but only in the
SmartForm.htmlpage, and if the form being viewed has been configured with a page view prefix.
- Section Level Page View (Tag)
- Google Analytics (Universal) tag type
- Actually creates the Google Analytics page view with the relevant prefix and section information
- Fires on the custom
page.changeevent that is generated by the user action
The other elements in this In-form Navigation folder in GTM are triggers and variables that support these two tags - mainly for extracting details from the generated custom event, as well as ensuring the page views only fire in relevant Maestro form pages.
Other Page Views
For all other page views, a fairly simple paradigm has been followed of a single Trigger and single Tag. It should be noted though that these items also rely on other existing Variables, but going forward it is unlikely that these supporting variables would need to change.
As an example, the Submission Complete page views are configured as follows (and the other pages follow the same
- Submission Complete Page Opened (Trigger)
- Page View Trigger
- Fires on DOM Ready
- Checks that the Page URL contains
confirmation.htmand that a form prefix has been configured for this form - which automatically ensures the page is a TM form confirmation page, and that the form has been set to use Google Analytics
- Submission Complete Page View (Tag)
- Google Analytics (Universal) tag type
- Uses the configured form prefix with a hard-coded page name - i.e.
{{Form Page View Prefix}}submission - Fires on the Submission Complete Page Opened trigger
Next, learn how to Autocomplete Fields for Dynamic Data Services.