Assign Groups to a User
Journey Manager (JM) The transaction engine for the platform. | System Manager / DevOps | All versions This feature is related to all versions.
Manager allows you to assign groups to users, so they can perform relevant actions or receive various notifications pertinent to each group. You can use this functionality to:
- Assign several user accounts to a newly created group
- Change an existing group’s membership after you added or removed some user accounts
Assign Groups
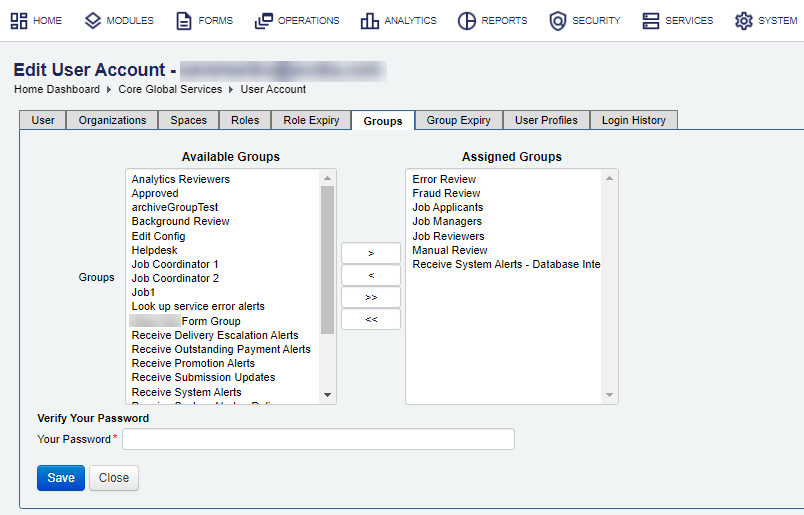
To assign groups to a user account:
- Select Security > User Accounts.
- Locate a user account and click Edit.
- Select the Groups tab to see the assigned groups for this user account, which are listed in Assigned Groups.

- Select one or more groups from Available Groups and click > to move them to Assigned Groups.
Note You can use the Shift and Ctrl keys to select multiple groups on Windows PC.
- Click >> to assign all groups to the user.
- Provide your password in the Your Password field, for security reasons.
- Click Save to update the changes.
Revoke Groups
When a user doesn't wish to be part of a group, you can revoke that grop.
To revoke groups from a user account:
- Select the groups from Assigned Groups and click < to revoke any assigned groups.
- Click << to revoke all groups from the user.
- Provide your password in the Your Password field, for security reasons.
- Click Save to update the changes.
You can also assign users to a group.
Next, learn how to configure group expiry.