Fields Lookup with Reference Data
Journey Manager (JM)
The transaction engine for the platform. MaestroThe UI design product. |
Form BuilderPlatform Developer | 17.10
This feature was updated in 17.10.
MaestroThe UI design product. |
Form BuilderPlatform Developer | 17.10
This feature was updated in 17.10.
Journey Maestro allows you to build forms that automatically prefills some fields with reference data that is stored in Manager.
There are the following steps you need to complete to be able to do this:
- Create reference data in Manager
- Test reference data filters in Manager
- Create the form
- Test the form
Let's look at them in more detail.
Create Reference Data in Manager
First, you need to create reference data in Manager for an organization where the form is deployed. In this example, we use the following resources, which you can download as a reference-data.zip file.
- Australian Postcodes CSV
- Australian Postcodes JSON
- Australian Postcodes XML
Then, for each resource, create a reference data object using this template:
- Enter a Name for the new reference data object.
- Enter en_AU in the Locale box.
- Select the appropriate Data Type as per a file extension.
- Click Choose File and select the sample reference data file that matches the Data Type.
Test Reference Data Filters in Manager
After that, you should test the reference data in Manager to filters subsets of data that you are going to use in your form. The sample query for reference data created from the Australian Postcodes CSV file is shown below:
{
	"select": ["postcode","suburb","state","dc"],
	"filter": [
		{"field": "state", "operation": "startsWith", "value": "NSW"},
		{"field": "suburb", "operation": "contains", "value": "belrose"}
	],
	"order": [
		{"field": "suburb", "sortAsc": false},
		{"field": "state", "sortAsc": true}
	],
	"fetchLimit": 50
}
The query result is shown below:
[
  {
    "postcode": "2085",
    "suburb": "BELROSE WEST",
    "state": "NSW",
    "dc": "BELROSE WEST LPO"
  },
  {
    "postcode": "2085",
    "suburb": "BELROSE",
    "state": "NSW",
    "dc": "FRENCHS FOREST DEL FAC-DEL"
  }
]
Create the Form
Let's assume you need to build a Maestro form to perform a filtered lookup of postcode reference data, using a pre-defined list of Australian postcodes. In this case, the sample reference data of a form has the following features:
- Suburb and state lookup fields to allow selection of optional filter values.
- A data driven drop-down to show the lookup results.
- Suburb, state and postcode display fields that show values pertaining to a row selected from the lookup results drop-down.
- A button to perform the lookup that:
- Fetch filtered suburbs by calling
Transact.referenceData. - Manipulate the returned results to add id and label fields with a better display format.
- Populate the data-driven drop-down with the manipulated results, using the id field as the key value.
- Fetch filtered suburbs by calling
- A change rule on the lookup results drop-down that populates the state, suburb and postcode fields based on the selected result.
- A button to clear all form fields.
To build such an application form, you need to:
- Create a new template.
- Create a new form based on that template.
- Add the following components to your form.
- Select the Lookup button and create a Click rule with the following code. For an explanation of this code, see Lookup Button Click Rule below.
var query = { "select": ["postcode","suburb","state"], "filter": [], "order": [ {"field": "suburb", "sortAsc": true}, {"field": "state", "sortAsc": true} ], "fetchLimit": 500 } if (!Util.isBlank(data.stateLookup)) { query.filter.push({"field": "state", "operation": "startsWith", "value": data.stateLookup}); } if (!Util.isBlank(data.suburbLookup)) { query.filter.push({"field": "suburb", "operation": "startsWith", "value": data.suburbLookup}); } Transact.referenceData("Australian Postcodes CSV", query, "en_AU").then(function(response){ var id = 1; data.$postcodes = response.filter(function(row) { row.id = id++; row.label = row.suburb + ', ' + row.state + ' ' + row.postcode; return true; }) var dropdownLabel = data.$postcodes.length > 0 ? 'Select...' : 'No results found'; data.$postcodes.unshift({label:dropdownLabel, id:0}); data.suburbs = 0; }).catch(function(error) { }); data.state = data.suburb = data.postcode = ''; -
Select the 'Suburbs Found' data-driven dropdown and create a Change rule with the following code. For an explanation of this code, see Suburbs Found Dropdown Change Rule below:
var selectedSuburb = data.$postcodes[value]; data.state = selectedSuburb.state; data.suburb = selectedSuburb.suburb; data.postcode = selectedSuburb.postcode; - Select the Clear button and create a Click rule with the following code. For an explanation of this code, see Clear Button Click Rule below:
data.state = data.suburb = data.postcode = ''; data.suburbs = 0; data.$postcodes = []; data.stateLookup = data.suburbLookup = ''; - Build and render the form, ensuring you select the Use Transact Functions option.
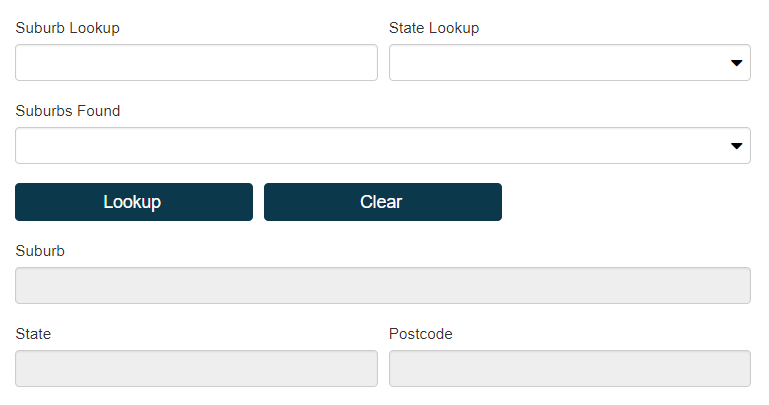
- The rendered form should resemble this.

| ID | Label | Component Type | Tab | Attribute | Value |
|---|---|---|---|---|---|
|
suburbLookup |
Suburb Lookup |
Text Field |
Integration |
TM Form Data > Include in Submission Data |
Clear |
|
stateLookup |
State Lookup |
Dropdown |
Properties |
Dropdown > Options > Values |
ACT, NSW, NT, QLD, SA, TAS, VIC, WA |
|
Properties |
Dropdown > Add Blank Value |
Select |
Properties |
Dropdown > Add Blank Value |
Select |
|
Integration |
TM Form Data > Include in Submission Data |
Clear |
|||
|
suburbs |
Suburbs Found |
Data-Driven Dropdown |
Properties |
Data-Driven Dropdown > Data Source |
data.$postcodes |
|
Properties |
Data-Driven Dropdown > Value Field |
id |
|||
|
Properties |
Data-Driven Dropdown > Add Blank Value |
Clear |
|||
|
Integration |
TM Form Data > Include in Submission Data |
Clear |
|||
|
suburb |
Suburb |
Text Field |
Properties |
Rules > Create Rule |
Read-Only |
|
state |
State |
Text Field |
Properties |
Rules > Create Rule |
Read-Only |
|
postcode |
Postcode |
Text Field |
Properties |
Rules > Create Rule |
Read-Only |
|
lookup |
Lookup |
Button |
A Click rule is added to this component in a later step. |
||
|
clear |
Clear |
Button |
A Click rule is added to this component in a later step. |
You must clear the Include in Submission Data checkbox on the Suburb Lookup, State Lookup and Suburbs Found fields, so that data in these fields is not sent back with the form XML data.
Test the Form
Now, you have to test the form to ensure that reference data can be filtered as expected.
To test the form:
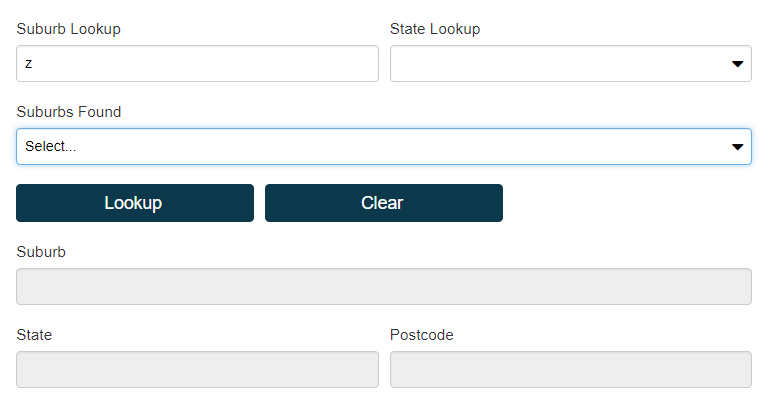
- Enter 'z' in the Suburb Lookup box and leave State Lookup empty. This will return a few results from the sample data provided with this article.
- Click Lookup. 'Select...' is displayed in Suburbs Found.

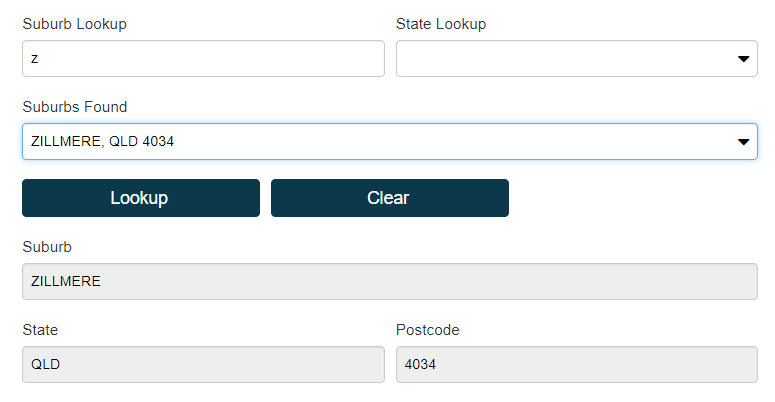
- Select a suburb from Suburbs Found. Suburb, State and Postcode are populated with the values corresponding to the selected suburb.

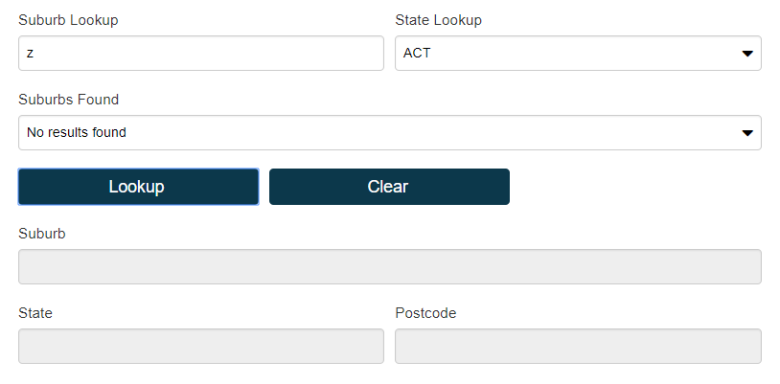
- Select ‘ACT’ from State and click Lookup. Suburbs Found shows 'No results found' and Suburb, State and Postcode are cleared.
- Click Clear at any time to clear all form fields.

As the form makes use of several business rule, let's look at them in detail.
Lookup Button Click Rule
Clicking the Lookup button causes its Click rule to be executed, retrieving the ‘Australian Postcodes CSV’ reference data which is filtered and stored as temporary form data and which is used to populate the Suburbs dropdown.
The Lookup button's Click rule code starts by creating a basic query object with an empty filter array. Other properties of the query object sort the results by ascending suburb and state, and limit the returned results to 500 rows.
var query = {
	"select": ["postcode","suburb","state"],
	"filter": [],
	"order": [
		{"field": "suburb", "sortAsc": true},
		{"field": "state", "sortAsc": true}
		],
	"fetchLimit": 500
	}
Suburb and state filters are added to the query object according to values entered in Suburb Lookup and State Lookup. The filter objects added use the format specified in Query Filter Syntax above.
if (!Util.isBlank(data.stateLookup)) {
	query.filter.push({"field": "state", "operation": "startsWith", "value": data.stateLookup});
	}
if (!Util.isBlank(data.suburbLookup)) {
	query.filter.push({"field": "suburb", "operation": "startsWith", "value": data.suburbLookup});
	}
The ‘Australian Postcodes AU’ reference data is retrieved by calling the Transact.referenceData function, passing the name of the reference data, the query object just constructed, and the locale.
Transact.referenceData("Australian Postcodes CSV", query, "en_AU").then(function(response){
	...
}).catch(function(error) {
});
Transact.referenceData returns a promise, to which we add a then method which will be called when the promise is fulfilled. Acatch method is also appended to handle any unexpected fail conditions.
...
var id = 1;
data.$postcodes = response.filter(function(row) {
	row.id = id++;
	row.label = row.suburb + ', ' + row.state + ' ' + row.postcode;
	return true;
	})

var dropdownLabel = data.$postcodes.length > 0 ? 'Select...' : 'No results found';
data.$postcodes.unshift({label:dropdownLabel, id:0});

data.suburbs = 0;
...
In the then handler, a results array is constructed which will populate the list in the Suburbs Found data-driven drop-down. The JavaScript array filter method is used to generate a display value for each row in the query results (that is, the response data) by combining the suburb, state and postcode into a single display field, and assigning a unique numeric id to each row.
The unshift method is used to insert a row with id 0 at the start of the results array. This row will have a different label depending on whether query results were returned ('Select...') or not ('No results found'), so that the drop-down will initially show an appropriate value. The results array is stored in data.$postcodes so it can be accessed elsewhere when needed.
Prefixing a property name with '$' on the form's data object prevents that property from being sent with the submission XML.
0 is assigned to data.suburbs so that the Suburbs Found drop-down will initially display the label of the dynamically constructed first row.
Note that each row in the result set has a unique id starting from 0, and id is the value used by the drop-down's Value property, so we can use this as an index into our result set (returned by the reference data query) when we select an item from Suburbs Found.
Finally, the state, suburb and postcode fields are cleared pending the results of the lookup.
data.state = data.suburb = data.postcode = '';
If there are no results, we want to clear these fields. This code should be placed at the top of the rule, but having it at the bottom demonstrates this code executing before the code inside the promise's .then method executes.
Suburbs Found Dropdown Change Rule
When a row is selected from Suburbs Found, the Suburbs Found drop-down's Change rule populates form fields with values from the selected row.
var selectedSuburb = data.$postcodes[value];
data.state = selectedSuburb.state;
data.suburb = selectedSuburb.suburb;
data.postcode = selectedSuburb.postcode;
The local variable value is pre-populated with the value of the field defined in the Suburbs Found dropdown's Value Field property, which is the id property added to each of the result rows returned by the Transact.referenceData call. This value is used as a numeric index into the results array to retrieve the item selected from the drop-down list and to store it in the local variable selectedSuburb. The other data fields on our form are then populated with values from the selected row.
By assigning the appropriate value to the form's data object, Angular takes care of updating the HTML input fields.
Clear Button Click Rule
When the Clear button is clicked, all form fields are cleared, ready for another lookup.
data.state = data.suburb = data.postcode = '';
data.suburbs = 0;
data.$postcodes = [];
data.stateLookup = data.suburbLookup = '';
This code clears state, suburb and postcode data values, resets the Suburbs Found drop-down to display the first item, and empties the saved postcode lookup data array. The overall result is that the entire form is cleared, including both drop-downs.
Next, learn how to populate fields autocomplete with reference data.