Manage Transactions
Journey Manager (JM) The transaction engine for the platform. | System Manager / DevOps | 22.04 This feature was introduced in 22.04.
The Operations portal is designed to assist System Managers and DevOps users in meeting their responsibility for providing operations services. One such responsibility relates to managing transactions at various stages of their life cycle. To support transaction management, the Operations portal includes an Operations space which has features that help you to find transactions, drill down into the transaction details, and perform appropriate actions such as recover an abandoned transaction or view the receipt for a submitted transaction.
Selecting the Operations space displays a List screen configured with a set of features common to all Journey UI applications. For an introduction to these common features, see UI Tour. Here, we'll focus on the additional features focused on transaction management available on the List screen.

- The Operations space item.
- This screen's name, Operations, corresponding to the selected space.
- A tabset presenting the views available on this screen.
- A set of global filters that restrict the data fetched from Journey Manager.
- A button that provides access to view filters.
- Components supporting the Search feature.
- A sortable item list populated with transaction items matching the selected view.
- Item list paging tools.
The main element on the List screen is the item list which displays brief information for a particular set of transactions. The view, filter, and search selectors at the top of the screen are the main way you control which transactions are displayed in the item list. There are two kinds of filter: global filters that are available for all views, and view filters that are specific to each view. If you can't see the transaction you’re looking for, you can sort the item list to change the order items appear. Finally, paging tools let you select how many items are displayed on an item list page and browse through all the items one page at a time.
Once you’ve found the transaction you’re looking for, you can interact with it in different ways. On the List screen, you can point your cursor at an item to reveal one or two shortcut action buttons on the right, then click one of these buttons to perform the corresponding action. Alternatively, you can click anywhere else on a list item to display more information about the transaction on the Details screen where you can interact with it further, including to perform actions.
The available actions for a transaction change over the course of it's life cycle. While some actions are always available, other actions are only available when, for example, the transaction is in a particular state. Further, some actions are available from the Details screen only. To learn about actions, see Workspaces Actions.
Item List
The main element on the List screen is the item list which displays brief information for a particular set of transactions. The items displayed in the item list satisfy a set of criteria selected by the user starting with a view then refined by searching and filtering. Each row of the item list represents a single transaction, and displays brief information that helps you to identify the transactions you're interested in. The fields (columns) displayed in the item list and the available filters are dependent on which view is selected. To learn more about views in general and the specific views available in the Operations portal, see Views below.
Items in the item list are displayed in an order determined by the current sort selection. This is indicated by an icon on the right-hand side of a column name. The icon indicates the item list is sorted by the column values in ascending order, while indicates items are sorted by the column values in descending order.
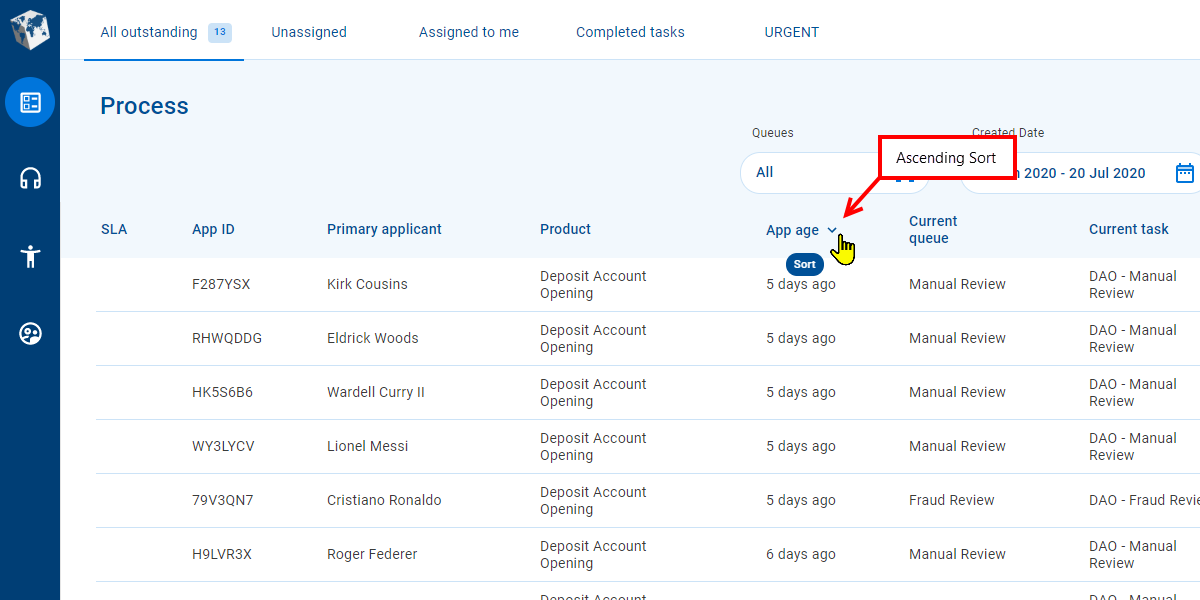
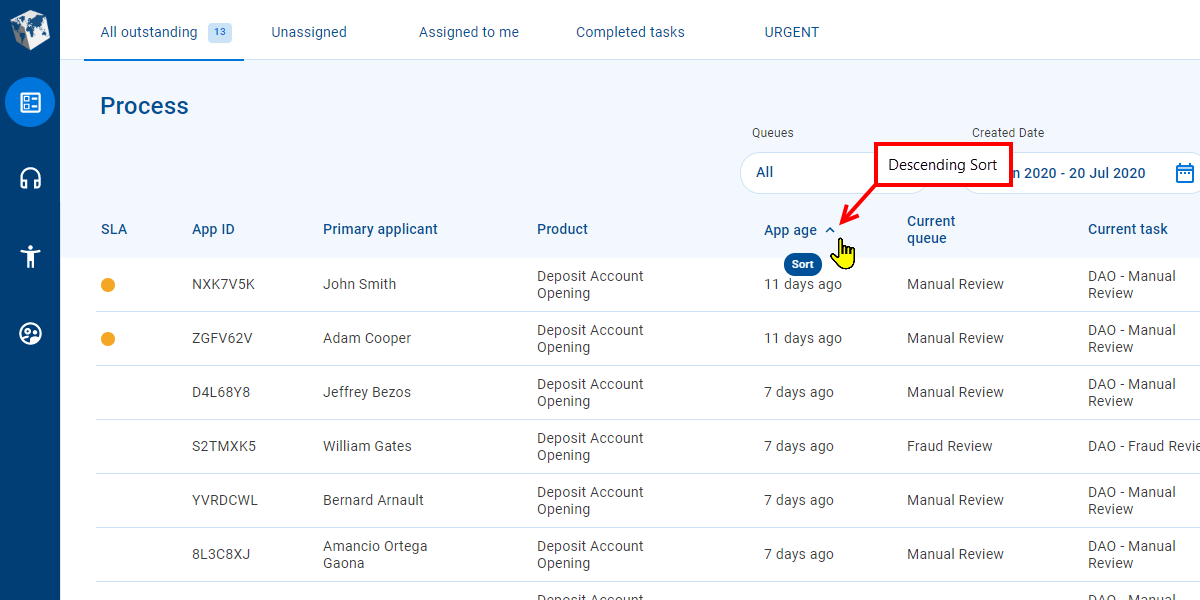
You can determine whether a column is available to use for sorting by pointing your cursor at a column heading. If your cursor changes to the hand pointer and a "Sort" tooltip is displayed, you can sort by the column. To change the sort order, click the column name. If you click the column name for the current sort selection, sorting will alternate between ascending and descending order.
Sometimes, there are too many items to display all at once on the screen. Paging allows you to see some of the items now then browse the item list one page at a time to see more. Paging tools let you choose the number of items to display on an item listpage, and navigate (forward or backward) through the available pages of items.

- Rows per page
- Items in list / Total matching items
- Previous Page
- Next Page
The and paging tools let you browse through item listpages to find the items you need. Click these tools to display the previous or next page of items in the item list. The tool is disabled when the first item list page is displayed; similarly, the tool is disabled when the last item list page is displayed.
Rows per page shows the maximum number of items displayed on an item list page. You can select a different page size from the Rows per page dropdown. Selecting a different page size, resets the item list to show the first page again.
Views
A view is a predefined configuration of item list fields, view filters and sort options. Selecting a view applies it's configuration to the item list on a List screen, changing the fields displayed and determining which view filters are available. These settings are selected automatically when a viewis displayed causing various screen elements to be updated, and reflecting the transactions that are now available for the selected view.
The Operations portal provides the following views:
- All Transactions: All transactions.
- Form Transactions: Transactions representing form submissions made by application form users.
- Saved Transactions: Transactions for forms that have been saved by application form users but not yet submitted.
- Abandoned Transactions: Transactions that have become abandoned actively by user actions, such as canceling an application, or passively based on the form's abandonment settings.
- Assigned Tasks: Transaction-related tasks that are assigned to a single user or a user group.
Click the links above for more detailed information about each of these views.
Global Filters
At the top of the screen, below the view tabs, are a set of global filters that let you control which tasks are displayed in the item list.
The global filters are:
- Space: Shows the name of the active Space filter, and lets you select another space.
- Form Name: Shows the name of the active Form Name filter, and lets you select another form.
- Created Date: Lets you hone in on transactions created in a specific period, and displays the date or date range that is currently selected.
The values available in the dropdown lists for the Space and Form Name filters are specific to each Manager environment. Each of these dropdown lists also includes an All item. Select a filter value to restrict the items displayed in the item list to just those that match the selected value. If All is selected, the item list is populated with items for all values for that global filter.
Finding transactions
Search
If you know which transaction you're looking for and you can't see it in the item list, you can try to search for it. Searching allows you to refine the list of items displayed to show just those relevant to what you are looking for.
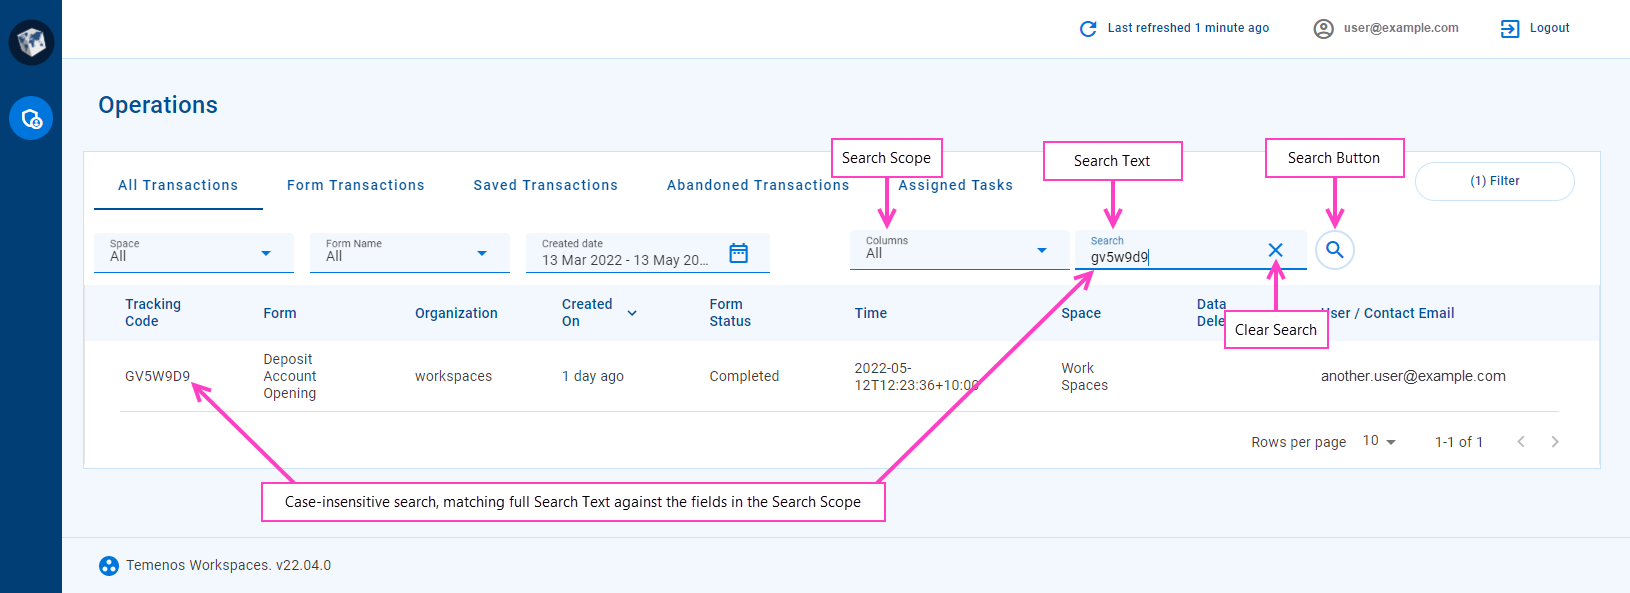
To search for a transaction, select a search scope from the Columns selector, enter your search text in the Search field, and press Enter or click . The search text is compared against the searchable fields in the search scope, and only matching items are displayed in the item list. If the search scope is All, the search text is compared against all searchable fields.
Here are some things to know about how searching works:
- Searching is case-insensitive; that is, it treats uppercase and lowercase characters as the same.
- Partial match is not currently supported, so searching only finds items that match the search text exactly (ignoring letter case).
- When a search is active, the items displayed in the item list satisfy the current view and filter selections as well as the search criteria.
A search remains active until you clear it. Deleting all of the search text does not clear an active search. To clear a search, click the button.
If you select an item in the item list while a search is active, when you subsequently return from the Details screen to the List screen, the search will still be active. This is indicated by the text and in the Search field.
View Filters
If you're looking for something specific and there are too many items to scroll through, filters might help you to find what you're after. A filter restricts what appears in the item list so that items more relevant to what you are looking for right now are shown. Filters are applied to the item list using the Filter dialog, however, a View can also include filters.
A filter is a requirement that must be satisfied for an item to appear in the item list. A filter requirement specifies one or more values to compare against a column in the item list, and all matching items satisfy the filter requirement. Multiple filters can be defined at the same time. Only items that satisfy all the active filters will appear in the item list.
If you select an item in the item list while a filter is active, when you subsequently return from the Details screen to the List screen, the filter is still active. This is indicated on the Filter button by a number in parentheses identifying how many filters are active.
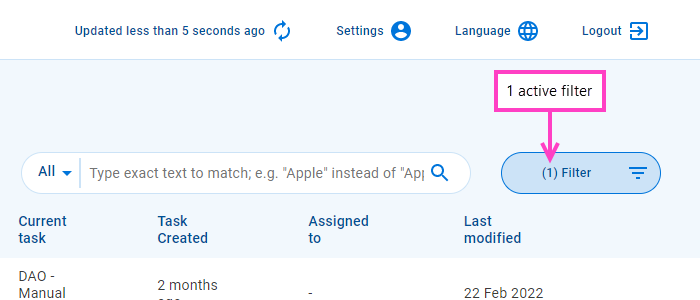
To view the current filters, click Filter. The Filter dialog is displayed showing all the filters that are currently applied to the item list. Each filter allows you to select a value or set of values to compare against the column.
Several different filter types are supported:
- Single-select: A single value selected from a predefined list of values.
- Multi-select: Multiple values selected from a predefined list of values.
- Date: A single date or a date range.
- Text: Similar to searching but applied to a single column.
When you click a single-select or multi-select filter field, a drop-down list appears populated with a predefined list of values. For a single-select filter, select a value from the dropdown list to filter on. For a multi-select filter, you can select one or more values from the dropdown list.
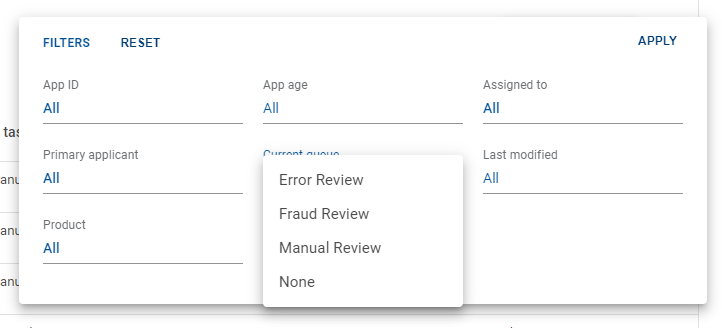
To apply a filter to the item list, click Filter to display the Filter dialog then select the filter values you want to apply from the various filter items and click Apply. Click outside the Filter dialog to close it. The number of active filter items is displayed on the Filter button.