Access to Form Reference Data
MaestroThe UI design product. |
Form Builder  Platform Developer | 19.05
This feature was introduced in 19.05.
Platform Developer | 19.05
This feature was introduced in 19.05.
Many applications require some type of reference data that infrequently changes, such as lists of countries, vehicle manufacturers, models, years, titles, product types, and so on.
Journey Maestro allows Form Designers to access reference data using the following techniques:
JavaScript Library
The Form Designer supplies JavaScript source, which is embedded directly into the form as a JavaScript Library component. Reference data under this scenario stays with the form and has no external dependencies, with the benefit that versioning of the data is managed by Maestro as part of the form content.
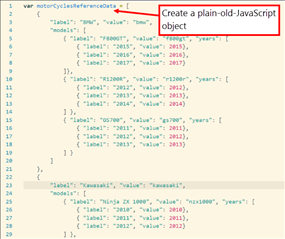
The reference data here is embedded in the form inside a JavaScript library. In the sample data below, we have used the property names label and value in our JSON object. These property names are the default values for displaying in Data Driven Dropdown components. By using these names, we can accept the default values for the dropdown's Label Field and Value Field properties. We can use any names we want in our JSON though, and simply change the dropdown properties to suit. To do this, follow these steps:
- Create a JavaScript file that contains a variable holding your reference data as a JSON object. You can have as many variables as you want, but for this example, we will only use one,
motorCyclesReferenceData. - Add a JavaScript Library component to your form, and upload your JavaScript file into it.
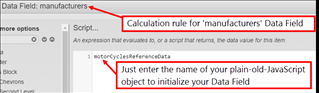
- Add a Data Field component to your form to hold each variable your JavaScript file contains. We use the name 'manufacturers'
- Add a Calculation rule to the manufacturers Data Field.
- In the Calculation rule, put the name of the JavaScript variable and save the rule.
- Reference your Data Field component as you want, in other parts of the form.
- Add a Data Driven Dropdown to your form, calling it 'Manufacturer'.
- In the Data Source property, double-click the 'manufacturers' Data Field.
- Preview the form.
- Your Manufacturer dropdown will now show values from your reference data.
Property Prefill
Reference data is stored and managed by Journey Manager and injected into the form's XML data at the time of the rendering of the form. There is a non-trivial setup process required in Manager, but one benefit is that reference data remains external to the form. For more information, see Prefill a Cascading Dropdown in Composer and Form Prefill for Anonymous Users. Be aware that prefilled data will be returned along with other data fields in the submission XML. For this reason, using prefill for reference data is not the ideal choice. For example, if your reference data is a list of country codes, you don't really what to have this data come back in the submission XML.
The reference data here is held in Manager as a Form Property. Before you can assign a value to a 'Property', you need to create a Property Type for it. To do this, follow these steps:
- Log on to Maestro.
- Create a form and add a ManufacturersPropertyData Data Field component to it.
- Click the Integration tab and select the Include in Submission Data checkbox to be able to map property data into the ManufacturersPropertyData field using the Property Mapping functionality of Manager. This also causes the data field to be sent back with the submission XML data. However, we don't want to do this for reference data, so we can prevent this from happening by using the following code.
- Add a ManufacturersPropertyDropdown Data Driven Dropdown component to the form.
- Change the Data Source to
data.$tempManufacturers. - Add the following Form Load rule to the form:
data.$tempManufacturers = JSON.parse(data.manufacturerspropertydata); delete data.manufacturerspropertydata; delete data.prefill.manufacturerspropertydata; - This rule converts the JSON formated text value that has been injected into the ManufacturersPropertyData data field into a JSON object. Then, it saves the converted JSON object into a temporary data field
$tempManufacturers- form fields with names beginning with '$', are not sent back in the submission XML data. It removes the manufacturerspropertydata field from the form data object, so it will not be sent back in the submission XML. It also removes the manufacturerspropertydata field from the form prefill data object, otherwise it will be merged back into the form data object before submission - Save and Publish your form to Manager
- Log on to Manager.
- Select Forms > Property Types and click New to create a new property type.
- Name it as ReferenceData.
- Select a scope as Client.
- Select a data type as JSON.
- Save the new property type.
- Select Forms > Forms and find your form to open it in the Dashboard window.
- Click the Properties link in the Form Versions section.
- Click New to create a new property.
- Name it as ReferenceData.
- Choose ReferenceData from the Property Type dropdown list.
- Paste your JSON data into the Value field, which you can copy from the
Motorcycles.jsonfile.Note If you try to create a new property of the same Property Type in your form, you cannot do that. A Property Type can only be given a value by one Property in the same form.
- Click Save.
- Re-open your form in the Dashboard window.
- Click Data Config link in the Form Versions section and select the Property Prefill Mapping tab.
- Click Edit.
- Scroll the left pane down until you can see the ReferenceData property
- From the right pane 'Target: Form Data XML', drag 'ManufacturersPropertyData' into the 'Form Data XPath' column and drop it beside 'ReferenceData'
- Click Save
- In some browsers, you may now be left with a blank screen. If so, press F5 to refresh the page.
- Open the form and select the Dashboard tab.
- Test the form by clicking the icon under 'Direct' in the Form URLs box
- Your form should now show data in the dropdown
Dynamic Data Service
Reference data is stored and managed by running a custom Fluent Groovy Service in Manager and made available at run-time when the form decides to fetch it. An advantage of this method is the potential ability to dynamically filter the data. Reference data is still external to the form using this method, but it does require the creation of a service in Manager. A form builder will need to write code to persist the dataaccess the service and deal with the response.
The table below lists compares the features of each techniques.
| Feature | JavaScript Library | Property Pre-fill | Dynamic Data Service |
|---|---|---|---|
| Works in Preview mode | Yes | No | No |
| Version control | Managed by Form versioning | None | Determined by service |
| Use When | form-specific data infrequent data changes no sharing required static data required work entirely in Maestro | sharing required static data required need to override at org/form/user | filtering requiredsharing required |
| Manager content validation | N/A | Yes | Determined by code |
| Supports lazy-loading | No | No | Yes |
| Share-ability | None | Shareable | Shareable |
| Security | None | None | Determined by code |
| Re-publish required after change | Yes | No | No |
| No-code implementation | No | Only for simple data type | No |
| Impact on save/retrieved forms | No | May break | None |
| Impact on review task forms | None | May break | None |
| Good Points | easy to implementno TM action requiredversioned with formno server calls needed | content managed by TMhierarchical org/form/user overridesno server calls needed | most flexiblelazy loadabilityfilterablesecurable |
| Filterable data source | No | No | Yes, if coded |
| Data variability | Static | Static | Dynamic, if coded |
| Data type | Object | String, can be converted to Object in code | Object |
| Data source | Embedded in JavaScript code | TM Properties | Determined by service |
| Data instance location | Global context | Form XML | Determined by code |
| Data associated with | Form | Organization / Form / User | Determined by service |
| Complexity of TM setup | Not required | Medium | Complex |
| Bad points | re-publish on change scope directly to form cannot be shared static data only | complex TM setup may break review / retrieved forms code required for object conversion initially, but contaminates form XML static data only | higher coding requirement overkill for simple cases |
Each of the following guides details how to gain access to reference data using the techniques discussed above. In each case, we populate an initial Data Field with some sort of data (for this example we will use data from motorcycle manufacturers). At the end of the guides, we will demonstrate methods of using the manufacturer's data to build cascading data dropdowns. Building the cascading dropdowns with each method is exactly the same process, the only difference is how you initially obtain the reference data.
Here we will create a new Manager service which will return our JSON as text. Then we will call the new service from a form to populate a dropdown as before. We will call our new service from the form's Load event.
- In Manager, choose All Services from the Services menu and click New
- Choose Service Type 'Dynamic Data'
- Choose Service Template 'Fluent Dynamic Data'
- Enter Service Name 'Motorcycle Manufacturers'
- Choose your Organization
- Click Save
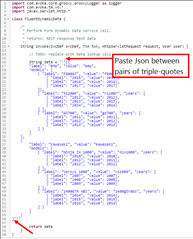
- Select the Groovy Script tab
- Replace all the existing JSON text between the pairs of triple single-quotes (''') with text from this Motorcycles.json file
- Your complete code should now look like:
- Click Save
- In Maestro, create a new form
- Drop a Data Field onto the form, call it 'ManufacturersDDS'
- Drop a Data Driven Dropdown onto the form, call it 'Manufacturers From DDS'
- Change its Data Source to data.manufacturersdds by double-clicking on ManufacturersDDS
- Click the Form Options button in the Maestro control bar
- Click Form Rules
- Click Create Rule and click Load under 'Form'
- Paste in this code:
DynamicData.call("Motorcycle Manufacturers", {}).then(function(response) {data.manufacturersdds = response;}); - Click Save
- Click Save again
- Save and Publish the form
- Render the form and you will see data from the service in the dropdown
Add Cascading Dropdowns
To complete your reference data implementation, you need to add cascading dropdowns. Here we will add additional dropdowns for Model and Year to the form. When the value selected in the manufacturer dropdown changes, the model will be re-populated with the models available from the chosen manufacturer. Similarly, when the model dropdown selection changes, the years dropdown will be re-populated.
Because we have continued to use the 'label' and 'value' properties throughout all levels of our JSON data, we don't need to change the 'Label Field' and 'Value Field' properties on any of the dropdowns.
The instructions here relate to the initial Data Field named 'manufacturers' and Dynamic Data Dropdown called 'manufacturer'. We created these components in the JavaScript library method. If you followed the JavaScript Library instructions and saved your form, re-use that form here so that your data fields and dropdown names match these instructions.
- In Maestro, open your form created during the JavaScript Library method instructions
- Check the Calculation rule on the 'manufacturers' Data Field... it should already contain 'motorCyclesReferenceData' from the JavaScript Library method instructions
- Add 2 more Data Field components to your form, name them 'models' and 'years'
- Add 2 more Dynamic Data Dropdown components, name them 'Model' and 'Year'
- Change the Data Source properties of Model and Year dropdowns to the Data Fields 'models' and 'years'
- Add a Change rule to the Manufacturer dropdown, with the code:
var selected = data.manufacturer; data.manufacturers.some(function(element) { if (element.value === selected) { data.models = element.models; data.years = undefined; return true; } }); return undefined; - The code above will execute when the Manufacturer dropdown selection is changed. The code just replaces the Data Fields 'models' with the child property 'models' from the selected manufacturer, and also sets 'years' to undefined.
- At this stage, you could Publish and render your form and see the Model dropdown populates on a change of Manufacturer, but the Year dropdown is always empty. We will implement a Model Change rule to bring the Year dropdown into play.
- Now add a Change rule to the Model dropdown, with the code:
data.years = data.models.filter(function(element) { return element.value === data.model })[0].years; - The code above just sets the 'years' Data Field to the years property of the currently select model. It closely follows the Manufacturer change rule code but is implemented slightly differently to demonstrate there are different methods that can be used to achieve the same result. In this case, we use the JavaScript filter function to find the matching data from the models Data Field.
- Save and Publish your form
Now when you render the form, you will see the cascading behavior between the Manufacturer, Model, and Year dropdowns.
Next, learn about pre-submit validation.