Deploy a Form Space
Journey Manager (JM) The transaction engine for the platform. | System Manager / DevOps | 18.11 This feature was updated in 18.11.
Manager allows administrators to deploy form spaces. Form spaces can be used to provide branded access to a set of forms and to a group of users securely or anonymously (unsecured). You can deploy multiple spaces to provide unique entry points for customers, partners, help desk employees or employee self service; you can whitelist by IP, or authenticate against different directories. Forms can be deployed to multiple Spaces or to a single space to provide access to a single group of users.
At least one form space is required to provide access to forms (Manager v3.x and 4.0). At a minimum, the form space styling is used for the Confirmation Page and Attachment Page (Deprecated with FTX in 4.1). When using a fresh deployment of Manager, you will need to customize a form space to reflect your brand. When operating shared services, you will need to deploy a Space for each department or brand which you support. When managing different classes of users (employees, contractors, partners, public) who perform different data collection functions (multi-solution platform), you will want to deploy a new form space for each class of user.
Our staff often follow this guide to build branded demos, or to instantiate cost-effective POC environments on shared infrastructure. Clients can use this guide to manage their own platform.
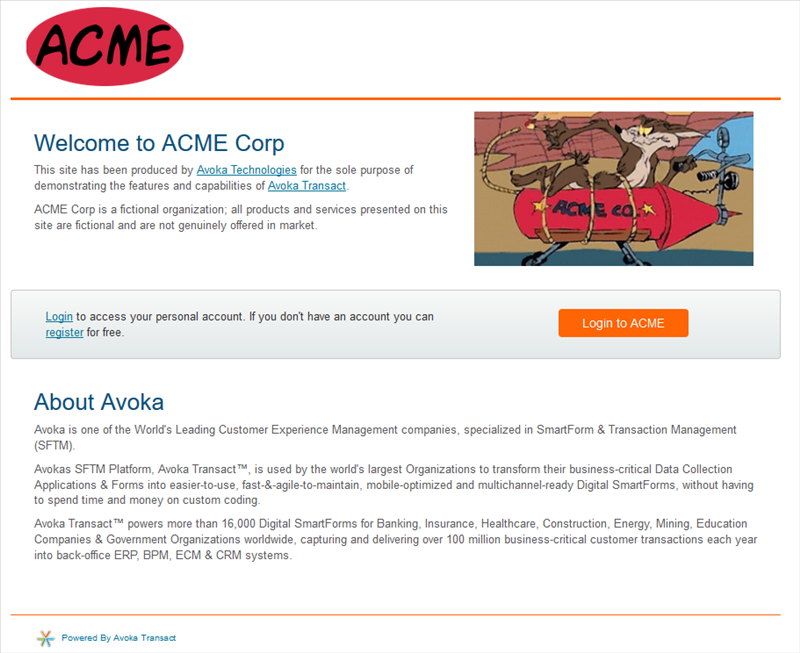
The outcome of this form deployment is shown below.
Preparation
Before getting started, you will need:
- Admin access to Manager
- Access to Apache configuration (or if hosted by Temenos, access to customer support)
- A copy of the Manager installer "Avoka-TM-Setup.jar" (ensure that you have the correct version).
- Optionally a form, ready to deploy, waiting in Composer for publishing.
You will also need to decide a few things:
- The name of the form space (EG: ACME Partner Space)
- The base URL context path (IE: the bit of the URL immediately after the domain name https://client.transactcentral.com/XXXX, where XXXX is the base URL context path). Note that your domain name will differ from this specific example.
- Which existing site to use as inspiration for theming.
Demo scenario
This guide will make some assumptions for the purposes of demonstration. You will need to make the obvious substitutions for the following:
- Manager Server: tm.demo.avoka.com
- Company name (brand): ACME
Method
1. Configure Apache
Configure Apache on your server to add a new context path "/acme". Traditionally URLs are lowercase; you should follow this convention.
If your Edition of Transaction Manager is hosted by Avoka, please contact support to request this configuration, and clearly identify which environment(s) should be updated (prod, test, UAT etc).
If your Edition of Transaction Manager is on premise, you may need to request a change to be made to your Web Server via your IT department, depending on your specific deployment configuration.
2. Run the java Transaction Manager Installer
This will not install software onto your computer, it just writes out some files. Just run it locally on your personal computer.
You should be able to just double-click the file "Avoka-TM-Setup.jar", however sometimes your computer's security settings will not allow double clicking jar files. In that case you can type "java -jar Avoka-TM-Setup.jar".
In the wizard:
- Make sure that you select the option to "Create a New Work Space".
- You will need fill in some details (see image below): The Space Name and Description fields are used only in Transaction Manager to help catalogue the space, but the Context Path option must match the context path defined in Apache.
- Ignore any additional options until you get to the "installation directory" page - you may want to choose something unique, if you are managing more than one Space or more than one version of Transaction Manager:
- Complete the wizard. Hitting "Install" will just produce a bunch of files in a directory, which we will use in the next step.
3. Deploy the Space
Log into Transaction Manager, and navigate to "Forms" -> "Form Spaces"
Press "Import WAR", and browse to the files you just created with the installer. You will need to find the "Deploy" directory, which will contain a single .war file.
A successfully deployed WAR file looks like this:
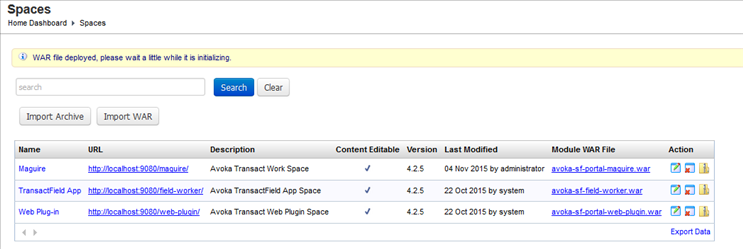
However, it won't work until you configure the form space.
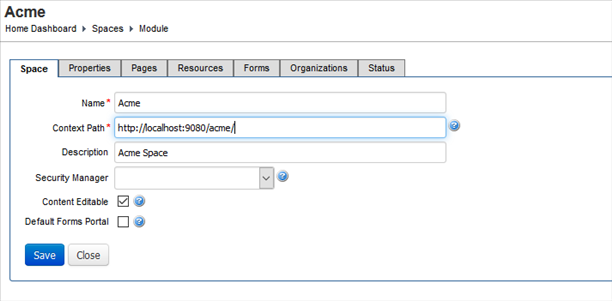
4. Configure the Space
Select the Space Name "ACME" to edit it.
You must edit the "Context Path" (which is set to "http://localhost:9080/acme/") to match the Internet Domain Name which matches your server. The easiest way to do this is to copy from your browser address bar:
You now have a deployed (but not configured) portal. You can test it by copying and pasting the entire Context Path into a new browser tab.
Before we get into branding, it is worthwhile to configure a few things at this point. This guide does not go into detail, however you will need to think about:
- Creating & configuring an Organization and associating it with the form space
- Provisioning access for yourself and any colleagues. Alternatively you might associate and configure a security manager (external directory)
- Deploy a form or two. At least for testing.
5. Brand the Space
To keep things simple, we will look at performing a very basic branding (logo and colors):
5.1 Replace the logo and hero image
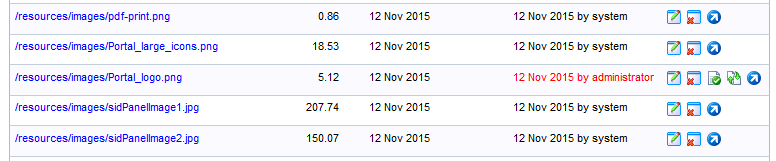
In the Space settings, navigate to the "Resources" tab, and find the "Portal_logo.png" object. Replace this with a file of your choice, by clicking the name of the resource. If you want to keep things simple, you should use a logo which is about 300x50px (+/-), has no border or bleed area and has a transparent or white background. (Feel free to get complex if you have time).
A successfully replaced resource will have a red modified date, but will retain the original resource name despite the filename which you have uploaded:
Do the same for the hero image (which is used by the index.html page). To replace this, look for the resource called "Fincorp_lady_370.jpg", and replace it. To keep things simple, use an image which is exactly 370 x 205 px.
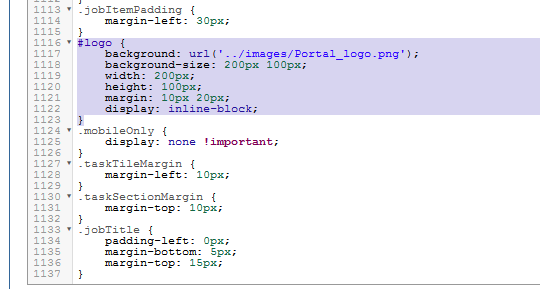
Next, you need to set the size of the logo. Look for the "Style.css" resource, and edit it. Scroll right to the bottom of the page to see the logo class, to edit the size of the logo:
5.2 Edit the index.html page
In the Space settings, navigate to the "Pages" tab, and find the "index.html" object. You can edit this page in the same way as above, to remove any reference to Maguire. You can keep things simple as displayed below, or you can replace the entire landing page with security information or alternate links to enrolment forms which do not require authentication. Some clients will delete all content in this page, so that staff can only get to resources via a link on another system (EG: Extranet or Intranet site).
By now, you should have something which has the following customisations:
5.3 Edit the portal CSS to reflect the brand
Edit the "Style.css" resource to change colors. You can use websites such as Stylify Me to choose new colors from an existing site. To start with look for the following:
- Any reference to Avoka's bright orange color #FF6405. Replace this with a bright corporate "callout" color. It's used for important things like reference numbers.
- .h1 class color (from #005280)
- .header border-bottom & .footer border-top (The page header & footer dividers)
- .btn-primary background-colour and .btn-primary:hover background-colour. Use primary call to action colors here.
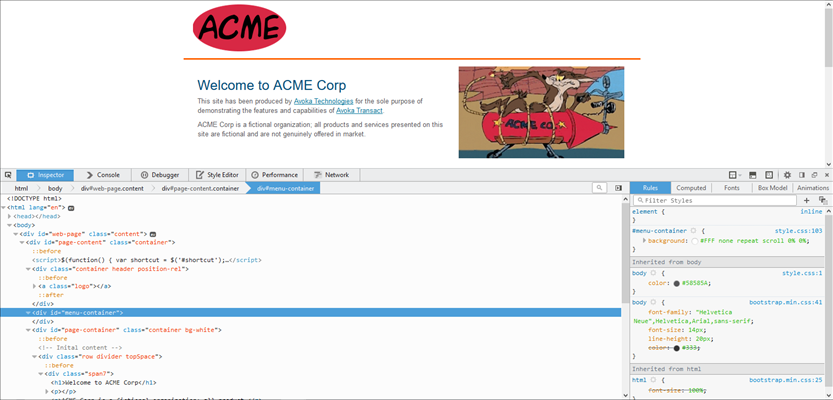
You can go much further than this. If, whilst testing, you find an element which you would like to recolor, you can easily find the class which describes it's settings by using your browser debugger. Just right-click on the object, and hit "inspect element" to get something like this:
If you are unfamiliar with your browser debugger
Keep in mind one technique: you may need to explore the HTML (bottom left pane), to find the right element, and you will need to scroll through the CSS pane (bottom right) to find the reference to the color. Most debuggers will display a color swatch (in this case orange), which can be used to find the right class quickly.
Once you have found the name of the class (in this case .btn-index), you will be able to search the Style.css file in Transaction Manager to edit the right property (in this example: background-color)
Next
- If you've built your Space in a non-production environment, it's easy to export it, and then import it onto a different server. All your Space settings will be retained. In this case, you will also need to think about the organization, and forms and user configuration which can be exported separately if required.
- You can perform much more complex customization of the Space, either by editing HTML pages & resources, or by editing the contents of the WAR file produced by the installer. This is not described in this document.
- Share the URL to some of your Space resources including forms, the base index page, or links directly to any page in the Space (EG: Account page, main menu, To Do list etc). These can be used by other systems to provide direct navigation to Transact resources.
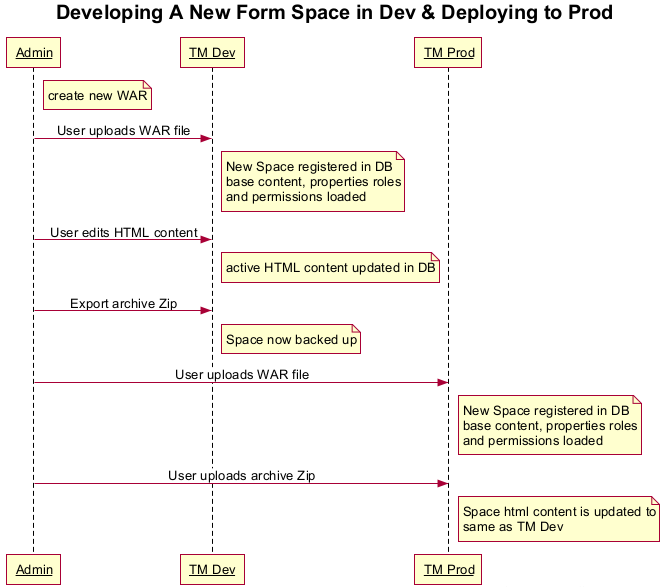
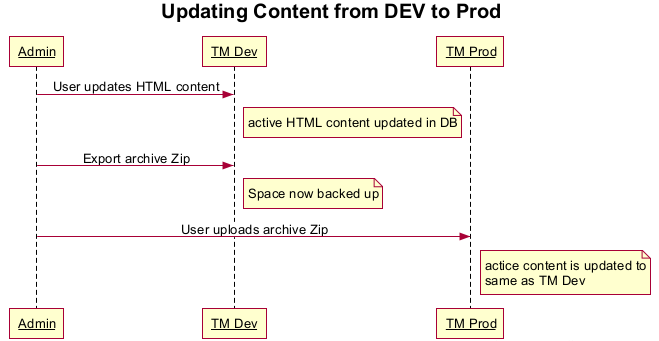
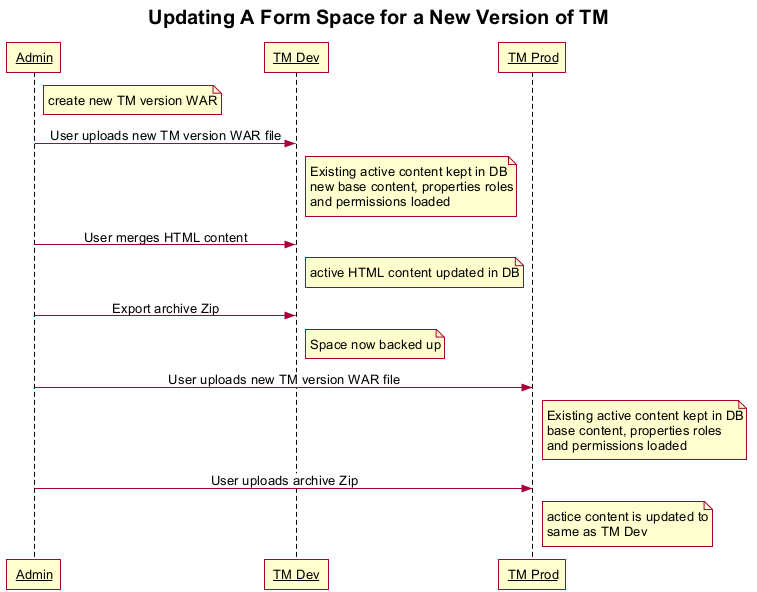
Production Deployment
The following sequence diagrams explain how to deploy a form space into production.
Next, learn how to configure form space properties.