Repeating Block Template
MaestroThe UI design product. | Form Builder | All versions This feature is related to all versions.
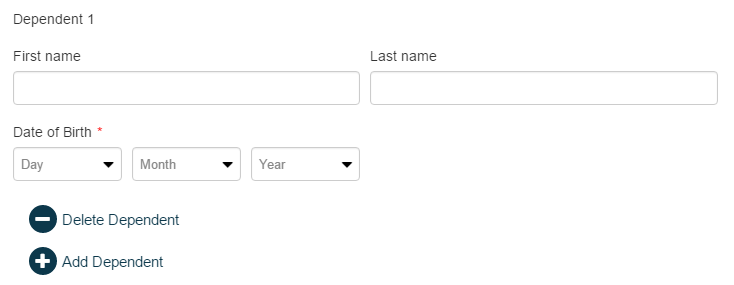
Maestro provides the Repeating Block Template component to allow users to add multiple instances of an item to a form. This is a useful when the number of instances varies for each form user, for example, when you need to add first and last names of all family members.
To configure the Repeating Block Template component on a Maestro form:
- Open a Maestro form.
- Select Repeats from the Palette.
- Select Repeating Block Template and drag it onto the form.

- Add components to be repeated to the Repeating Block Template component, as shown below.
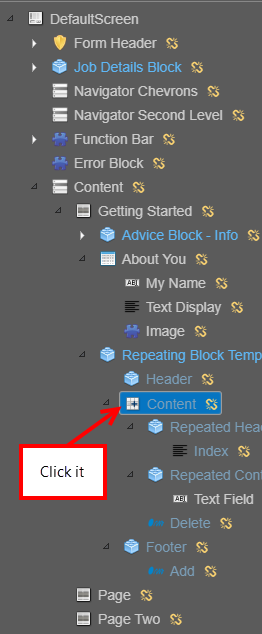
The Repeating Block Template is made up of several different components. It is important to customize the correct part of the repeating block template depending on what you are trying to achieve. For example, when items are added to the Repeating Block Template, they are added to the Repeated Content block. However, if you would like to change the Repeat Item Label or the Min or Max items in the repeat, you will need to select the Content block.
- Select the Content of the Repeating Block Template to edit it.
- Click the Properties tab.
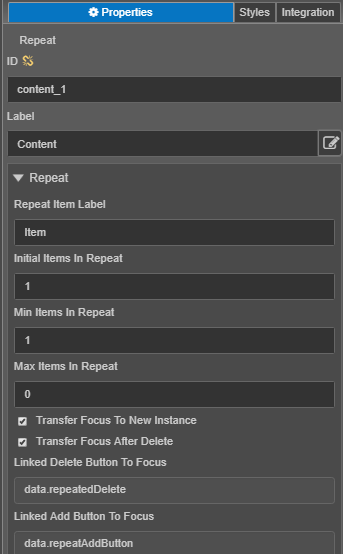
- Edit the Repeat properties.

- Repeat Item Label - changes the heading within the repeating section and the button labels.
- Initial Items in Repeat - the starting number of repeating items, which defaults to 1. Change it if required, but there must have at least one item in the repeat block.
- Min Items in Repeat - The user can add or remove items. This is the minimum number of items that must be displayed on the form. You must have at least one item. Once the minimum is reached, the Delete button can disappear.
- Max Items in Repeat - You set a maximum number of repeating items for the form user. Once the maximum is reached the Add button can disappear. Enter zero to indicate that there is no maximum number of items.
- Transfer Focus To New Instance - When the user adds a new instance/item, the focus will be on the first component of the new instances/items.
- Transfer Focus After Delete - When the user deletes an instance/item, the focus will be on the first component of the previous instance/item.
- Linked Delete Button To Focus - When the user deletes an instance/item, the focus will be on the delete button of the previous instance/item in the repeat.
- Linked Add Button To Focus - When the user deletes all instances/items in the repeat, the focus will be on the remaining add button. This setting is only relevant where the Min Items in Repeat is set to 0.
- Edit the Button Options properties.
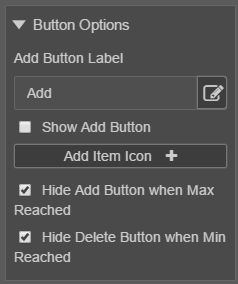
- Add Button Label - allows you to change the wording on the Add button. The default is "Add" plus the Repeat Item Label that is “Add {{item.properties.itemLabel}}”. Click Edit to edit the button text in the editor, which allows you to use properties from other elements of the repeating block.
- Hide Add Button when Max Reached – select it to hide the Add button when the Max Items In Repeat is reached. This is selected by default.
- Hide Delete Button when Min Reached – select it to hide the Delete button when the Min Items In Repeat is reached. This is selected by default.
- Edit Rules to implement specific customer requirements.
- Click Save.
- Click Build and Render Form to see how this rule is displayed when the form is built and rendered.


Hide Delete Button for a Single Item in the Repeating Block Template
Each time a new item in a repeat block is created, Journey Maestro creates an Add Item button and a Delete Item button on the item. These buttons are used to allow the form user to continue to add items until they have entered all items that are required of them. However, there may be times where a Form Builder doesn't want to give the form user the option to delete an item until a certain validation rule has passed. The Form Builder may also only want the delete button to appear on certain repeat items.
To hide a delete button for a single item in a Repeating Block:
- Configure the repeating block template component.
- Select the Delete Item button from the Repeating Block. Delete Item buttons in the Repeating Block Component have their own visibility rules that can be modified to create expanded validation and sometimes extra functionality.
- Click the Properties tab and expand Rules of a default Delete Item button.
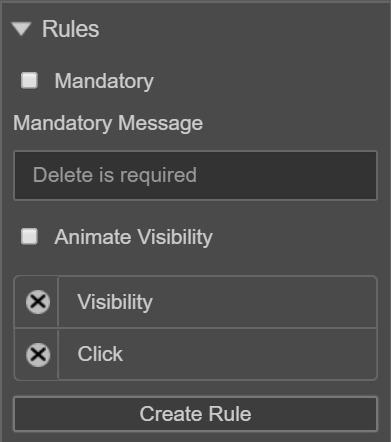
- Click Visibility to edit the rule. This rule is created by default for all Delete Item buttons in a Repeating Block. To hide the delete button, you need to add additional logic to this rule.

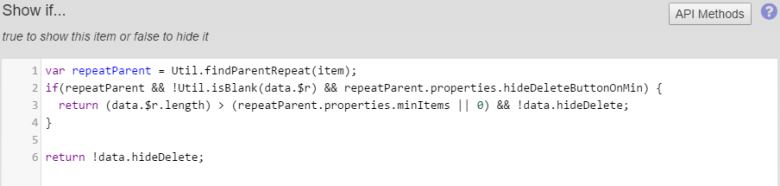
- Edit the JavaScript rule. In this example, we use a checkbox to decide which instances of the repeat block will display a delete icon button. When the Hide Delete checkbox is selected, the Delete Item button is not displayed for the following item, as shown below.
- Click Save.
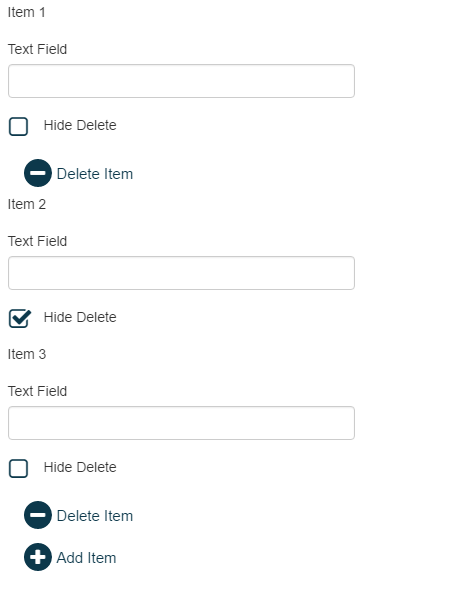
- Click Build and Render Form to see how this rule is displayed when the form is built and rendered. The example below displays this visibility rule applied to a Repeating Block when the Hide Delete checkbox has been selected after the first Text Field is displayed and the result of this selection is that the Delete Item button is removed from the second item.


Next, learn about the section component.