Configure Maestro Forms for Use with Collaboration Jobs
MaestroThe UI design product. | Form Builder | All versions This feature is related to all versions.
Maestro forms require configuration before you can use them with collaboration jobs, including:
- How to configure data extracts.
- How to use the collaboration job components that are included in Maestro by default.
- How to set form rules, such as visibility and editability rules, based on collaboration job's steps.
- How to preview your form in Maestro and simulate the collaboration job behavior.
In this example, we use the Maestro form configured with the Review and Approval – Multi Step Group Review job controller service in Manager.
Data Extracts
Some form components are required to be saved as data extracts so they can be used with collaboration jobs. For example, the forms used in this example where an applicant enters a loan amount. If the reviewer approves the loan, the Loan Amount on the Request tab must be checked to validate if it exceeds the threshold of $20,000. In this case, the loan must be also approved by a manager. To achieve this, we will pass the entered loan amount from the form to the job controller service in Manager using the form of data extracts.
To include a component into the data extracts:
- Select a component to be extracted from the Structure panel or directly from the form editor.
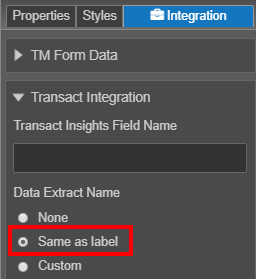
- Click the Integration panel.
- Expand the Transact Integration section.
- Select the Same as label radio button.
- Alternatively, if you want the data extract's name to be different from the form component's name, select the Custom radio button and enter a new name in the text field. This depends on the name of the variable used within Manager such as in the job controller service. For more information, see submission data extract.
Collaboration Job Components
Collaboration job components have been created to assist the form builder in combining the collaboration jobs features into their forms.
To use a collaboration job component in Maestro:
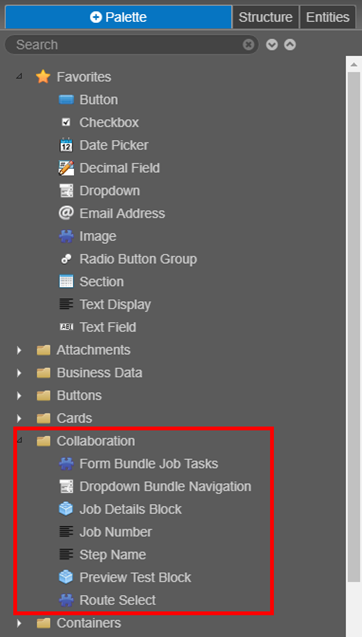
- Go to the Palette panel.
- Expand the Collaboration folder.
- Drag and drop a components you need on to your form.
The collaboration job components can be one of the following:
Form Bundle Job Tasks
This component is used for form bundles as a way of navigating and keeping track of forms that are still to be completed. It appears as a set of links for navigating to the applications for products previously selected. It has extra features such as allowing a user to click on only the applications that have not been completed and allowing to download a copy of any completed application.
Dropdown Bundle Navigation
It provides a similar feature as the form bundle job tasks, but it is presented as a simple dropdown.
Job Details Block
This component is for displaying collaboration job details on the form.
To display the collaboration job details:
- Expand User Experience.
- Click Form Options.
- Selecting the Include Collaboration Job Details.
- Use the Job Details Block to customize the location of the collaboration job details within you form or template.
Job Number
This component displays the collaboration job number.
Step Number
This component displays the step's name the collaboration job is currently at.
Preview Test Block
This provides a section in your form that can be used to test the form without having to render the form in Manager. The block is used for testing purposes and can be viewed from the preview mode in the Maestro editor. This allows the form builder to preview the form and make sure that the rules are set up correctly without having to leave Maestro. That is, without the form being first deployed to Manager and associated with a job controller. It is important to note that the Preview Test Block will never display in a built / rendered form as it only appears when using the Maestro Preview mode.
The following components may be entered:
- Job Reference will be shown in the relevant job details or job number fields. That is, it will appear in the Job Number and Job Details components where they appear on your form, or in the job details in the heading if you have ticked the Include Collaboration Job Details in the Form Options.
- Step Name is quite useful for testing the rules set up for presenting the correct form depending on which step name the form is up to. As this is a dropdown you must first configure the options to mimic the step name values of the job controller, which is also used in the visibility and editability rules configured for this form. To do this:
- Select the Properties panel.
- Expand the Dropdown section.
- Click Options.
- Enter each of the correct step name values for each row under the Label column. Make sure that the first one is left blank which is used for testing when the applicant first submits the application.
- Click Save.
- Available Routes is used for the Route Select dropdown component. It will plug in the correct values in the Route Select dropdown, which is the same as when passed from the job controller. The values must be entered as a pipe delimited string. You will also need to select the suitable step name from the Step Name checkbox above.
Route Select
This component is a dropdown that will present to a reviewer or manager reviewing the application a list of options. A review or manager will choose an option to indicate their decision. This component will dynamically plug-in the values for the options from the job controller associated with the form. This may be useful but there has been a preference towards using radio button group component instead. For more information, see below.
Form Rules
A collaboration job workflow is often required to be shared amongst the relevant parties, such as an applicant, a reviewer and a manager. For the form to be presented suitably to each user, you need to specify the form rules, such as:
- Applicants can enter their personal details but can't approve their own applications. However, they can update their initial request if it was declined.
- Reviewers can indicate their decision. They can view but not update any of the applicant’s personal or form request details.
- Managers can indicate their decision which is an additional decision to the reviewer decision. Managers can view but not update any of the applicant’s personal or form request details. Managers are like reviewers except they can only view but not update the reviewer’s decision.
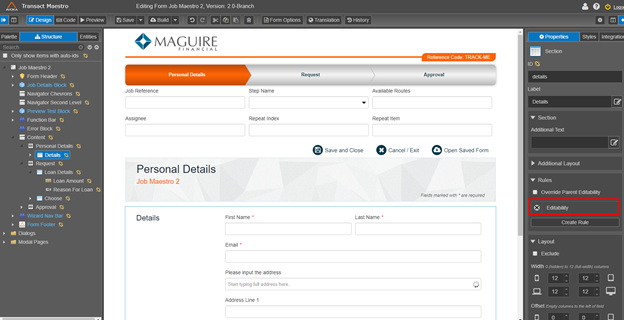
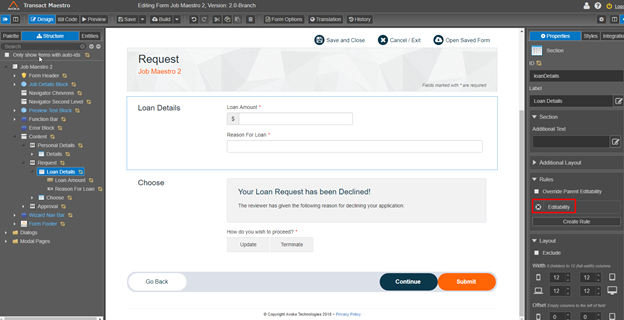
To allow only the applicant to enter and update their personal or form request details, you must create editability rules in your form as shown below.
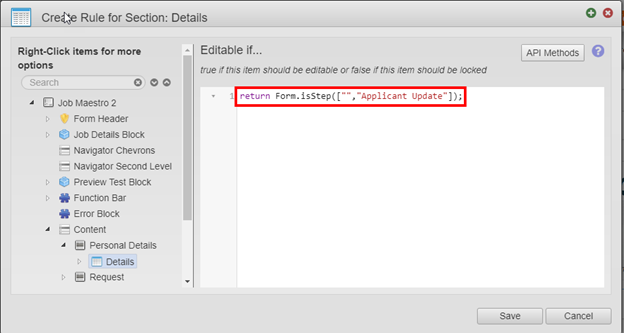
Create the editability rule with the second parameter matching the step name in your intended job controller service configured in Manager. In this example, the step name requesting the applicant to update their details is the Applicant Update step.
Add this same editability rule to the applicant’s request.
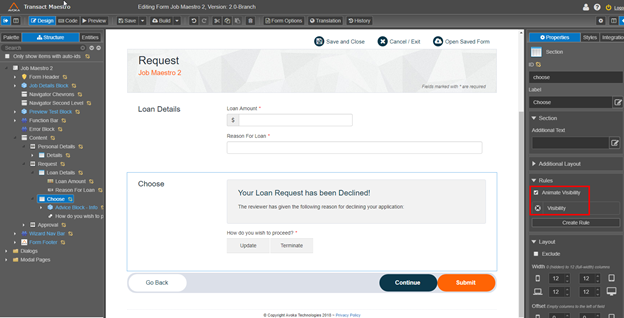
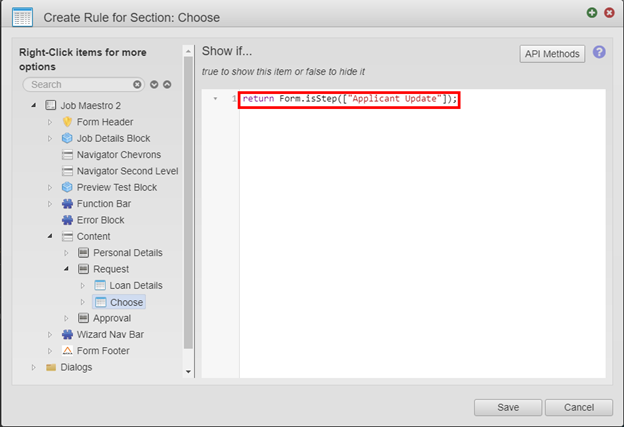
Create the following visibility rule to present the relevant information to the applicants when their application was declined. This rule allows them to choose whether to update or terminate their loan application.
This rule is only relevant for this section to appear when the application was previously declined.
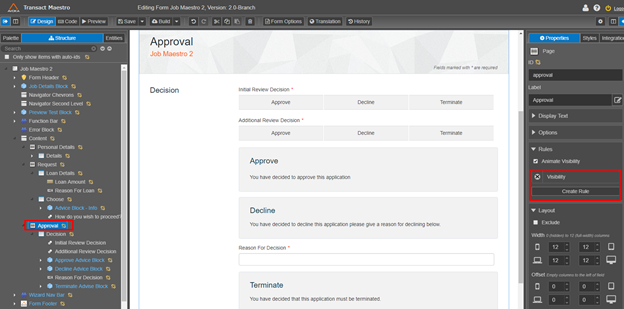
A visibility rule is created to only show this tab to both reviewers and managers.
Create a new rule as shown below.
Using a Radio Button Group for the Reviewer and Manager Decision
Both the reviewer and the manager need to be able to indicate their decision on the form. Previously, we covered the Route Select component, which dynamically loads each of the possible decisions for a reviewer and a manager, using the job controller service. However, a radio button group is much better choice because:
- It looks nicer than a dropdown list.
- Feedback and decision can be clearer.
- The form receipt indicates the decision that was made.
- It accommodates for additional instructions or feedback to the reviewer and manager.
The only negative side is that the radio button group doesn’t allow for the dynamic load of the radio button options based on the job definition service. You must hard code the possible decisions as radio button options on the radio buttons group.
In this example, the reviewer and the manager are both involved in the collaboration job, so we will use the Review and Approval – Multi Step Group Review job controller service.
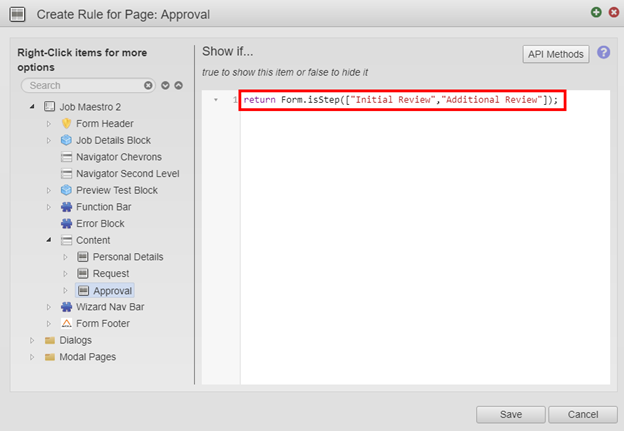
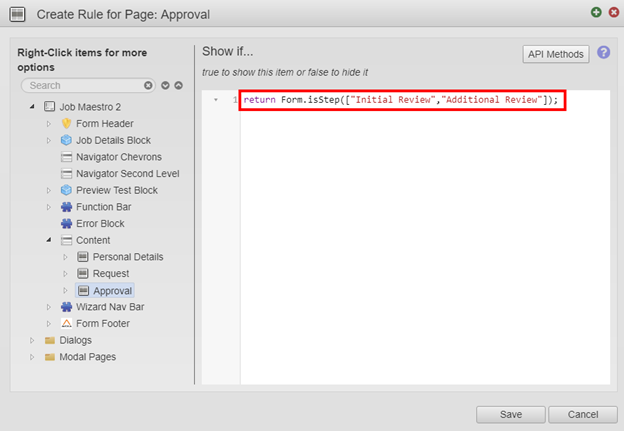
As this decision feature is not available for the applicant, it makes sense to add a separate tab, the Approval tab, to your form, which can be shared amongst the reviewer and manager, so it is only visible to them.
To create a new visibility rule:
- Select the Approval tab.
- Select the Properties panel and click Create Rule.
- Add the following rule.
-
Click Save.
Being a shared tab, we need to manage the form interaction correctly for each of the parties involved. For example, the following rules apply:
- A reviewer can indicate their decision, but can't see the manager’s decision.
- A manager can indicate their decision, which is an additional decision to the reviewer decision. A manager is like a reviewer except they can also view, but not update the reviewer’s decision.
To keep it simple, we will cover some of the rules here, but you will need to determine all the rules that apply for your form.
To create a radio button group for the reviewer decision:
- Open your form in Maestro.
- Add a new tab, the Approval, to capture the reviewer and manager decision.
- Drag and drop the Radio Button Group component onto your form and name it Initial Review Decision.
- Select the Properties panel.
- Expand the Button Group section.
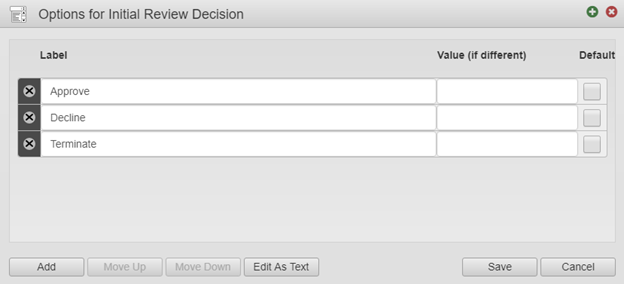
- Click Options.
- Enter each of the decision options under the Label column, for example, Approve, Decline and Terminate.
- Click Save.
- Expand the Rule section and select the Mandatory checkbox to make the decision mandatory to minimize ambiguity.
To create a radio button group for the manager decision, repeat the above steps 2 to 8 and give it a suitable name, for example Additional Review Decision.
As explained above, the two radio button groups require different rules, so for the reviewer, the Initial Review Decision radio button group, you need to create the following two rules:
Change Rule
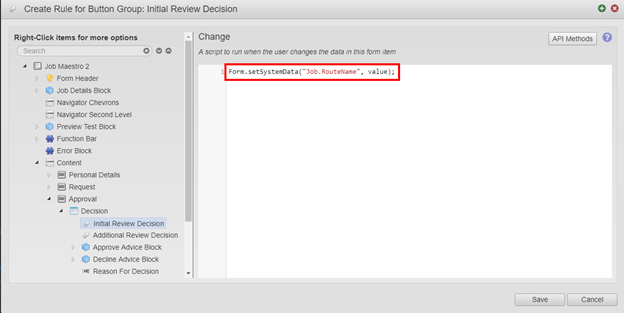
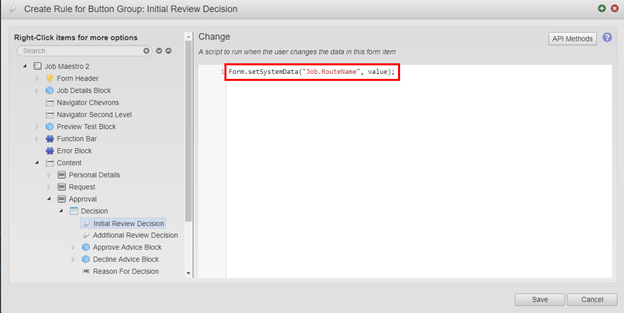
An added complexity exists with sharing this form regarding which decision must be used for the job controller to decide what to do next. For this, you need to create a change rule which plugs the reviewer decision to the system profile route name, Job.RouteName, only when the reviewer has changed this. This means that, on change, the reviewer decision will be used by the job controller. To do this:
Editability Rule
As the reviewer can also be seen by the manager we need to make sure that only the reviewer can update this. To do this:
For the manager, the Additional Review Decision radio button group, we need to create the following two rules:
Change Rule
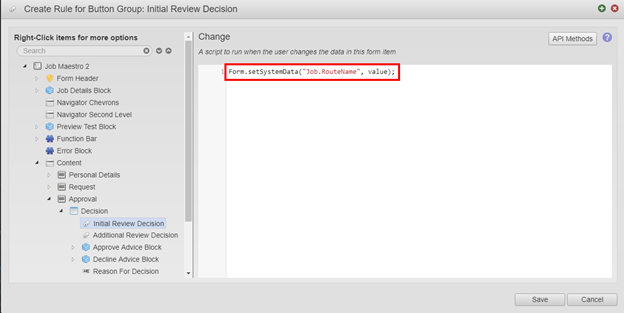
The same change rule as for the reviewer needs to be added here to allow the manager’s decision to be used for directing what happens next when this has been changed.
Visibility Rule
This radio button group must only be visible to a manager. To do this:
Some other rules that may be relevant are:
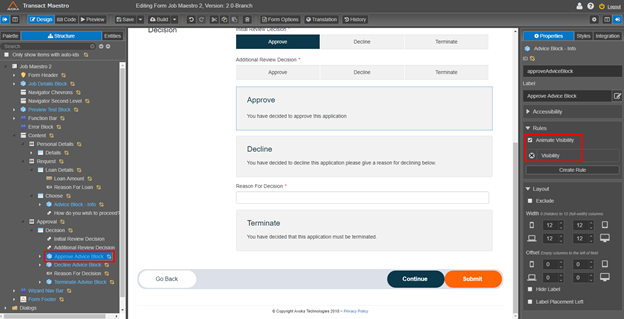
In this case an Approve Advice Block pops up when the reviewer or manager clicks the Approve radio button option, to highlight the decision they are about to submit.
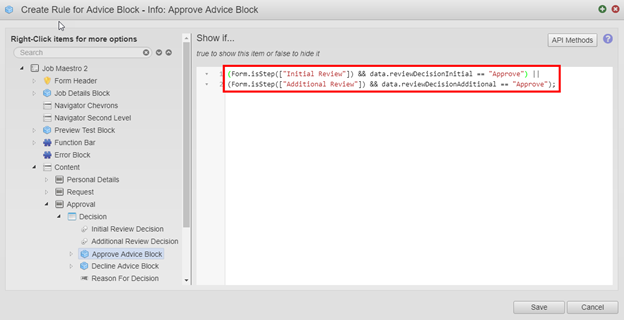
For this the visibility rule is:
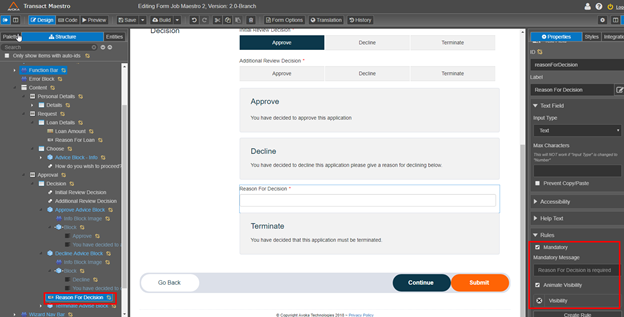
When either the reviewer or the manager declines the application, they must enter a reason for their decision.
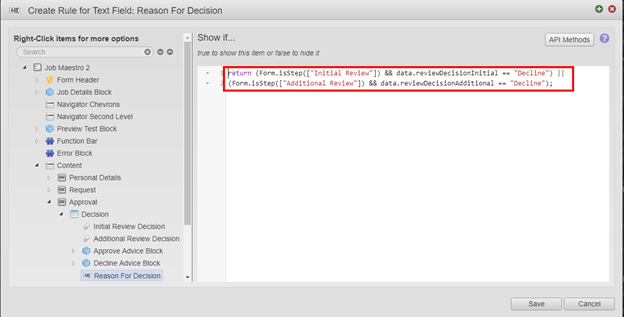
The following visibility rule is required for the Reason for Decision field which is ticked as Mandatory.
The visibility rule is:
Now, your Maestro form is ready to be used with collaboration jobs.
Next, learn how to configure Composer forms for use with collaboration jobs.
