Add Google Tag Manager to a Composer Form
Journey Manager (JM)
The transaction engine for the platform. |
Form Builder System Manager / DevOps | All versions
This feature is related to all versions.
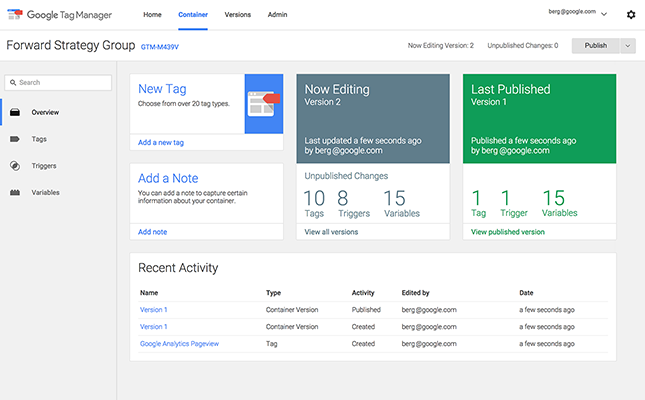
Google Tag Manager (GTM) lets you launch new tags with just a few clicks, so you get better control over your digital marketing and analytics software faster. The typical GTM dashboard is shown below:
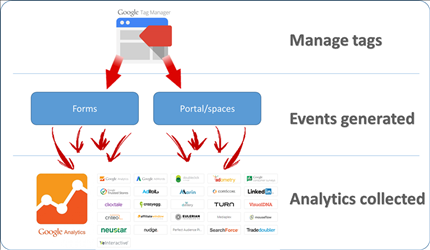
In combination with manage, GTM will allow you to collect analytics information by adding tags to any field, or action in your form without having to make any code changes. This how-to article describes how to add GTM in Manager and how to add tags to your form. We also have added a number of best practices as well as possible mistakes that you'd like to avoid when using GTM.
Online web forms created with Composer have a single-page architecture, whereby all of the content exists in a single rendered html page, but the user navigation flow is controlled through hide/show logic of different sections (or logical form pages). Whilst providing a better user experience, this means any standard Google Tag Manager (GTM) configurations that utilise page views to track web-site traffic will stop tracking the user movement once the form is opened - none of the in-form navigation will be tracked.
The Google Tag Manager (GTM) container discussed here provides a configurable user interface to enable web-site analytics for these forms - tracking user movement through the different sections of a form, as well as improved tracking for the separate pages that a user will be directed to after completion of the form.
This implementation includes Tags for the Google Analytics framework, however tags could be adapted or created to support any analytics engine.
The GTM container is a fully functional entity that can be applied to any Transact Composer environment. Installation and configuration can be summarised as a series of steps:
- Import the container into a Google Tag Manager account
- Configure Transaction Manager to enable Analytics with this Tag Manager Account
This how-to guide assume that you already have a GTM account with the "manage" permission. You will also have to download the Temenos GTM container.
These steps only need to be performed once for a Transaction Manager installation, but note that there is additional configuration required for each form that is to be added to the GTM implementation. This extra configuration will be covered below.
Import the Container into Google Tag Manager
The Temenos Journey Manager GTM Container is designed to run in isolation - the tags pre-configured within it will only produce page views for Temenos forms and their related pages. For this reason it is safe to use either option for importing the container into GTM - either merge it into an existing container, or create a new one.
It should be noted however that if choosing to merge it into an existing container, care should be taken that pre-existing tags and triggers do not adversely affect the pages. Additionally, if new tags are being created for forms, correct use of triggers should be maintained to ensure that the tags only fire in the correct places - and not in other pages that may be connecting to the same GTM container.
Steps for importing the container:
- Login to Google Tag Manager and select the correct container to import into (Navigate to the Accounts tab and select the relevant container - or create a new container if required)
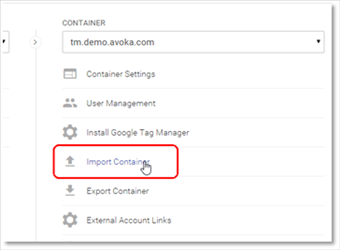
- Navigate to the Admin tab and select Import Container from the Container menu.
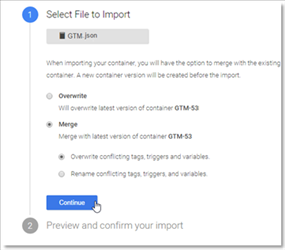
- Under Select File to Import navigate to the container file on the file system
- Select to either overwrite the existing container (for new containers only) or merge and press the Continue button.
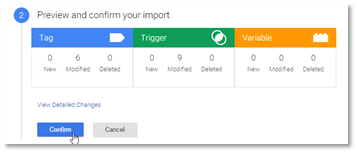
- After viewing the Preview hit Confirm to import the container.
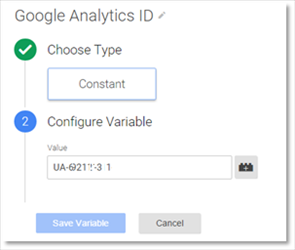
- Navigate to Container > Variables and select the Google Analytics Id variable
- Inside this variable, enter your Google Analytics Tracking Id. This is important to ensure that page views are being sent to the correct Google Analytics account.
Configure Manager to Enable Analytics
As stated, a Composer form is built using a single-page architecture, where all of the content added to the form in the Composer tool is rendered in a single HTML page, and hidden or shown as appropriate via browser scripting. However, the actual form content only forms part of the user-experience picture.
Landing pages, Save and Resume pages, Attachments pages and Submission Complete pages that may be presented to the user before or after they have filled in the form. These pages are also critical to deriving useful data from an analytics engine, and therefore need to be included in the GTM implementation.
Manager maintains global versions of these pages that are used by all forms by default, so it becomes important to be able to identify which form the page has been opened for. For the most part this can be achieved by using the formCode URL request parameter that is required to open the form, however for some of the post-form pages (Submission Complete, Attachments, Save Confirmation) this parameter is not provided. In these cases GTM has been setup to look for a form code within the HTML of the page that's been rendered, by finding a hidden element with the id of submission_formCode. The pages do not automatically include this hidden element, but any Manager user with the Portal Edit permission can add it with a few simple steps:
- After logging into Manager, navigate to System > Form Spaces
- Find the space that contains the form you would like to add GTM capability to, and click on the name of the space.
- Find the page to be edited, and click on the name entry.
- Navigate to the Pages tab.
-
Place the following HTML inside the page content. The location is not critical, but ensure it is not inside any conditional logic (with markup such as
#if ($session.emailed):<input type="hidden" name="formCode" id="submission_formCode" value="$form.formCode"/> - Save your changes (the button at the bottom of the page). These changes will need to be applied to the all pages that you would like to track even ts on.
Enable Analytics for each Form
Part of the configuration exercise is to enable the creation of analytics data on a per-form basis. This allows greater control over which forms are tracked (and when) as well as tailoring the exact look of the page views that are generated. Enabling analytics for a form involves steps in both Manager and GTM.
If any of these steps are not performed, no analytics data will be received for the particular form - even if it's published to an environment that already has other forms sending analytics data.
Having said that, it only needs to be done once for each form - thereafter, if changes to the form are made in Composer, and published to the Manager environment, this setup does not need to be repeated.
To add the GTM container script to the form:
- Select Forms -> Forms and locate a form you want to track.
- Click Edit and select the Page Tracking tab to enable page tracking.
- Select the Use Form Page Tracking checkbox.
- Select the Inside HEAD in the Page Script Include Position dropdown list. Keep the Tracking Script Template blank.
- Paste the GTM script in the Form Page Tracking Script text field to enable tracking of the form.
Note You can find the GTM script from your Google Tag Manager account by selecting Admin > Install Google Tag Manager.
- Click Save to update the changes.
Additional Forms Pages
Manager has the ability for a form to maintain its own version of these pages - so that different content may be displayed to the user for a particular form. However, this setup is optional, and if not configured, the default pages referred to in section 2.2 are used.
If configured, then these custom pages also require the same changes that were applied in section 2.2 - to include a hidden field with the form code that GTM can use.
Every time a form is being enabled for GTM it is therefore necessary to check whether any custom pages have been configured, and to edit these.
- Navigate to Forms -> Forms
- Locate the relevant form and click on the name entry
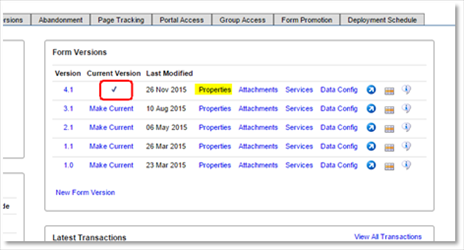
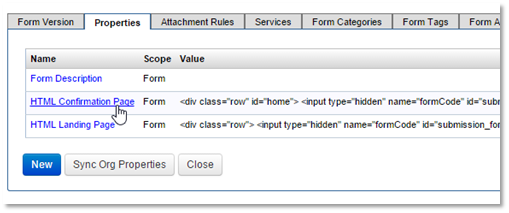
- In the Form Versions box, locate the version that is ticked as the default, and click on the Properties link for that version
- In the list of properties, if you see an entry for any of the relevant pages, they will need to be edited. The list of possible entries that will require editing are:
- HTML Confirmation Page
- HTML Saved Page
- If present, click on the name of the relevant property
- Place the following html inside the page content. The location is not critical, but ensure it is not inside any conditional logic (with markup such as
#if ($session.emailed):<input type="hidden" name="formCode" id="submission_formCode" value="$form.formCode"/> - Save your changes (the button at the bottom of the page)
Configure Google Tag Manager
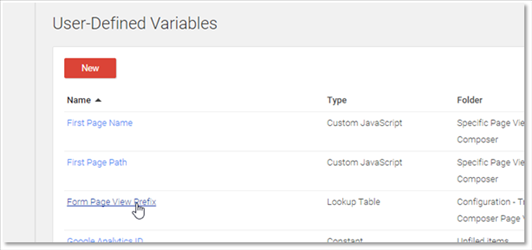
Navigate to Container -> Variables -> Form Page View Prefix.
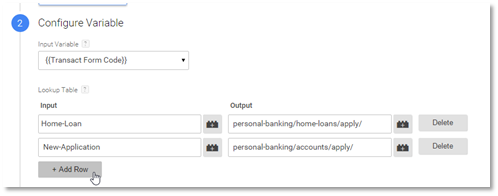
Click inside the Configure Variable section to allow editing, and add a row to the Lookup Table.
In the Input field, type the Manager Form Code and in the Output field enter the Page View prefix that will be used for this form. This prefix will be used for all Page Views generated by this form, and is a unique path that will identify the form in the Analytics engine
Save the Variable
Once all changes have been made, it is important to publish the changes using the Publish button in the top right corner of the GTM page. Once published, traffic on that form will generate the new page views which will be sent to Google Analytics
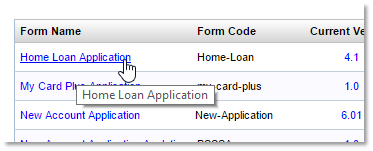
To find the Manager Form Code, open Manager, and navigate to Forms -> Forms. The resulting list will show the form codes for all published forms in that environment:
Further Information
The following sections include some useful information for GTM administrators that may be wishing to maintain the container, or make changes going forward.
Navigate and Locate Items in GTM
A folder structure has been setup inside the container to group relevant items together. By navigating to the Folders section (in the left-hand menu structure) items can be located a little more easily. The folder structure consists of the following folders:
- Configuration - Transact Composer Page Views - contains variables that relate to the changeable configuration. In particular, the Form Page View Prefix variable that an administrator needs to edit to add or change a form's analytics settings is located here.
- General In-form Navigation Page Views - Transact Composer - contains Variables, Triggers and Tags that are involved in generating the page views for in-form navigation - such as registering to receive custom events when a user changes sections, as well as the variables that resolve the section name from the custom event, to be used in the page view Tag.
- Specific Page Views - Transact Composer - contains Variables, Triggers and Tags for the page views that are to be generated for all pages outside of the actual Composer form - such as confirmation pages, attachments pages and landing pages.
General Functional Overview
In-form Page Views
To enable page views to be generated as a user navigates through the Composer form, a few key GTM elements have been configured.
- Register Page Change Form Events (Tag)
- Custom HTML tag type
- Injects some javascript that utilises the Composer libraries to detect when a user has changed pages, and sends a custom event to GTM - the custom event contains information relating to which section has been opened.
- Fires on Document Ready, but only in the SmartForm.html page, and if the form being viewed has been configured with a page view prefix (see the Document Ready with Section Level Analytics Trigger)
- Section Level Page View (Tag)
- Google Analytics (Universal) tag type
- Actually creates the Google Analytics page view with the relevant prefix and section information
- Fires on the custom page.change event that is generated by the user action
The other elements in this In-form Navigation folder in GTM are triggers and variables that support these two tags - mainly for extracting details from the generated custom event, as well as ensuring the page views only fire in relevant Composer form pages.
Other Page Views
For all other page views, a fairly simple paradigm has been followed of a single Trigger and single Tag. It should be noted though that these items also rely on other existing Variables, but going forward it is unlikely that these supporting variables would need to change.
As an example, the Submission Complete page views are configured as follows (and the other pages follow the same
- Submission Complete Page Opened (Trigger)
- Page View Trigger
- Fires on DOM Ready
- Checks that the Page URL contains confirmation.htm and that a form prefix has been configured for this form - which automatically ensures the page is a form confirmation page, and that the form has been set to use Google Analytics
- Submission Complete Page View (Tag)
- Google Analytics (Universal) tag type
- Uses the configured form prefix with a hard-coded page name - i.e. {{Form Page View Prefix}}submission
- Fires on the Submission Complete Page Opened trigger
Next, learn about the form dashboard.
