Global Filters

   Journey Analytics The behavioural analytics tool.  |   Analytics User |   Latest Version Latest version 21.05.0 cloud hosted.

Global Filters allow you to choose filters to define which transactions to analyse within Journey Analytics. Any global filters applied will impact all analytics views. The behavior of global filters and how to apply them are described below.

The filter allows you to determine which transactions are used in visualizations for all views. Constraints can be in the form of either a whitelist or a blacklist:

  • The whitelist filter values will filter all views to only show transactions which match the filters.
  • Blacklisted values will result in views only showing transactions which do not match the filter values.
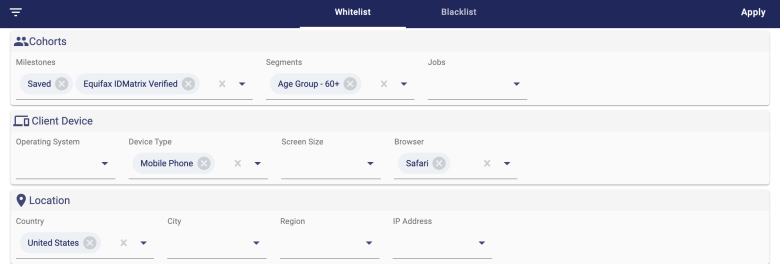
Applying filters

To add global filters, use the following steps:

  1. Determine whether you will create a whitelist (show only matching transactions) or blacklist (show non-matching transactions) filter.
  2. Click the Whitelist or Blacklist tab based on your filtering strategy.
  3. Click any of the filter dropdowns you wish to apply.
  4. Select the value to filter. You can manually input a filter value with your keyboard or use the dropdown options to select a value.
  5. Click Apply to refresh the analytics views with global filters applied.
Note

Selecting more than one filter value will restrict transactions to only those which match all selected values. The filters, in this way, are applied in an additive manner.

How it works

Global filters allow you to focus on particular transactions and to filter using a range of categories:

  • Cohorts - filter transactions for certain user groups. Read more about milestones, segments and Collaboration Jobs.
  • Client Device - filter transactions based on user device information.
  • Location - filter transactions based on user locations.
Whitelist vs. Blacklist

To only show trusted browser transactions, you could:

  • Add robot and crawler browser types to the blacklist to remove any such transactions from view.
  • Alternatively, you can whitelist only Chrome browser transactions to only show data for transactions from users on Chrome.

In this way, the filters are flexible so you can exclude or include transactions as needed.

Notice

The Legacy Dashboard app is now deprecated and replaced by the Journey Analytics Visualiser app. The Legacy app will be unavailable from v23.04.

The filters available allow you to focus on particular transactions and to filter by a range of categories which include:

  • Scope
  • Period
  • Client Device
  • Location
  • Cohorts

Apply and reset global filters

To apply the global filters you selected, click Apply. The selected filters will then be applied across all applications visible in the analytics views.

To reset the global filters, click Reset.This clears the global filters and resets the time period to 1 week.

To reset the global filters, simply click Apply again.

Scope filter

In v18.05 the Scope filter allows you to choose applications from available organizations and/or spaces.

To filter by scope:

  1. Select either the Organisation or Space checkbox.
  2. Select the organizations or spaces you want to filter by.
  3. Click Apply.

Consider the following:

  • When no organization or space is selected, all applications accessible to your Insights user account will become visible.
  • When one or more organization is selected, only applications from those selected organizations will be displayed.
  • When an organization is selected, spaces that are a part of that selected organization will become visible to select in the Space option.
  • When one or more spaces are selected, only applications from those selected spaces will be displayed.

The Scope filter is not required, as all organizations and spaces the user has access to in Journey Manager will be available for analysis.

Period filter

The Period filter allows you to choose a specific time frame where transactions associated with the selected applications were undertaken. The time period will remain visible on the top right-hand corner in all views of Journey Analytics.

To select the date range:

  1. Click on the Period filter.
  2. Click on the date range you want to analyze.
  3. Click Apply.

To select a custom timeframe:

  1. Click on the Period filter.
  2. Select Custom.
  3. Select your Start date and End date.
  4. Click Apply.
Note

The pre-defined period options are calculated backwards from 11.59 pm of the day prior to the current date.

Client Device filter

Filtering based on the client device allows you to analyze data coming from specific devices and configurations. This data provides information on how transaction data from different device configurations compare against one another.

For example, you may want to only show transactions completed using a mobile phone. To do this, filter by the Mobile Phone Device Type.

To filter by device:

  1. Select either the Operating System, Device Type, Screen Size or Browser checkbox.
  2. Select the options you want to filter by.
  3. Click Apply.

Location filter

The Location filter allows you to filter transaction data coming from specific geographies, such as Country, Region, or City. 

To filter by location:

  1. Select either the Country, City or Region checkbox.
  2. Select the locations you want to filter by.
  3. Click Apply.
Note

  • When one or more Countries are selected, all regions for the selected Countries will appear under the Region filter. You may then select one or more regions from the list.
  • When filtering by City, manually enter the name of the city. City names are case-insensitive.

Cohorts filter

 |   v18.05 & Earlier This feature is related to v18.05 and earlier.

The Cohorts filter allows you to filter transactions based on specific custom milestones that have been identified and configured in Maestro, Composer or Journey Manager.

From v18.11 you can also filter by Segments, that have been configured and addedd to the Segment Whitelist.

From v19.05 you can also filter by Collaboration Jobs.

Custom milestones are preconfigured events that occur in a transaction. To filter by milestone is to filter by a specific event that occurred in a transaction.

To filter by milestones:

  1. Select the Milestone, Segments or Jobs checkbox to display the a dropdown list.
  2. Select the milestones, segments or jobs you want to filter by.
  3. Click Apply.

Selecting more than one milestone in the Filter will only include transactions that contain all selected milestones. For example, in an application with configured milestones called Prefilled Info and E-Signed, that trigger if the user chooses to auto-populate form details or sign electronically, choosing both milestones in the Filter will display only the transactions that have both Prefill Info AND E-Signed milestones.

 |   v18.11 & Higher This feature is related to v18.11 and higher.

Segments are custom events or groups that are preconfigured and sent from a Maestro or Composer application, or from a groovy/fluent service on Journey Manager to Journey Analytics. Each segment event lets Journey Analytics know to which segment or group a transaction belongs to. A transaction can only belong to one segment or group. For instance, transactions can be grouped by gender, age or age brackets, products selected, or Exchange packages used to complete an application, such as the Mitek drivers license scan.

To filter by segments:

  1. Select Segments to display the segments dropdown list.
  2. Select the segments you want to filter by.
  3. Click Apply.