Configure Form Email Verification
Journey Manager (JM) The transaction engine for the platform. | Platform Developer | All versions This feature is related to all versions.
A verification email is used to confirm the email address of a form user. Manager allows you to configure these verification emails for selected forms. Once configured, these emails are sent when a user submits a form. Commonly, a verification email includes a link that the user must click to verify their email address. A form does not send a verification email by default, so you have to enable this option manually.
For submission email verification to work, a contact email address must be stored for the submission. For more information, see configuration mapping.
To configure a form with a verification email:
- Select Forms > Forms.
- Locate a form and click Edit.
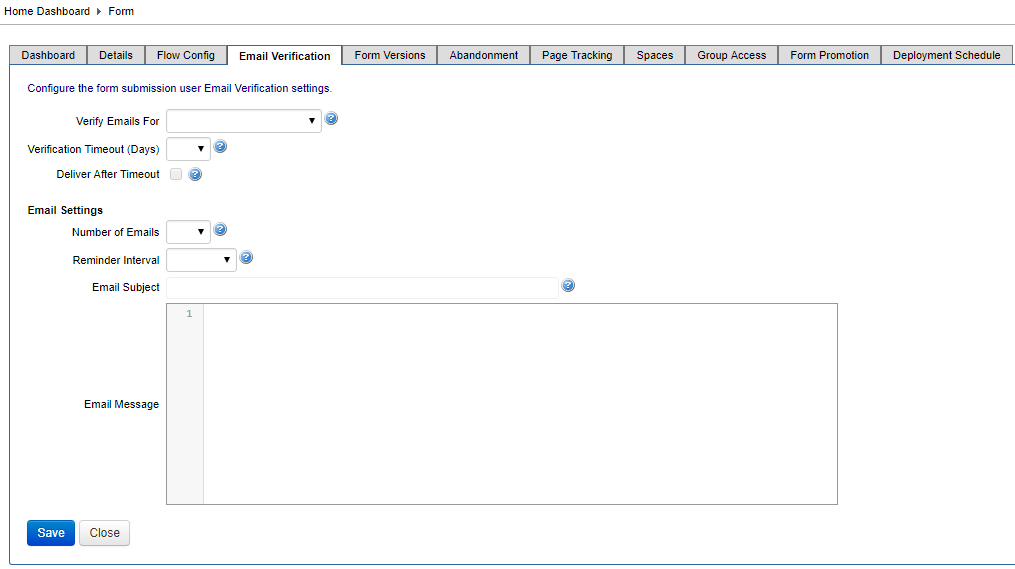
- Click the Email Verification tab.
- Select Verify Emails For to specify when to send an Email Verification to the form user.
- Blank - to disable email verifications. This is the default option.
- Anonymous Submissions - to enable email verification for submissions from an anonymous user only.
- All Submissions - to enable email verification for submissions from all users.
- Select Verification Timeout to specify how many days (at maximum) you want to give a user to verify their email address. After verification timeout has been reached, the form submission will be abandoned by default unless opting to deliver submission anyway (Deliver After Timeout is selected).
- Select Deliver After Timeout to indicate once a user misses the due date as per the Verification Timeout, whether to deliver the submission anyway (selected) or to abandon the submission (unselected is the default).
- Select Number of Emails to specify how many emails in total will be sent to a user as a reminder to verify their email address.
- Select Reminder Interval to specify the time (hours or days) to wait before sending each reminder email. For example, if Number of Emails is 3 and Reminder Interval is 7 days, then a user that hasn’t verified their email address will receive up to 3 verification emails every week.
- Edit Email Subject to specify the subject text of the Verification Email. It is predefined as Please Verify Your Email.
- Edit Email Message to specify the message defined using basic HTML mark-up. It is predefined with a message. When making changes to the Email Message HTML, ensure the message always contains the URL that the user needs to access to complete submission email verification (the placeholder is
${verificationUrl}). - Click Save to update the changes.
If the Email Verification is selected, you can configure the following options.
Select the Deliver After Timeout checkbox only when email verification is not mandatory.
Next, learn how to view form versions.