Library Advanced Features
Composer This topic is related to Transact Composer. | Form Builder | v4.3 & Higher This feature is related to v4.3 and higher.
Overview
As we have already seen above in TheHierarchyandEnvironment, an Account has Libraries and Organizations under it. Also, there are also special libraries called "Releases" and "Service Packs" which we will call here "Compatibility Settings"; but these are assigned to Organizations. Also, the Organization itself has its own library elements attached to itself. Here are the different Libraries and their locations:
|
Library Type |
Location or Association |
|
|
Compatibility Settings |
Releases |
Live above the Workplace structure. Each Organization is associated with a particular release. |
|
Service Packs |
Live above the Workplace structure. Each Organization
may be associated with particular service packs.
|
|
|
Ordinary Libraries |
Native Libraries and Style Packs |
Style Packs are Libraries packaged by Avoka
Technologies. Otherwise, they are ordinary Libraries.
|
|
Library Type |
Location or Association |
|
|
Account |
||
|
Shared Libraries and Shared Style Packs |
These are ordinary Libraries that live in other Accounts and which have been explicitly shared with this Account. |
|
|
The Organization's Internal Library |
Lives inside the Organization, not — unlike the other
Libraries in the Account — as a separate Library entity
under the Account. |
Composer Account Administration
If you wish to carry out work on Libraries, you should consult the
"Transact Composer Account Administration Guide". This is a handy
reference on where to go in the Composer user interface in order to carry
out such important Library-related tasks as:
Allocating users at the Organization and Project levels Creating and
importing libraries
Inspecting which libraries are available to Organizations Assigning
Libraries from other Accounts to an Organization
Maintaining Libraries and their contents (style sheets, templates, custom
types and property sets) Ongoing maintenance
Maintaining compatibility through revision maintenance of Organizations
The Administration Guide gives a number of tasks to be completed in order to
make Libraries and particular Templates available to Project users. The rest
of this topic below discusses the theory on how the stack of inheritance
works and what its effects are. The administration tasks and the theory work
together and both need to be understood.
How Libraries Relate to Organizations and Projects
There are 2 properties in the behavior of libraries that need to be
understood here:
Visibility and
Inheritance
Visibility is the easier to understand. Inheritance then is a consequence of
visibility.
Inheritance is extremely important. It determines what templates are
available at the form level and the style of each template at the Project
level. Please refer to
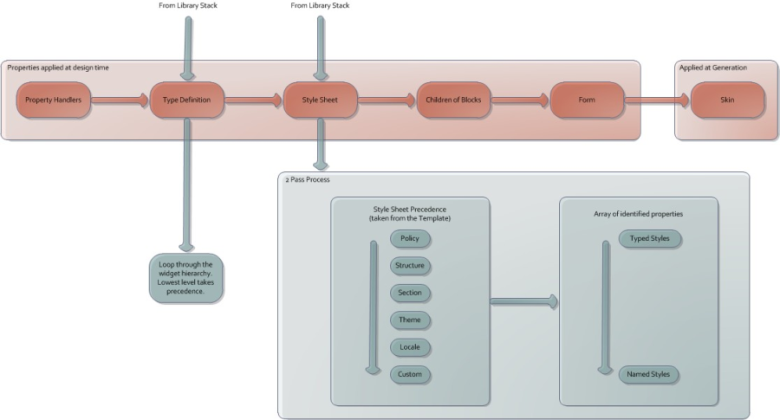
Inheritance Within Forms. especially the diagram showing how the inheritence of library components
then affect the behavior of the form's elements.
Visibility
Ordinary Libraries at the Account Level
Ordinary Libraries — those not part of the Compatibility libraries — are
visible at the Account Level. The rules for visibility for ordinary
Libraries operate at the Account level and are:
Libraries that are live in an Account are visible to all Organizations in
the Account. This includes Libraries imported into an Account via a package.
("Workspace -> <Account> -> Import Library or Organization
link") The Libraries of an Account can be explicitly shared (or not
shared) with other Accounts. (Go to "Workspace
-> <Account> -> <Library> -> Administration tab ->
Library Share sub tab".)
Visibility means that the components of the Library, withthe exception oftemplates, are shared by all Organizations and their
children in the Account. Here, we do not include Administration (the
configuration settings for visibility for users and Organizations) and
Problems (a log of error messages for the Library).
Compatibility Libraries
Compatibility Libraries contain Releases and Service Packs; these are
visible at the Organization Level. They are allocated at the Organization
level in the wizard when a new Organization is created ("Workspace
-> Create New Organization link"). Compatibility can be changed
later (via "Workspace -> Organization -> Change Release action
button"), meaning that the Organization will point to a different set
of compatibility Libraries.
So, the consequence is that different Organizations in the same Account can
be compatible with different Composer versions and service packs.
The Organization's Internal Library
In terms of its type of contents, the internal Library is pretty much an Ordinary Library. But in terms of its effect, it is the most powerful of all the Libraries because it lies above the Search Path settings of the Organization.
Search Path Inclusion at Organization Level
When an Account is visible to an Account, either by virtue of belonging to
the Account or by being shared, the contents of the Library still doesn't
affect the Organization until it has been included in the Organization's
Share Path. You specify the share path in "Workspace ->
<Organization> -> Update Organization Details action button ->
second screen of the resultant wizard".
Note: the choice of Libraries for search path inclusion is
only between Libraries native to, or shared with, the Account.
Templates
Template availability operates at the Project level. Only Templates from visible, search path-included Libraries can marked "Available" to a Project.
Visibility Summary
Note: Visibility has to cascade down from the Account Level. Thus, for a Template to be allowed for a project, its Library has to be shared at the Account Level and put into the Search Path at the Organization Level.
|
Level |
Object |
Location |
Method |
|
Account |
Ordinary Library (Templates, Stylesheets, Custom Types, Resources) |
Within Account |
Always Visible |
|
In another Account |
Shared with other accounts:
|
||
|
Organization |
Compatibility Libraries (Releases and Service Packs) |
Assigned to Organization through "Release Settings" |
In wizard when creating account
|
|
Level |
Object |
Location |
Method |
|
button" |
|||
|
Ordinary Library |
Anywhere in the |
In wizard when creating |
|
|
(Templates, Stylesheets, |
environment. |
account |
|
|
Custom Types, |
Must be shared with the |
"Workspace -> <Account> |
|
|
Resources) |
Account and included in |
-> Create New |
|
|
the Search Path |
Organization link" and 2nd |
||
|
screen of the resulting |
|||
|
wizard |
|||
|
or when updating |
|||
|
Organization |
|||
|
"Workspace -> <Account> |
|||
|
-> <Organization -> |
|||
|
Update Organization |
|||
|
Details action button", 2nd |
|||
|
screen of the resulting |
|||
|
wizard. |
|||
|
Internal Library |
Is automatically allocated to every Project in the
Organization. |
Examine and populate this library through
"Workspace |
|
|
Project |
Templates |
Anywhere in the environment.
|
Allow or Block the template from being used in new forms
in the project. "Workspace -> <Account>
|
Inheritance
The Cascade
Stylesheets and Custom Objects now live in the Libraries, not in Templates.
All Organizations now inherit all the Stylesheets, Custom Objects and
Resources contained in the Compatibility Libraries.
This means that all users have access to all the objects in a release and
that all the release's widgets will appear in the Form Editor's palette. (In
fact, if you have the access, you can open a release and you will find that
the widgets in the "Custom Types" tab, though you must check
"Include non-editable types" to see them.)
So, there is a cascade of inheritance at the Project Level. which is where
the Library visibility settings matter. Forms within the project inherit the
Library visibility of their Project. The form inherits all the Stylesheets,
Custom Objects and Resource, plus all of the allowed Templates, of all the
visible Libraries.
Search Path Order
So, what happens when there is a conflict, for example stylesheets in
different libraries with the same name? This is resolved as follows, moving
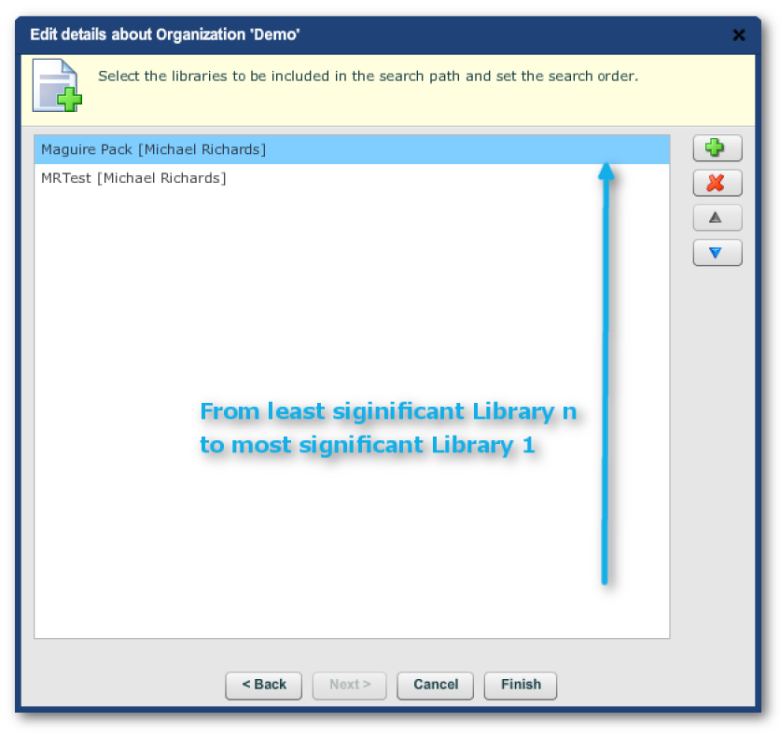
through the stack of libraries from the least significant to number 1 in the
Search Order and then to the Internal Library:
Compatibility Library -> Search Order Library n -> ......... ->
Search Order Library 1 -> Organization's Internal Library
The Internal Library, therefore, lies at the top of the stack.
You set the Search Order in "Workspace -> <Organization> ->
Update Organization Details action button -> second screen of the
resultant wizard":
Do note that where n > 2, the search order for the other lesser
significance libraries may still matter because the element at the top of
the stack may not specify every parameter and those that are not specified
will be populated according to the order of values encountered in the stack.
Custom Types
Location: Workspace -> <Organization> -> Custom
Types tab or
Location: Workspace -> <Library> -> Custom
Types tab
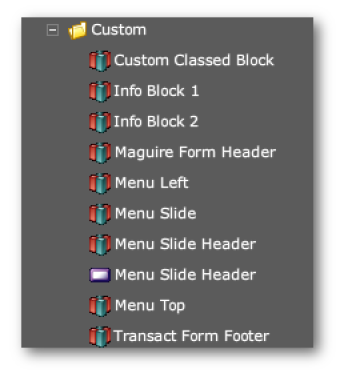
Custom Types refers to all the members of the Widget Palette of the Form
Designer. There are 2 types of Custom Types:
Non-editable CustomTypes
the standard members of the Widget Palette.
Editable Custom Types which are your saved types.
Localization Keys
used for the Internationalization of forms. We will discuss this elsewhereinthis guide.
Non-editable
To list the non-editable Custom Types visible for a Library (either Ordinary
or internal to an Organization), go to the Custom Types tab of the Library
or Organization. Set the "Filter By Source" to "All".
There are no Action items.
All the non-editable Custom Types have been
inheritedfromthestack, so the bulk of them come from the Release and Service Pack.
Editable
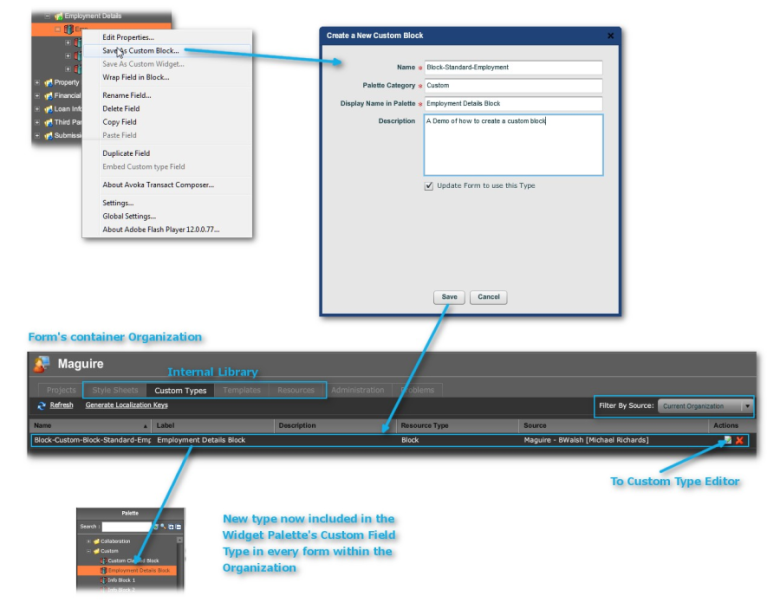
There is only one way to create a Custom Type: by using "Save As Custom
Type/Block" from a form's Structure Panel. The newly-saved type will
then appear in the Internal Library of the form's containing Organization.
It is not possible, using the User Interface of the Form Designer, to create
a Custom Type in one of the Account's Ordinary Libraries.
Because of the position of the Organization's Internal Library in the
inheritance stack, your Custom Types will be available to all Projects in
the Organization. However, you are not able to export these to other
Organizations in the Account or to other Accounts. You can, though, export
the whole Organization as a package and import it into another Account and
the Custom Types in the imported Organization's Internal Library will also
come across.
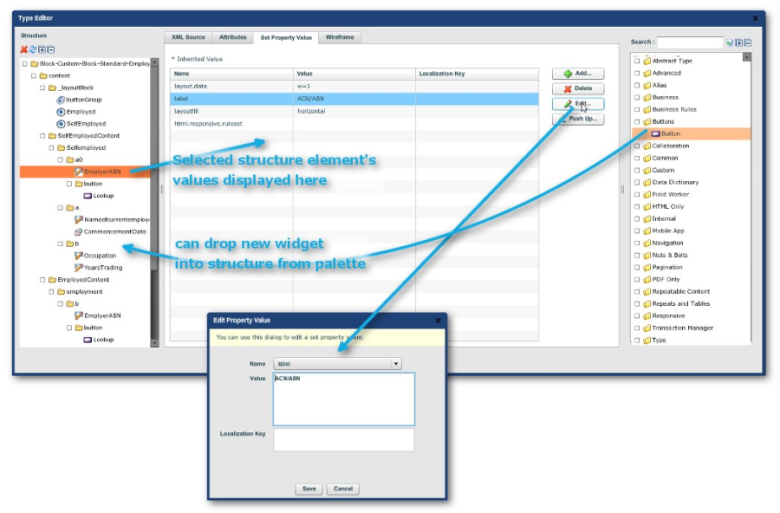
You can open the editor on editable types:
In the Set Property Values tab, you can edit the values of all the structure
elements contained in the Custom Type. Inherited values from the stack are
marked with an asterisk ("*").
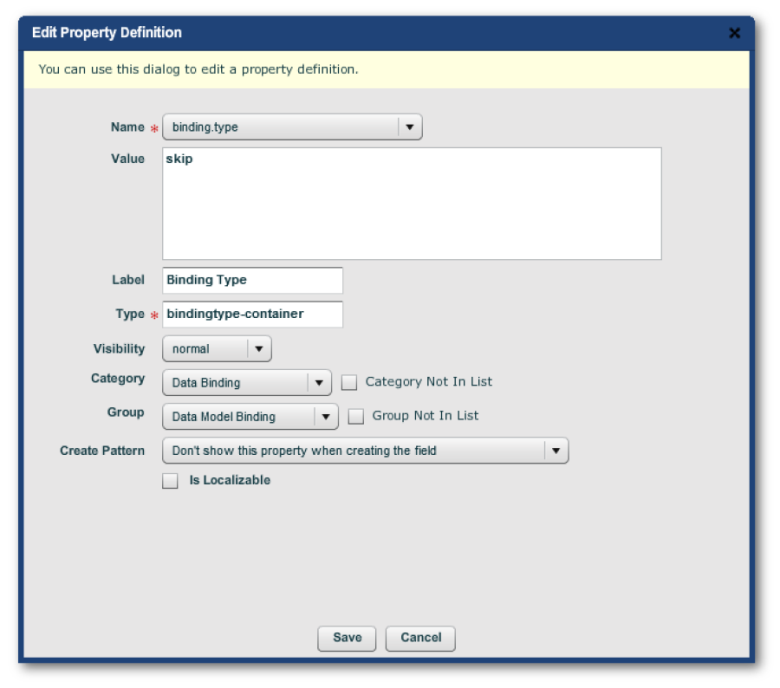
The Create Pattern dropdown menu in the
Edit Property Definition dialog defines whether:
The property appears or does not appear in the wizard when the custom Type
is dropped onto the structure panel of forms
and if it does appear in the wizard. whether the property is marked
mandatory or not.] Here are examples of the other tabs in the editor:
Note that the XML Source updates on-the-fly as you add or subtract new
objects into the structure or edit attributes and property definitions.
Style Packs
Custom Types play a major role in Style Packs. The Custom Field Type, for
Organizations where a Style Pack is part of the stack, will have a rich
selection of prebuilt widgets.
The Maguire Style Pack is a good example of this. It has a number of form
structures not covered by the usual Nuts & Bolts settings.
Besides these custom widgets in the Form Designer's Palette, such a style
pack also has its own set of Stylesheets, Templates and Resources to
supplement the Release. Typically, a release has a very large number of
Stylesheets because the set has to cover practically every time of form
element, while a Style Pack's set is very much smaller and far less general
in scope.
Inheritance Within Forms
Overview
As
above, forms inherit their Library elements (Stylesheets, Custom Types,
Templates, Resources) through the stack. So, the library elements available
to the form has already been established. This includes stylesheets that you
have modified to change color-schemes and other components of the general
look of your forms.
But then, inheritance now occurs through the form's structure:
The settings of the various Style Choosers
Settings of parent form elements and their children (blocks and their
contents, for example) The use of Named Styles (or even manual over-rides
Widget Hierarchy
As we have already seen in CustomTypes, some widgets are blocks of widgets and and children blocks. The properties of the simplest elements of these compounds are the ones to take effect. See the next topic immediately below.
Inheritance in blocks
Inheritance in blocks is similar to inheritance for individual widgets, but
it is complicated by the fact that blocks contain content. When you drop a
block onto a form, its content is also inherited, and can also be
overridden, just like regular inherited objects. So you can simply double
click on any of the child objects contained in a block, and modify their
properties.
However, there are some important differences between inherited children and
regular children. For example:
You cannot delete an inherited child (although you can change its visiblity
to "Never visible", which achieves a similar result)
You cannot re-order inherited children
You cannot insert another object between two inherited children (although
you can append an object at the end of the inherited children)
In order to differentiate between inherited children and regular children in
the tree, inherited children are shown in yellow. This helps you to identify
why certain operations (such as right click->Delete) are disabled for
some objects.
If you make a change to a property of an inherited child object, only that
particular property change is stored in your form (or overridden); all other
property changes are obtained from the shared block. So if the definition of
the block is changed, your form will automatically inherit all of the
changes, except the specific properties that you've overridden. This makes
maintenance of your form library very simple - you can change blocks in one
place, and have the changes automatically reflected in all your forms.
Starter Content
Sometimes when you drag certain types of objects such as sections, tables or
even complete forms, you will see a checkbox called "Include Starter
Content". Starter Content appears similar to inherited content, but
there are some important differences.
Starter Content is not really part of the block itself - it's just
additional children that are optionally added to make your life easier and
quicker. This is partly to save you time, and partly to show what type of
content is appropriate for this type of object. There is no difference
between the starter content, and content that you may have manually added
yourself.
Therefore, you can modify, delete or move starter content just like you can
any other object - none of the restrictions of inherited content apply.
Resources
The Resources tab in a Library is where you store uploaded files. In theory
you can upload any kind of file. But, the User Interface of Composer really
only allows you to utilize only graphics files in a form.
Other file types commonly found in library resources are JavaScript (.js)
and Cascading Stylesheets (.css). Please refer to
LibraryAdvancedFeatures on how to utilize these in forms.
Other file types stored in the Resources tab are XML (for data definitions),
XFA files, .zip files, backups and others. These are currently beyond the
scope of this guide.
Custom CSS
Composer uses an abstracted stylesheet mechanism in order to allow styling
of both HTML and PDF forms. For HTML forms, you can implement additional
styling by directly specifying the CSS in the form definition to achieve
effects not possible in Composer alone.
Note: CSS is rarely developed in isolation. It is usually
specifically designed to add styling to a set of web pages that are
structured in a particular way. This has two implications:
-
-
- In order to use CSS effectively, you must understand the way that Composer generates HTML forms. The easiest way to do this is generally to open a Composer generated form in a browser that enables you to explore the HTML and CSS, such as Firebug (in Firefox), in Google Chrome or Web Inspector in Safari.
-
-
-
- It is unlikely that importing an existing CSS file from, for example, your corporate web site, will have much value to be used directly in Composer forms (except in the most trivial of cases). It is more likely that you will extract certain elements from your existing CSS, restructure or refactor them, and then import the modified CSS into Composer.
-
Note: If you are going to be directly implementing CSS, you
must not only understand CSS in general, but also be careful to test your
CSS on multiple browsers and devices. The advantage of sticking with regular
Composer styles is that we have done all the testing to ensure that changes
work correctly in all browsers.
Custom JavaScript Libraries
Sometimes you may need to add custom JavaScript libraries to your project.
This is an advanced topic, and we generally recommended that you add custom
libraries with the help of Avoka professional services.
You can do this as follows:
Write your JavaScript functions using a text editor, and save as a .js file,
such as mycode.js.
Drag the JavaScript Library widget from the palette to the Nuts and
Bolts/JavaScript Libraries node. Specify a name.
Click the browse button to upload and select your mycode.js file to be
associated with this library.
You may now invoke functions in mycode.js using the following syntax:
library_name.function(a, b);
If you want two different versions of the library for PDF and HTML:
Create two versions of the .js file. Ensure that each library has the same
functions, with the same signatures, but with appropriate
implementations.
Create a JavaScript Library object for each .js file, but check the checkbox
to specify it's used for only HTML or only PDF respectively.
Override the Library Name property (which defaults to the Field Name by
default) so that both Libraries have the same Library Name.
This way you will be able to use the same syntax to call functions, and it
will automatically have the right version of the library in either the HTML
or PDF forms.
Templates
Overview
We have already seen
ademonstrationofthepoweroftemplatesinComposer. Composer 4.0 has an editor for creating new templates which now gives you
control over some of the template properties.
which Style Choosers will be visible
what options each of these choosers has custom choosers
which form types will be available Custom form types
Layout of form headers and footers
However, the bulk of the work of creating a template involves editing
stylesheets
Using the Template Editor in conjunction with editing the XML source of the
template uploading the appropriate
resourcefiles to be referenced in the XML source
There are about 120 stylesheets and over 300 Custom Types in the latest
release, not to mention those in future service packs. Such a workload is
the reason we recommend that Avoka Professional Services be engaged to
create templates for you, if what you require is an extensive departure from
the templates that ship with the product.
But, it is also true that no one would in reality contemplate a complete
re-invention of the wheel: i.e. an overhaul of every stylesheet, property
and parameter of the shipping libraries.
That being so, here follows some notes on the creation of template based on
moderate intervention into the stylesheets
Stylesheet Modification
Location of the Stylesheet Modifications
The location of these revised stylesheets depends on where you want these
modifications to sit in
theLibrary stack.
Will these modifications be made available to A few Projects in an
Organization
Or to all projects within one Organization.
To several Projects in more than one Organization, all in the same Account
Or to all Projects in several Organizations, still all in the same Account
Or across several Accounts
Ultimately the choice is to have your new stylesheets either in an internal
Library for one Organization or to be in a separate library in the Account
and make sure that any form you intend to use the template has the necessary
visibility of the library elements.
Scope of Stylesheet Modifications
Just be aware that changing stylesheets will also affect the standard-issue templates. If you want the templates shipped with a release to still look and work the same as when they were installed, you should reserve, or create afresh, an Organization to hold the unedited stylesheets that accompanied these standard templates.
Editing the Elected Stylesheets
We have already described how to do this. If you want your new stylesheet to replace the standard issue stylesheet in the stack, you must give it the same name as the original. After you have saved the new version, you should be able to see it in the "Stylesheet" tab of the Library or Organization you have chosen to contain the modified version. Note the values in the "Source" column for stylesheets with the same name to check that you new version exists. Use the template editor to view if the change is expressing itself in the template and that it is having the intended effect.
Template Editor
You access the Template editor through "Workspace -> <Account>
-> <Organization> or <Library> -> Templates tab -> Edit
Template action button". The editor itself has 4 tabs, 3 of which we
show immediately below:
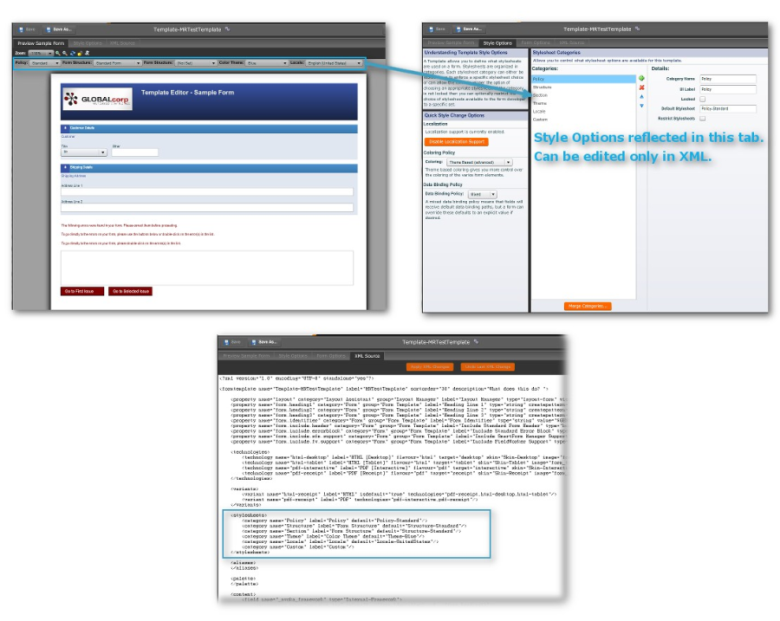
Style Options tab
The Style Categories panel of this tab allows for configuration of the Style
Chooser dropdowns at the top of the Form Designer's wireframe.
The Categories are, as expected the
stylesheetcategories and the dropdowns are populated by each stylesheet in the given category.
For the Details panel of a Stylesheet Category, the settings are:
|
Detail |
Explanation |
|
Category Name |
Cannot be edited. Derived from the Stylesheet category chosen for a Stylesheet Chooser dropdown |
|
UI Label |
The caption appearing next to the stylesheet chooser. For example, we here have "Form Structure" for the Structure category. |
|
Locked (checkbox) |
If unchecked, the category's chooser appears in the form wireframes. If checked, the category gets no visible chooser in the wireframe. |
|
Default Stylesheet |
The name of the default stylesheet in the chooser menu. Here "Structure-Standard", giving "Standard Form" as the default in the dropdown. |
|
Restrict Stylesheets (checkbox) |
If checked the chooser is populated by only a few of the available stylesheets in the category. A textarea appears, in which you list the stylesheets used in the restricted menu.. |
Editing the XML Source of the Template
Currently, though the set of stylesheets inherited to the template from the
stack determine the layout and look of the template's content, the actual
content of the form is dictated by the form's XML Source. This you can view
and edit in the XML Source tab.
Editing this is a job only for the technically competent in this area,
otherwise you could do a lot of damage. However, for those who feel up to
attempting this, we have included the
TemplateSchema at the back of this guide.
Localization
Overview
Composer's Localization feature allows you to provide your forms in multiple
languages. Earlier in this guide, you would have seen
amodestdemooflocalizationinaction.
For localization to be successful, you must have a native-speaker to edit
the localization resources. For a rough draft you can use Composer's
auto-translation feature (which uses the Google Translate engine), but if
you have ever used Translate to render a foreign language web page, you
would know that the results are less than convincing.
But once you have obtained a decent translation of a form, you will have no
need to lay out the form anew for new supported languages (or
"locales"). Even dropdown menus, and other widgets involving
choices, will reconfigure to reflect the language change:
Activating Localization
The template used for a form must support localization. So, either you switch the form's template to one that does support localization, or you activate localization support in the template.
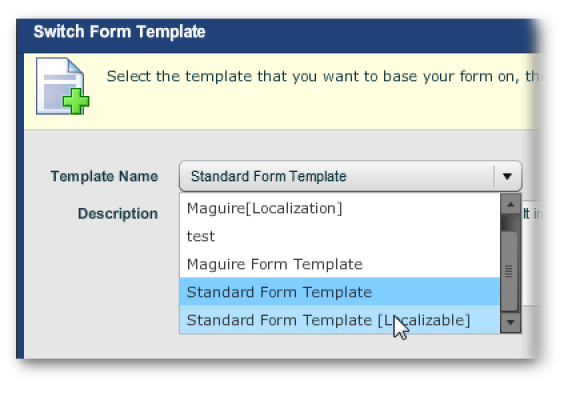
Switching Template
Done in "Workspace -> <Account> -> <Organization>
-> <Project> Forms tab -> <Form> -> Switch Form
Template button". Usually templates with localization activated
indicate this in their title in square brackets.
You then can move to the next step:
SettingTarget Locales
Activating a Template
You can also activate Localization in an existing template. Go to
"Workspace -> <Account> -> <Library> or
<Organization> -> <Templates> tab -> <template>
-> Edit Template action button" which brings up the
Templateeditor.
In the editor, "Style Options tab -> Quick Style Changes Options
panel -> Enable Localization Support button".
Setting Target Locales
You have to configure Localization for each form.
Open the form in the Form Designer and go to the Localization tab
("Workspace -> <Account> ->
<Organization> -> <Project> -> <Form> ->
Localization tab").
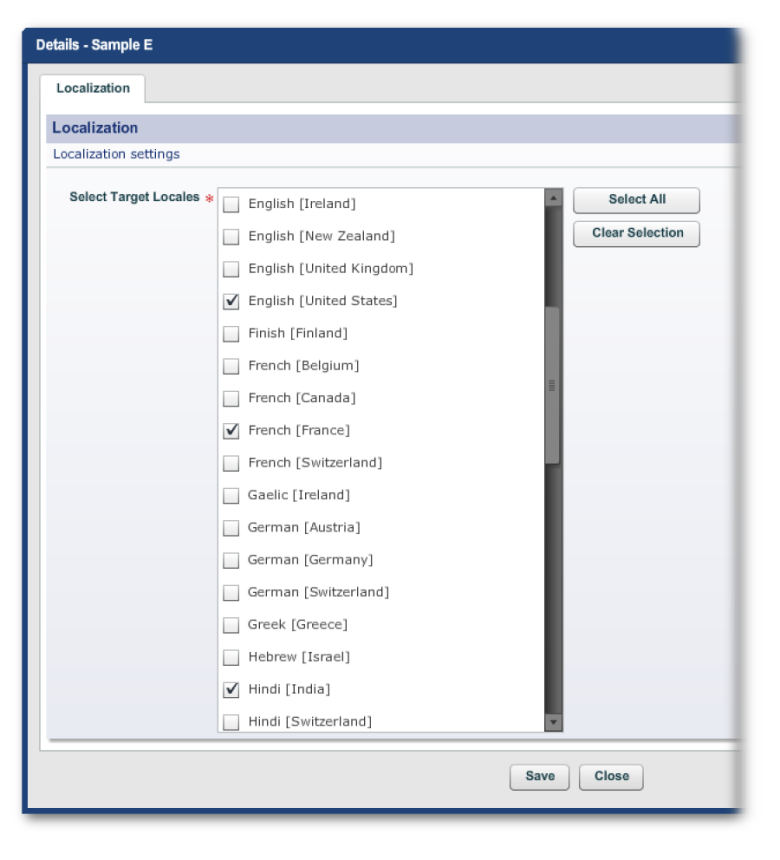
Click on the "Set Target Locales" link. This brings up a dialog
for selecting locales.
Generating Keys
You then have to generate keys for the form's elements. This is simply done by clicking on Generate Keys link in the form's Localization tab and completing the brief wizard. You can then move on the next step.
Generating the Properties File
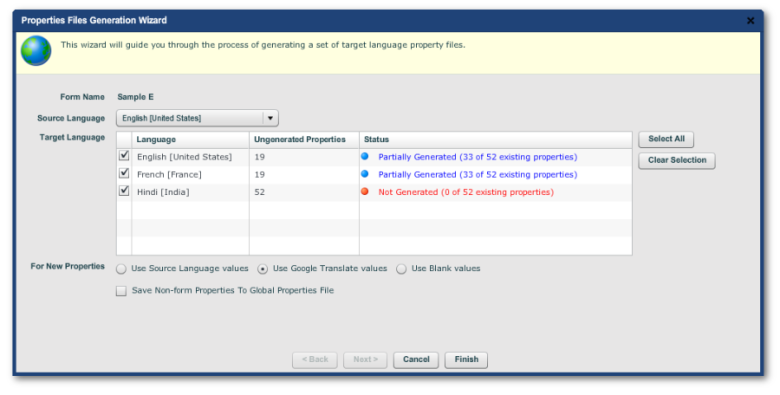
Click on the Generate Properties File link in the form's Localization tab.
The "For New Properties" radio buttons and checkbox:
Use Source Language Values
create the new files, but leave the values the same as the original locale and let the (human) translator change the values to the new locale
Use Google Translate Values
and use these values as a rough draft for the translator
Use Blank Values
let the translator fill in the blank values. This means the translator will have to have access to the Properties file of the original locale of the form.
Save Non-form Properties to Global Properties File
This means that a global properties file is created for each locale at the
Organization's internal library resources level. It lists only the
template's common properties (such as "Type-
Section.section.help.image.tooltip" or
"Button-SectionCollapse.tooltip" and so on).
Form properties are the content of the individual form, such as
"form.customer.section.heading" or
"form.firstName.label". Form properties are objects that begin
with "form.".
These property files for form properties will appear in the Localization tab
of the form:
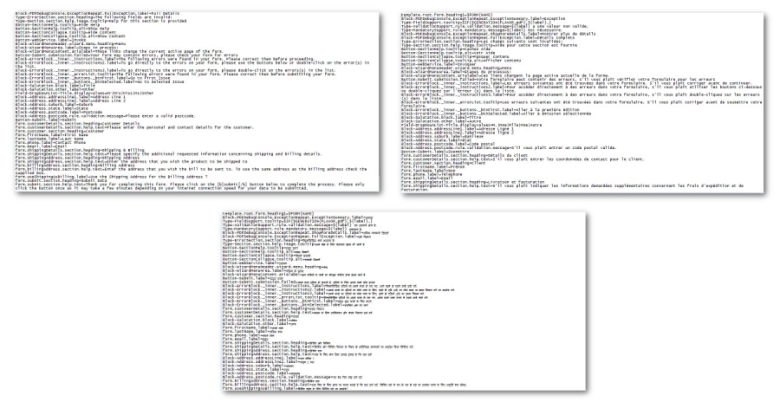
Their contents look as follows:
The translators then can edit the translation of the properties. Be careful,
though, that the diacritics and glyphs of any script (here
Devanagari for the Hindi locale) are handled properly by the text editor used by the
translators.
Deployment Options
The Localizations of the form can be deployed to different instances of the parent form in Transaction Manager, or for that matter to different portals.
