Dynamic Data
Composer This topic is related to Transact Composer. | Form Builder | v4.3 & Higher This feature is related to v4.3 and higher.
Overview
In Composer, Dynamic Data has two meanings:
Dynamically changing the information displayed on a form without reloading
the page
Accessing a third party web service for data for this dynamic
display
What is Dynamic Data?
Dynamic Data is an Avoka Transact capability that allows a form to
communicate back to the Transaction Manager Server while the form is still
being filled in and even display new data on the fly, without the page being
reloaded or the form being submitted. This allows an additional level of
functionality to be built into forms.
Dynamic Data is a general purpose communication mechanism and can be used
for many reasons. Common use cases are:
Sending some data from the form to the server (such as a user id) and
retrieving some information to populate fields in the form (such as their
address).
Sending some data from the form to the server (such as a user id) and
retrieving some information to populate a pick-list in the form (such as a
list of the subjects that the user is enrolled in). The pick-list can be in
the form of a drop-down list, table, or other visual element.
Sending some data from the form to the server to perform a server-side
calculation. Sending some data from the form to the server to perform a
server-side validation.
Dynamic Data requires collaboration between the form developer, and a
server-side developer who defines a Dynamic Data service in Transaction
Manager. Please refer to the Transaction Manager document for more
information on this.
Composer provides a number of different facilities for using Dynamic Data:
Widgets that have pre-built Dynamic Data support, such as the
"Lookup" Button. An
assistantthatbuildslookup-styleDynamicDatacapabilities.
Dynamic Data in Action
We recommended you initiate Dynamic Data invocations by a direct user
actions, like a button click, not from implicit actions, such as exiting a
field. Direct actions set user expectations that "something
time-consuming should now happen, and may even fail." Internet
performance and reliability is beyond our control, so using a button sets
end user expectations that some action is about to occur.
However, it is also possible to use Dynamic Data to perform
"predictive" lookups, such as the list of completion hints seen
while typing in a Google search . The
AutoSuggest example below shows these predictive lookups using the Veda Geolocation
service.
The Dynamic Data Assistant
By dropping the Dyanmic Data Assistant onto the form, and filling in a few
details, you can populate your form with a dynamic data fields in a few
steps by merely filling in the "Add A Dynamic Data" dialog.
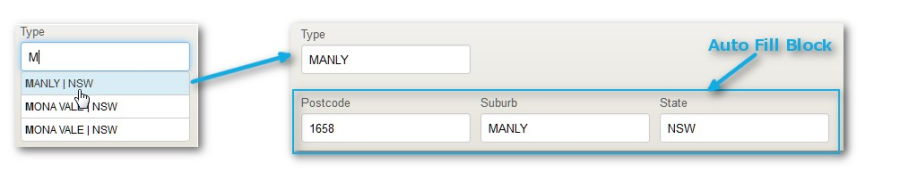
In this example, the Transaction Manager service definition is
"ACMEPOST", which in real life would access some webservice from a
third party provider. Here, there is only one input field,
"Suburb" and the TM service returns multiple sets of 3 fields
each.
The "Result Block Type" selector toward the bottom of the dialog
gives 3 options:
Standard Block
which will display only one set of returned data
Repeatable Block
which will display multiple sets of data in the more flexible format than a
table structure
Table
as selected in this example. Each set of returned data will populate a row
of the table.
We
have also activated the "Test Mode" checkbox. The assistant will
then provide a set of fake data automatically. You can also provide your own
fake data, as explained below. Of course, for the form to work from real
data, the service must already be defined in TM.
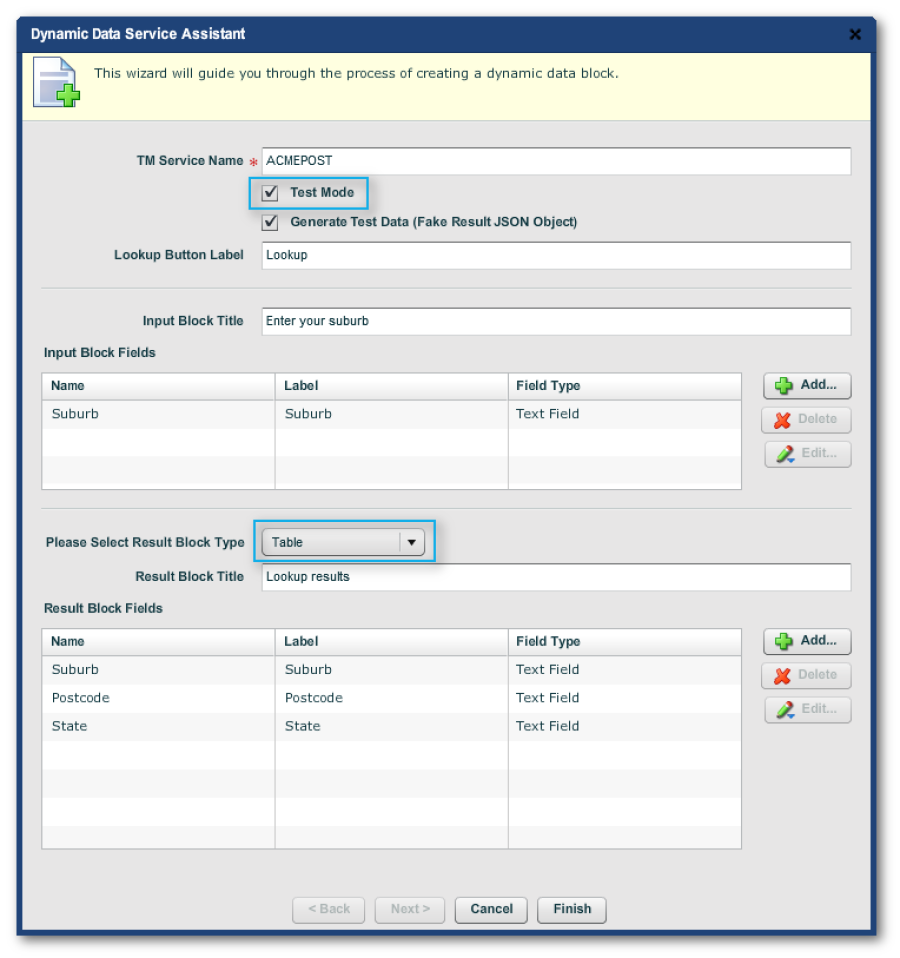
The Dynamic Data Assistant wizard dialog.
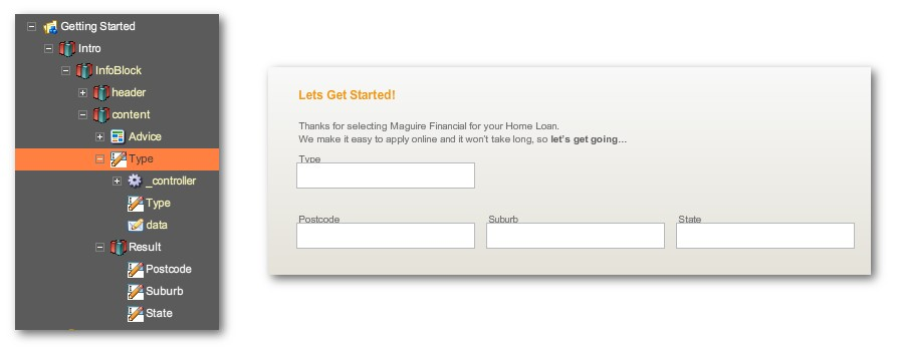
This dialog results in this wireframe and structure:
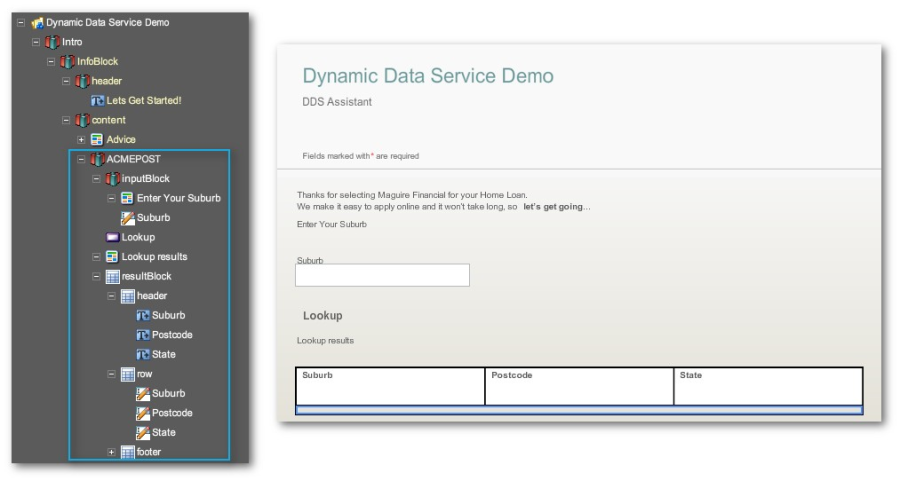
Dynamic Data Assistant creates the following strutcure and wireframe.
Previewing the form in HTML and clicking on the "Lookup" button
results in the following display of the default fake data generated by the
assistant.
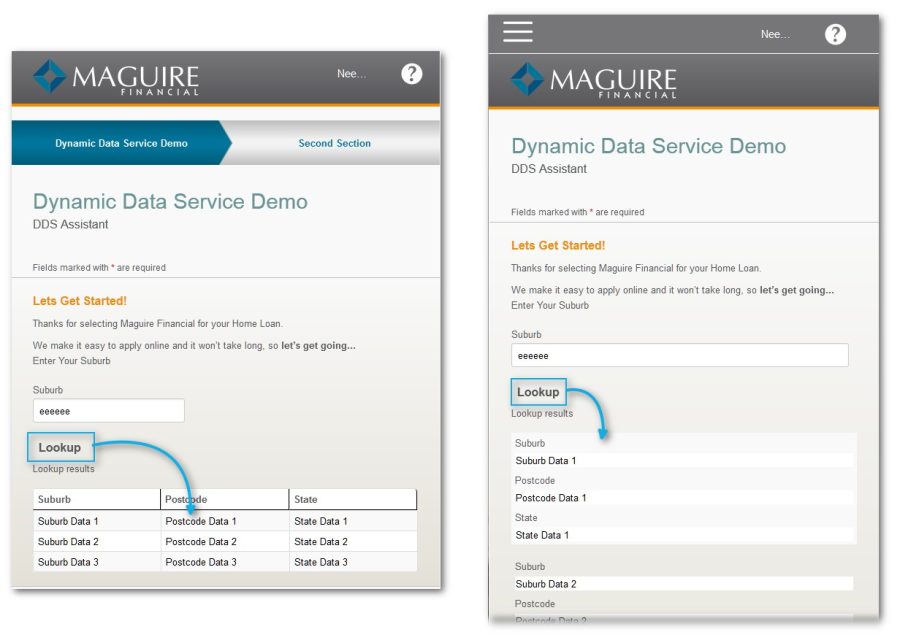
Preview of the form with fake data generated by the Dynamic Data Assistant, desktop vs narrow mobile
The fake data belongs to the structure's button, here called
"Lookup". Going to the button's "Edit Properties ->
Properties -> Data -> Dynamic Data Testing" exposes a text field
called "Test Data (Fake Result JSON Object)". If you wish, paste
your own JSON data here. If the "Result Block Type" is either
"Repeatable Block" or "Table", all the JSON fake data
will display; if not, only the first set of the fake data will display.
When the service is returning an unmanageable number of hits, consider using
pagination.
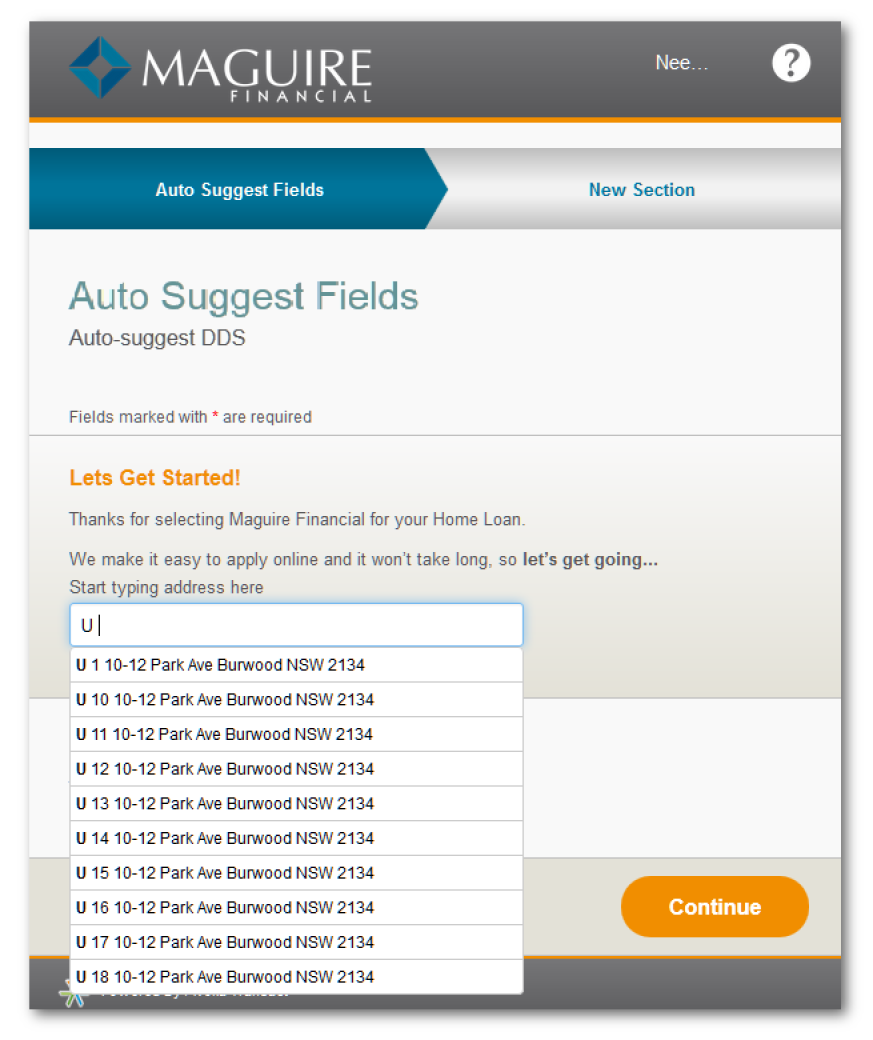
AutoSuggest
Overview
An auto-suggest field is a text field (and its associated control widget)
where the rest of contents of the field are suggested to the user in a popup
below the field, and the user selects the correct information. The
suggestions are obtained from a dynamic data service (DDS). A common use
case for auto-suggest is entering a household address with suggestions
coming from a geodata DDS.
Here is how the field looks and behaves:
For the autoSuggest widget to work, the widget configuration has to
correspond to the Groovy scripts of the service in the "Service
Definitions" page of Avoka Transaction Manager. In other words, unlike
most widgets in Composer, the necessary service creation and scripting must
already exist in Transaction Manager before the widget can be added to the
form.
The following discusses:
Building an autoSuggest form element from scratch, with a service we have
defined as ACME POST in Transaction Manager
Using predefined widgets and scripts that ship with both Composer and
Transaction Manager for the VEDA
GeoCoder webservice
For further detail on the configuration parameters, refer to
thenotesbelow.
Reference Data Lookup Block
CSV Data With Headings
Another widget, the TM Reference Data Lookup Block, also provides lookup
data. The aim of this widget is to give a convenient way to provide an auto
suggest function with no programming. The reference data can be an Avoka
Transact dynamic data service defined in TM (see the Transaction Manager
Administration Guide), or from prepopulated data (see
hereforanexampleofhowyouintroduceprepopulateddataontoaform using a Data Field widget). In this example, we use test data.
The only change we made to the structure built from the block was to build
the "Result" block (3 in-line text fields named according to the
table headings of the CVS test data) and point to it in the
"Configuration" panel. Note the "Complex Reference Data"
checkbox: it is activated because the data is a table with more than 2
column headings.

Panels in "Properties -> Data" for the "Type" node (a TM Reference Data Lookup block)
Which results in the following behavior:
CSV Data Without Headings
You can have only two columns of data, that is only one pair of data points
per row separated by a single comma. Make sure the Complex Reference Data
checkbox is unchecked.
So, as there are now no headings, the convention is that the left data point
or column is refered to as "display". The right data point or
column is called "data". The default parameters of the
Configuration Panel is to have the left column, "display", as the
"Trigger Field Name"; the right is the "Data Field
Name".
Notes on Auto Suggestion _controller Data Configuration Parameters
The following tables describes some of the "TM Auto Suggestion
Controller" parameters and gives the default abstracted values provided
off-the-shelf in the "TM Veda Address Lookup Block [Australia] ->
_controller". If you want to change these values, you should do this in
the TM Veda Address Lookup Block [Australia], not in its children.
Note: you still nominate to use test data in the "TM
Veda Address Lookup [Australia] -> _controller -> Data -> Test
Mode" checkbox.
|
AutoSuggest _controller -> Properties -> Data -> various panels |
Parameter Description |
VEDA Controller Abstracted Value |
|
Dynamic Data Service Name |
Points to the DDS |
$../{dds.service.name |
|
Minimum Characters to trigger auto suggest |
The number of keystrokes before the auto-suggest popup appears |
$../{dds.min.chars} |
|
Continue Typing Message |
A message displayed in grey in the trigger field while the user has still not made a selection from the suggestions presented |
$../{continue.message} |
|
Not in List Message |
Displayed at the bottom of the suggestions if the typed input in the trigger field is not an exact match to one of the suggestions presented. The user clicks on the message to leave the trigger field. What then happens is determined by the "Clear Trigger Field When Not Matched" checkbox |
$../{notInList.message} |
|
DDS Fail Message |
Displayed if the service times out. This is usually left blank. |
[blank] |
|
Clear Trigger Field When Not Matched checkbox |
If the user leaves the trigger field, and the entry does not match any of the suggestions, the field becomes empty. Otherwise, the un-matching entry will remain. The "Not in List Message" will be displayed. |
[checked] |
|
Second DDS Service Name |
Enables another layer of dependent data to be accessed from a DDS service and receive more auto suggestions in a secondary field. It follows that there are secondary input fields, and that test data can also be pasted into another Test Data field. |
$../{dds.detail.name} |
|
Timeout |
specifies number of milliseconds before the DDS access fails. This value is usually left as "0". |
0 |
|
Delay of Triggering DDS (in milliseconds) |
sets the delay before the user input triggers a query on the DDS. If this is set too short, there will be usability issues. |
200 |
"Hide Standard Address Block" in VEDA Block Widget
This is a special checkbox in "TM Veda Address Lookup Block [Australia]
-> Properties -> Data -> Veda Configuration": the "Hide
Standard Address Block". Its behavior is as follows:
When checked:
- Initally only the trigger field is visible and the address block invisible,
- If the user selects one of the suggestions, the filled-in trigger field only is visible
- If the user selects "My address is not listed", the address block becomes visible and the focus moves to "Address Line 1".
When not checked:
- Initially, both the trigger field and the address block are visible
- Initially only the trigger field is writable
- If the user selects "My address is not listed", the address block becomes writable and the focus moves to "Address Line 1".
In both cases:
- The trigger field will be cleared, regardless of the setting "_controller -> Clear Trigger Field When Not Matched".
Sequence Numbers
Sequence numbers are enabled by these lines at the end of the service
definition Groovy script in Transaction Manager:
// See if there is a queryString holding a sequence number
def value = request.getParameter("seq")
if (value == null || "".equals(value)) {
// The request parameter 'seq' was not present in the query
stringOR
// The request parameter 'seq' was present in the query string but has
no value
return result
} else {
// add the sequence number back on theresult
result += new JSONSerializer().toJSON("{'seq' : '" + value +
"'}") return result
}
If there have been a number of requests made on the DDS, the responses may
not be returned in the same order as the requests. If sequence numbers are
being emitted in response, the value of seq is incremented with each
response, allowing TM to tell if responses came back out of sequence. TM
will then only act on the most recent response, that with highest seq
number.
Internet Explorer 8 Issue
End users on IE8 can receive multiple alert dialogs. The workaround for this
is setting the "TM Auto Suggestion Controller -> Edit Properties
-> Rules -> Click -> Failure Notification" and choose "Do
Nothing".
Pagination
Composer now has a "Pagination Block" widget (currently
specifically for Dynamic Data using a "Lookup" button). It is very
simple to add to a form using a Dynamic Data Service with a table in the
result bock:
just drop in a "Pagination Block" onto the form
point the lookup button of the input block of the dynamic data service to
the page controller of the Pagination block
point the page controller of the Pagination block to the lookup button of
the input block We illustrate this by adding pagination to the
ACMEPOSTexample.
Add from the Palette, a "Field Types -> Pagination -> Page
Pagination Block" element. Fill in the resulting dialog:

Adding a Page Navigation Block
Note: the "Include Dynamic Data Button" in the
Page Navigation Block is not activated in this example: there is already a
button in the ACMEPOST Dynamic Data block.
And. vice versa, you point the Dynamic Data Service back to the
page navigation structure, via the ACMEPOST Lookup button's "Edit
Properties -> Properties -> Data -> Data -> Page Navigation
Controller".
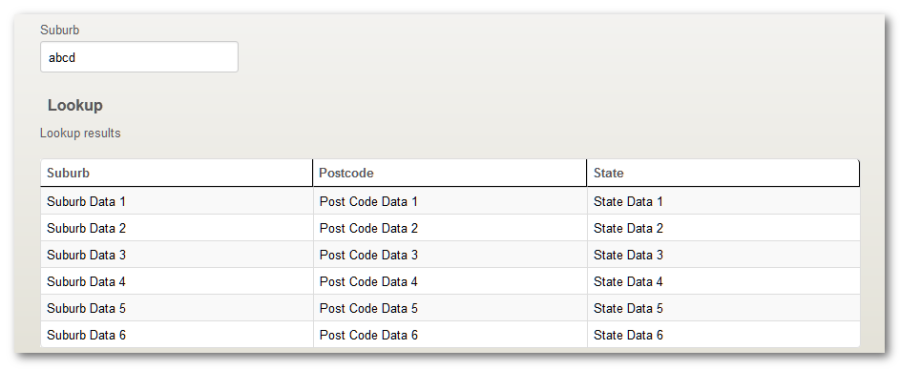
There must be enough rows of fake data in the result table to activate the
pagination functionality. If so, the preview looks like this:
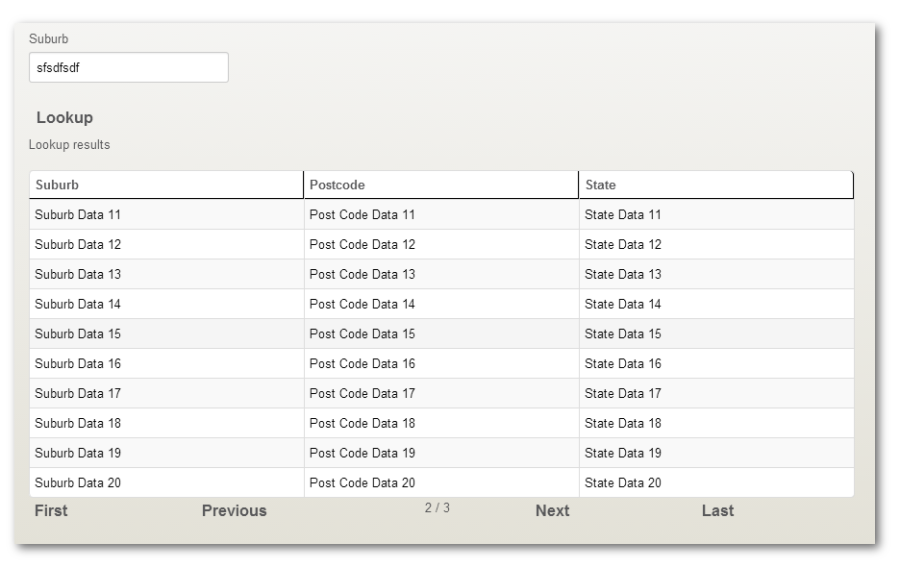
2nd page of the page navigation output (using fake data).
Please refer to the Responsive Layout section about viewing the result table
on mobile devices. You should give some thought on how you want the table to
appear
intheresponsivelayout thresholds, where each table cell gets its own line instead of being laid out in
rows.