Layout Exercise v5.1
PlatformApplicable to all products in Temenos Journey Manager. | Form Builder | All versions This feature is related to v5.1 and higher.
This exercise will allow you to practice your skills for working with the layout of your form. During this exercise you will use an existing form to edit the layout of components.
Do your best to follow the provided information and complete each step.
If you get stuck, you can always re-watch any of the online training modules. This is a good way to refresh your form building skills. You’ll also find Extra Help at the end of this exercise, which contains additional information to help you complete the exercise.
You can find a sample of the completed exercise form in the Maestro Exercise Project: Maestro Training Exercises v5.1 > Layout Finish. If you have not already imported the Maestro Exercise Project please visit Exercise Setup - Importing the Maestro Exercise Files for more information.
Step 1: Open the Existing Form Layout Begin.
- In the Navigator Panel, expand the Organization.
- Expand the Project.
- Select Forms.
- Double-click Layout Begin.
- Click the Edit Version button to open the form.
Step 2: Adjust the Layout of Title, First Name and Last Name
On the Applicant Details page, adjust the components so they appear on the same line when viewing the form on large screens. Update the ‘Your Details’ section to match the image below.
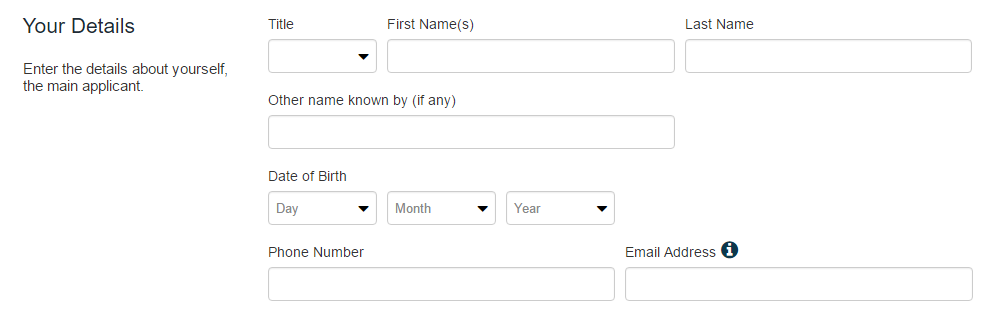
Set Title to 2 columns wide.
Set First Name(s) to 5 columns wide.
Set Last Name to 5 columns wide.
Set Other name known by (if any) to 7 columns wide.
Set Phone Number to 6 columns wide.
Set Email Address to 6 columns wide.
Best practice: only change the width values for the Large and Full Screen sizes.
In the Editor, you’ll only see the changes made to the Full screen size.
Use Preview to check the form and make any necessary adjustments.
Once you’ve made room on a row, you can drag a component into position if it doesn’t automatically move to the larger space.
Click Save.
Step 3: Adjust the Employment Details Components
Adjust the components so they appear like the screenshot below.
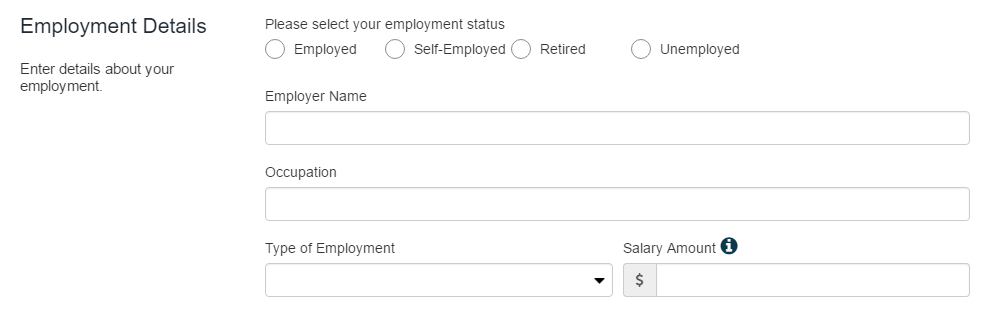
Set Employer Name and Occupation to 12 columns wide.
Set Type of Employment and Salary Amount to 6 columns wide.
Click Save.
Step 4: Adjust the Living Expenses Components
On the Income and Expenses page, adjust the components so they appear as four columns on the same row.

Set all four components to 3 columns wide.
Once you’ve made room on a row, you can drag a component into position if it doesn’t automatically move to the larger space.
Click Save.
Step 5: Add a New Component to the Living Expenses Section
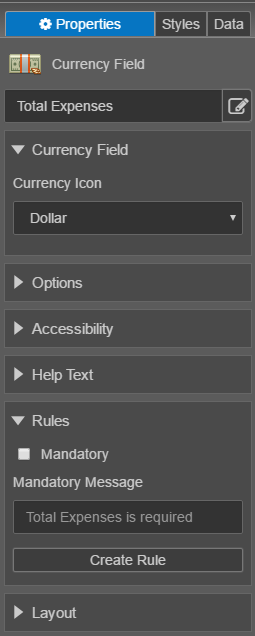
In the Expense Details section, add a new Total Expenses component.

Notice: the currency symbol for Total Expenses is added by using the Currency Field.
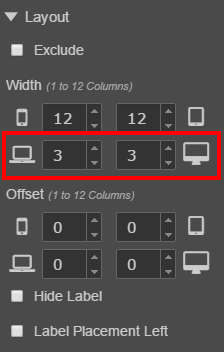
Set Total Expenses to 5 columns wide.
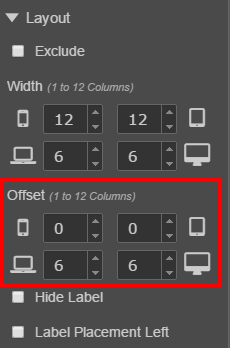
Set the Offset for Total Expenses to 7 columns.
Click Save.
Extra Help
Need some extra help?
Use the information below to assist you in completing the exercise steps.
Change the layout of components
Select the component you want to change. Adjust the Width values within the Layout section (Properties panel) to make any changes.
Decrease the column width for the relevant screen size.
You will only see changes in the Editor when you adjust the full screen layout.
Change the position of components (using Offset)
Components can be shifted to the right or left within their row. Select the component you want to change.
Adjust the Offset values within the Layout section (Properties panel) to make any changes.
You can increase the offset to move the component to the right or decrease the offset to move the component to the left.
Add a Currency Field
The Currency Field component automatically includes a currency symbol. Use Search in the Palette to find the Currency Field and add (drag) it to your form.
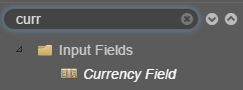
Use the Properties panel to make changes to the field, including the currency icon used.