Journey Setup project
SpringboardThis topic is related to Springboard. | Form Builder | 23.10This feature relates to the 23.10 release
This topic contains instructions and guidelines for Springboard developers relating to the Journey Setup project. It is assumed you have access to the springboard/journey-setup GitLab project (login required).
It is also assumed you are familiar with the requirements for developing solutions on the Temenos Journey Manager platform and dependent software. Information is available on these subjects and more in this documentation and on the TJM resources website. We also offer online courses and instructor-led training on developing Temenos Journey Manager platform solutions.
Contributions
Changes to the Journey Setup project are managed using a GitFlow branch/merge strategy. If you want to contribute any changes, submit them to the develop branch as a feature branch, via a Git merge request or pull request.
Getting started
Prerequisites
The minimum JDK and Maven versions required for this project are defined in the Jenkins file (login required).
Maestro form
In Maestro, the Journey Setup form can be found under the Springboard organization, CMS project.
Default brand
The default brand definition files stored under org-properties are a starting point for your brand. After deploying the Journey Setup application in Temenos Journey Manager, follow the instructions below.
Build the Journey Setup project
To build the Journey Setup project, use one of the following commands.
- Unix:
build.sh - Windows:
build.cmd
Always build locally and resolve any issues before pushing any changes to your Git repo.
Organization properties
Journey Setup generates brand information and stores it in organization properties in Journey Manager. To learn about how to create and maintain organization properties, see Configure Organization Properties.
Brand properties
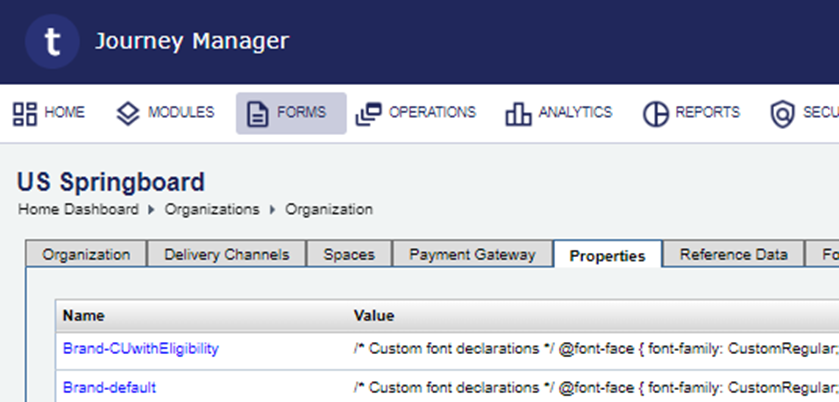
Journey Setup generates two properties for each brand that relate to style. One property stores the brand CSS, and the other stores the saved XML from the Journey Setup tool used to generate the CSS. The names of these properties use the following naming conventions:
- CSS:
Brand-BRANDNAME - XML:
BrandXML-BRANDNAME
Replace BRANDNAME with the name of the brand.
The image below shows example CSS organization properties for the default and CUwithEligibility brands.
Take care when manually editing or deleting any of these properties to ensure they have valid values.
Brand email template properties
Journey Setup generates an email template file organization property for each brand. The property name uses the naming convention EmailTemplate-BRANDNAME, replacing BRANDNAME with the name of the brand.
The image below shows example email template properties for the default and CUwithEligibility brands.

Journey Setup data properties
The Journey Setup tool also updates the following organization properties.
springboardCountryData: Includes the following country-specific data:country,iso,currency,code,maestroLang.springboardCountryLangData: Includes the following country language-specific data:country,language,label,maestroLang.springboardBrandData: Includes the following brand-related data:label(brand's display name),value,bankName,bankAddress,bankFotterLinks.
The example below shows a springboardBrandData property with content for the default and CUwithEligibility brands.
[
    {
        "label": "Default",
        "value": "default",
        "bankName": "Temenos",
        "bankAddress": "www.temenos.com",
        "bankFotterLinks": "[{\"label\":\"About Us\",\"url\":\"https://www.temenos.com/\"},{\"label\":\"Terms and conditions\",\"url\":\"https://www.temenos.com/legal-information/website-terms-and-conditions/\"},{\"label\":\"Privacy Policy\",\"url\":\"https://www.temenos.com/legal-information/privacy-policy/\"}]"
    },
    {
        "label": " CUwithEligibility",
        "value": " CUwithEligibility",
        "bankName": " CUwithEligibility",
        "bankAddress": "www.temenos.com",
        "bankFotterLinks": "[{\"label\":\"About Us\",\"url\":\"https://www.temenos.com/\"},{\"label\":\"Terms and conditions\",\"url\":\"https://www.temenos.com/legal-information/website-terms-and-conditions/\"},{\"label\":\"Privacy Policy\",\"url\":\"https://www.temenos.com/legal-information/privacy-policy/\"}]"
    }
]
This springboardBrandData property results in the following organization properties being defined:
Brand-defaultBrand-CUwithEligibilityBrandXML-defaultBrandXML-CUwithEligibility
Reference data
Page content
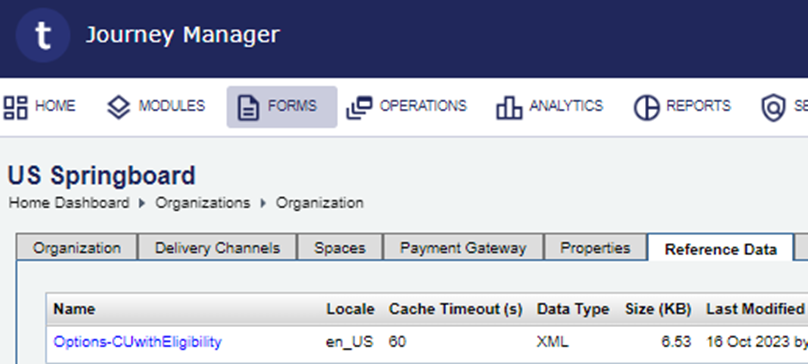
Credit Union Member Eligibility content, created in the Content Management Tools > Page Content > Member Eligibility section of the Journey Setup tool, is created for combinations of Brand+Locale, one at a time, and stored in Journey Manager as reference data. To learn more about reference data, see Configure Organization Reference Data.
You can generate page content for multiple Brand+Locale combinations, each of which is stored as a separate reference data item. The reference data item names use the naming convention Options-BRANDNAME, replacing BRANDNAME with the name of the brand.
You can have multiple reference data items with the same name, as long as they have different locales. Locale is specified using the format LANGUAGE_COUNTRY where LANGUAGE is a language code (often two lowercase letters), and COUNTRY is a region code (often two uppercase letters) qualifying the language for a specific country, territory or region. For example, the locale en_US corresponds to the English language in the United States, while en_GB corresponds to the English language in Great Britain.
The image below shows example page content reference data for the CUwithEligibility brand on the Organization > Reference Data tab in Journey Manager.
Deleting a brand
When a brand is no longer required, you can delete it.
To delete a brand:
- Delete the properties
Brand-BRANDNAMEandBrandXML-BRANDNAME.For example, if your brand is called CUwithEligibility, you need to delete the properties
Brand-CUwithEligibilityandBrandXML-CUwithEligibility. - Edit the
springboardBrandDataproperty and delete the JSON section that includes“value”: “BRANDNAME”.For example, if your brand is called CUwithEligibility, you need to delete the JSON section that includes
“value”: “CUwithEligibility”.Info When deleting a section from JSON data, take care to also remove an unnecessary comma on the preceding section.
- Optional. If Page Content has been defined, delete all reference data items with the name
Options-BRANDNAME, noting that there may be more than one. To learn how to delete an organization property, see Configure Organization Reference Data.For example, if your brand is called CUwithEligibility, delete the reference data item with the Name
Options-CUwithEligibility.