Configure the Transact for Salesforce App UI in Salesforce
PlatformApplicable to all products in Temenos Journey Manager. | All Personas | All versions This feature is related to all versions.
You can configure the Transact for Salesforce AppCanvas UI in Salesforce so that users can access this UI on the object detail pages.
Create the Visualforce Page
A Visualforce page needs to be created for each Salesforce object type you wish to make the Transact for Salesforce App UI available for. In this example, we will outline the process for enabling the UI for the Contact object.
- Select App Setup and click Develop > Pages.
- Select Visualforce Pages and click New.
- Suggested Page Attributes:
- Label - Transact - Contact
- Name - Transact_Contact
- Description - Contains the view for the Contact object.
- Leave defaults for other options
- Enter the following Visualforce Markup and click save:
- Click Save to update the changes.
<apex:page standardController="Contact">
<!-- Begin Transact App -->
  <div id="transact-container"></div>
  <apex:canvasApp applicationName="Avoka_Transact_Connector"
        containerId="transact-container"
        width="100%"
        border="0"
        scrolling="no"
        height="350px"
        maxHeight="infinite"
        parameters="{
            SObjectId:'{!HTMLENCODE(Contact.Id)}',
            SObjectType:'Contact',
            ContactFirstName:'{!HTMLENCODE(Contact.FirstName)}',
            ContactLastName:'{!HTMLENCODE(Contact.LastName)}',
            ContactEmail:'{!HTMLENCODE(Contact.Email)}',
            EnableUserView:'false',
            EnableObjectView:'true',
            EnableNewForm:'true',
            EnableGlobalSearch:'true'
        }" />
  <!-- End Transact App -->
</apex:page>Visualforce Markup Attributes
- standardController="Contact" - should be set to the name of the object you wish to present the Visualforce page on - in this case 'Contact', if we were creating a Visualforce page for the Account object this value would be 'Account'
- applicationName="Avoka_Transact_Connector" - should be set to the name of the connected app that has been configured - in this case
Avoka_Transact_Connector - containerId="transact-container" - set the containerId to the id of the div above the canvas app definition - in this case transact-container
- width="100%" - Stretch the canvas app to the full available width
- border="0" - Use no border on the frame
- scrolling="no" - set scrolling off because we enable the scrollbars in the page layout (see next section)
- height="350px" - default height of app
- maxHeight="infinite" - app can grow in height unconstrained
- Parameter SObjectId - (required) the Id of the Sobject being accessed - in this case just taking the Id of the current Contact record
- Parameter SObjectType - (required) a plain english name for the type of the SObject being accessed, may be used in some places throughout the Canvas UI
- Parameter ContactFirstName - (optional) The first name of the contact for 'Send to Contact' forms. As we are illustrating with the Contact record we are able to take the Contact's first name, but for other object types we may leave this parameter out
- Parameter ContactLastName - (optional) The lastname of the contact for 'Send to Contact' forms. As we are illustrating with the Contact record we are able to take the Contact's last name, but for other object types we may leave this parameter out
- Parameter ContactEmail - (optional) The default value to include for the email address of the contact for 'Send to Contact' forms. As we are illustrating with the Contact record we are able to take the Contact's email, but for other object types we may leave this parameter out
- Parameter EnableUserView - (optional) A 'true' or 'false' flag to indicate whether to show the User's My Forms page in the Canvas App. Default is false.
- Parameter EnableObjectView- (optional) A 'true' or 'false' flag to indicate whether to show the Object Forms page in the Canvas App. Default is false.
- Parameter EnableNewForm- (optional) A 'true' or 'false' flag to indicate whether to show the New Form page in the Canvas App. Default is false.
- Parameter EnableGlobalSearch- (optional) A 'true' or 'false' flag to indicate whether to show the Search page in the Canvas App. Default is false.
- Parameter InitialView - (optional) The name of the page to present when the Canvas App loads. Valid values are 'UserView', 'ObjectView', 'NewForm', 'GlobalSearch'. Default is to initialise on the first included page on the left.
- Parameter FormCategoryFilter - (optional) {Version 1.5} A comma separated list of form category names to present in the New Form view. Category names should exactly match the names in Transaction Manager. Without this parameter, all available categories containing forms will be presented.
The HTMLENCODE directive is required for parameter values to avoid unescaped characters.
Add the Visualforce page to the Page Layout
- Under App Setup, click Customize > Contacts > Page Layouts.
- Under Contact Page Layouts find Contact Layout and click edit.
- In the widget palette at the top, choose Visualforce pages.
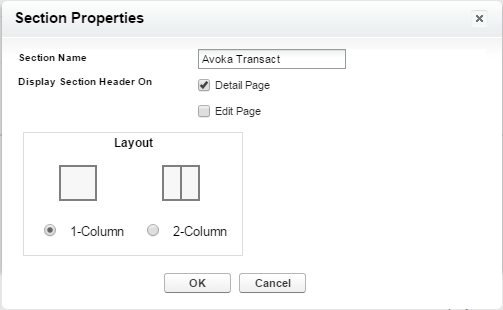
- Drag a new Section onto the page in the location you want the UI to appear.
- Name it as Transact.
- Clear the Edit Page and choose 1-Column layout.
- Drag the Visualforce page into the section just created.
- Click Save to update the changes.
- Edit the Forms properties, set height to 350px and select Show Scrollbars.
- Click Save to update the changes.
Next, learn how to enable access to restricted forms
