Best Practices for Maestro SCM Feature Branch Workflow
MaestroThe UI design product. |
Form Builder  Platform Developer | 18.11
This feature was introduced in 18.11.
Platform Developer | 18.11
This feature was introduced in 18.11.
Introduction
Maestro Source Code Management (SCM) provides support for collaborative Journey form development using a flexible approach towards version control. This article provides an example of how to use Maestro SCM to implement a Git Feature Branch workflow.
The Feature Branch workflow scenario starts by creating an SCM project in Maestro and cloning it to your local computer. The Maestro SCM project source code is used to initialize a Git repository which becomes the source of truth for all subsequent development. While form development still occurs in Maestro, all version control activities, such as branching and merging, are performed in Git. In order to follow the Feature Branch workflow, Maestro projects are mapped to Git master and feature branches.
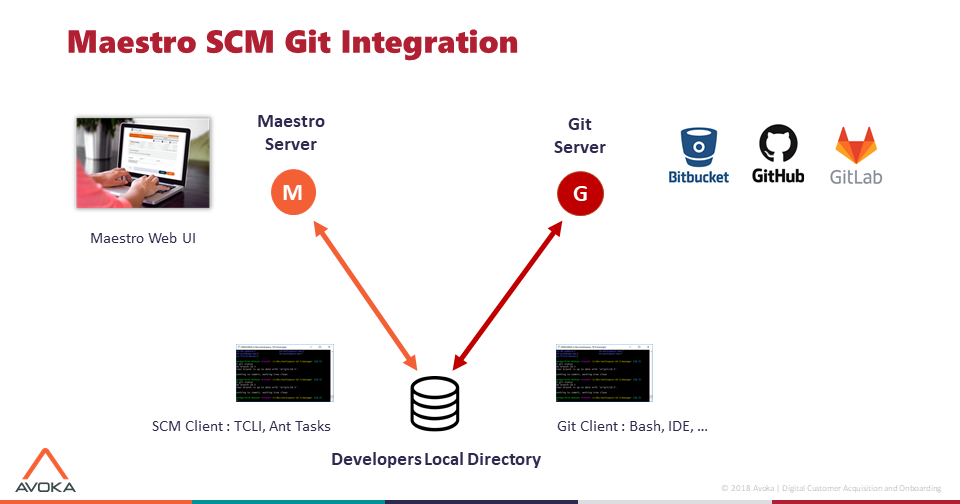
The following diagrams illustrate two perspectives on the relationship between Maestro SCM and Git in a Maestro SCM Feature Branch workflow. The first diagram shows how changes flow between Maestro projects and Git branches using Maestro SCM and Git commands. The second diagram shows how changes move between a project on a Maestro server and a remote Git repository on a Git server via the user's local Git repository using the SCM shell (also known as the SCM client) and a Git client.
|
|
|

These diagrams serve as a useful point of reference for the process described in this article. They are also used in this Maestro SCM v18.11 video to support an introductory explanation of how Maestro SCM is used in a feature branch workflow.

Prerequisites
This article assumes that:
- The Maestro SCM shell is installed on your computer and you know how to start it.
- You know how to create a Maestro form.
- You have access to a Journey Maestro environment.
- You Maestro user account has the SCM Project permission.
- You have a working knowledge of Git.
- You have a Git client installed on your computer.
- You have a working knowledge of (and access to) a Git server, such as GitLab.
- You are using a Windows computer. (The
scmandgitcommands are operating system agnostic, but some Windows-specific commands and tools are used in this example.)
Maestro SCM Feature Branch Workflow
The Feature Branch workflow is implemented across three environments:
- Maestro.
- GitLab (or another Git server).
- Your local computer.
The following diagram shows that the majority of commands are performed on your local computer using the SCM shell and your preferred Git client, while form development occurs in Maestro, and key Git actions happen on your Git server.

Follow these steps to implement a Maestro SCM Feature Branch workflow. The letter diamonds in the previous diagram are referenced throughout these steps using the format X. Sample scm and git commands are provided that you can adjust to follow along with the example.
Part 1: Getting Started
-
Create a Maestro SCM project. A
Login to Maestro and select your organization. Click Create Project to display the Create Project modal. Enter the required details and select SCM as the Project Type.
Note SCM projects appear in the Navigator pane with a different icon than standard Maestro projects. This new icon shows at a glance that the project supports Maestro SCM.
-
Create a form in your Maestro SCM project.
-
Open a command prompt, start the Maestro SCM shell, and change to the directory that you want to clone your Maestro project into.
scm.bat cd \c\projects\scm-example -
Clone your Maestro SCM project's source code. B
The Maestro SCM command to clone your project's source code can be found on your Maestro project's Project Details page, in the SCM Clone field. The command is of the form
scm project clone <org>/<proj>where<org>is your project's organization and<proj> is your project's name.Enter the SCM Clone command.
scm project clone know/scm-exampleYou can verify that your project's source code is on your computer and up-to-date using the
dirandscm project statuscommands.dir scm project status -
Create a blank repository on your Git server. C
-
In your Git client, execute the commands to clone the new repository and initialize it with the Maestro project files. These commands can be obtained from GitLab after creating the repository. Use the Existing folder commands. D E
git init
git remote add origin <path-to-remote-repo>
git add .
git commit -m "Initial commit"
git push -u origin master
Part 2: Feature Branches
At this point, the Maestro master project and Git master branch have been created and initialized. We are now ready to create the feature branch and project.
-
In your Git client, create a local feature branch. F
git checkout -b "scm-feature" -
In your SCM shell, create a Maestro feature project using the
scm project addcommand. Gscm project add 'Add a new feature' -
Refresh Maestro to confirm that the feature project is now available. The Project Details page should show that it's of the type SCM Private. Only project owners and administrators have access to projects of this type.
Note In the Navigator pane, feature projects are distinguished from the master SCM project by a differently colored icon.
Part 3: Feature Development
At this point, the Maestro feature project and Git feature branch have been created and are ready for development of the new feature. While the feature project is available in Maestro, the Git feature branch only exists on the local computer.
-
In Maestro, open the form in the feature project, make necessary changes to implement the new feature, and save your form.
-
Return to your SCM shell and check the feature project's status:
scm project statusYou'll find differences between your local project and the remote project on your Maestro server.
Update your local project with the changes from the Maestro server: H
scm project pullWhen you pull the changes, you need to confirm which changed files to accept. You can type
Ato accept all file changes,Nto reject all file changes, orYto interactively accept or reject each file change. -
Return to your Git client and check the local repository's status. Git will report that there are modified files that need to be staged for commit. Stage and commit these files, except for
scm.propertieswhich we'll deal with later. Igit status git add *.json git commit -m "Implemented the new feature"
Part 4: Merging Features
At this point, work on the new feature has been completed in Maestro, and the Maestro feature project and local Git feature branch have been updated. Next, we need to merge the feature branch into the master branch and update the master project from the master branch.
-
In your Git client, push the local feature branch to the remote repository, thereby creating a remote feature branch. J
git push origin scm-feature -
In GitLab, merge the feature branch into the master branch. K
A good (and sometimes mandatory) practice is to merge the feature branch into the master branch via a merge request. When creating the merge request, you can choose to have GitLab remove the feature branch for you once it is merged. If you don't select this option, you can delete the feature branch manually after it has been merged.
-
In your Git client, checkout the master branch and synchronize your local master branch with the remote master branch. L
git checkout master git pull -
Checking the local Git repository's status reveals that the modified
scm.propertiesfile remains in the local working directory. As this file contains the project name, we want to restore the version of this file from the original SCM project created in Maestro before we update the master Maestro project. To do this, check thescm.propertiesfile out of the master branch.git status git checkout scm.properties -
With the local working directory updated, we can now update the master Maestro project. M
In your SCM shell, push the local master Maestro project up to your Maestro server:
scm project pushThen delete the feature project:
scm project delete know/scm-example
Part 5: Project Cleanup
At this point, the master Maestro project has been updated with the work carried out in the feature project. You can confirm this in Maestro, then finish up by removing any left-over artifacts of the development process.
-
Refresh Maestro to confirm that the feature project has been deleted.
-
Open your master Maestro project and confirm that the changes made in the feature Maestro project are now applied to the master Maestro project.
-
In your Git client, delete the local feature branch and the local tracking branch for the deleted remote feature branch.
git branch -d scm-feature
git fetch --prune
The Feature Branching workflow used in this article offers a simple approach to collaborative development, wrapping Maestro SCM commands and processes around a Git feature branching strategy. If, however, you prefer to use a different branching strategy, you can still use the Maestro SCM version control commands to manage version control of your Maestro project assets.
Getting Help
If you need help with Maestro SCM command syntax, type help at the prompt to see the following list of available commands.
$ help
Maestro Source Code Management (SCM) shell, version 19.5.0Type help 'name' to find out more about a named command:
cd                      Change the current working directory.
ls                      List the files in the current or specified directory.
cat                     Displays the contents of a text file.
start                   Start the specified program or OS shell command.
del                     Delete the specified file or empty directory.
cls                     Clear the screen.
rm                      Delete the specified file or empty directory.
dir                     List the files in the current or specified directory.
pwd                     Print working directory path.
type                    Displays the contents of a text file.
mkdir                   Make a new directory.
scm                     Maestro Source Code Management (SCM) integration commands.
scm connect             Connect to remote Maestro server.
scm design clone        Clone remote design to the local directory.
scm design diff         Compare differences between local design files and remote design.
scm design pull         Pull remote design file differences to local directory.
scm design push         Push local design file differences to remote design.
scm design rm           Remove remote design file.
scm design status       Compare local design files with remote design files.
scm library clone       Clone remote library files to the local directory.
scm project add         Add a new project to Maestro server using local project files.
scm project clone       Clone remote server project to the local directory.
scm project diff        Compare differences between local project and remote project.
scm project delete      Delete remote server project.
scm project list        List remote server projects.
scm project pull        Pull remote project file differences to local project.
scm project push        Push local file differences to remote project.
scm project rm          Remove remote project file.
scm project status      Compare local project files with remote project files.
Next, check the Maestro SCM Quick Start for your Journey SDK release.