Host an Embedded Form
Journey Manager (JM) The transaction engine for the platform. | System Manager / DevOps | 18.11 This feature was updated in 18.11.
Manager allows you to host an embedded form in a form space's web page, so your form appear as if it were a seamless part of an existing website. There are various ways of doing this, which are discussed in integrate forms to existing websites.
This article focuses on the process of embedding a form inside an iframe element. In particular, it shows how to use a JavaScript helper method, showEmbeddedForm, to embed your form.
Reasons for employing the iframe method can include:
- Customers may not wish to have branding included in the form, preferring instead to manage their own branding within the pages where they want to show their minimally or non-branded forms
- Customers may wish to take advantage of controlled advertising services to surround the form with dynamic ads
- URLs will always reflect the customer's domain, rather than an external URL if the form is presented via a redirection
- Embedding the form may provide a more consistent user experience across the whole web site
How does it work?
Transact Manager includes the ability to embed a form inside a Form Space page. This is accomplished by JavaScript code which injects an iframe element into the page, and renders a form into it.
This guide will show you how to configure Transact Manager through the management console to accomplish this.
In following this guide, you will be:
- Setting up appropriate security access permissions to your form:
- Assigning the Organization which owns the form to the Form Space
- Assigning the Form to the Form Space
- Editing a Page in the Form Space to force it to show the Form. In this article, we will be editing the 'index.htm' page to host the form
- Inserting JavaScript in the page to cause it to create an
iframeand render the form into it
The prerequisite for this guide is that you already have created your form in your Organization.
Step-by-step guide
- If you need to create a new Form Space, follow the instructions atManaging Form Spaces
- Ensure your Form Space is functioning correctly and can be accessed from a browser
- Ensure your Form is built and can be rendered in one of the standard Form Spaces, such as Maguire or Web Plug-In
- Open the Form Space in Transact Manager, select the Organizations tab, and assign the Organization which owns the form to the Form Space
- Open the Form in Transact Manager, select the Spaces tab and assign the Form Space to the Form. Take note of the Form Code in the Form Details pane of the Form's Dashboard tab
- Open the Form Space again, and select the Pages tab
- Click the 'Index' link in the Name column of the Pages list (do not click the index.htm link in the Path column)
- Paste this code into the Page Content box, change 'your-form'code' to your own form code, then click Save. You might also want to change the style to suit your form.
- Open the Form Space again and select the Pages tab
- Now click on the 'index.htm' link in the Path column - a new web browser tab or window should open, and the form should render into it
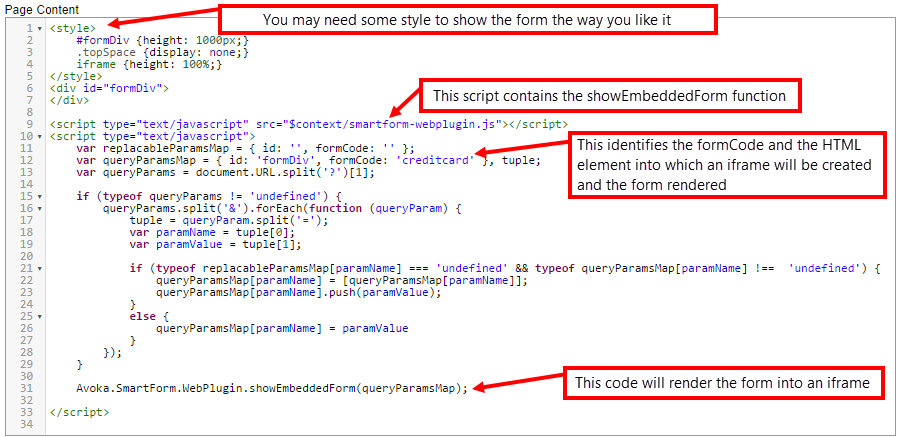
<style>
    #formDiv {height: 1000px;}
    .topSpace {display: none;}
    iframe {height: 100%;}
</style>
<div id="formDiv">
</div>
<script type="text/javascript" src="$context/smartform-webplugin.js"></script>
<script type="text/javascript">
    var replacableParamsMap = { id: '', formCode: '' };
    var queryParamsMap = { id: 'formDiv', formCode: 'your-form-code' }, tuple;
    var queryParams = document.URL.split('?')[1];
    if (typeof queryParams != 'undefined') {
        queryParams.split('&').forEach(function (queryParam) {
            tuple = queryParam.split('=');
            var paramName = tuple[0];
            var paramValue = tuple[1];
            if (typeof replacableParamsMap[paramName] === 'undefined' && typeof queryParamsMap[paramName] !==  'undefined') {
                queryParamsMap[paramName] = [queryParamsMap[paramName]];
                queryParamsMap[paramName].push(paramValue);
            }
            else {
                queryParamsMap[paramName] = paramValue
            }
        });
    }
    Avoka.SmartForm.WebPlugin.showEmbeddedForm(queryParamsMap);

</script>Explanation of Form Page Content
The JavaScript code above simply gathers query parameters from the URL, adds a couple of default values, and calls the showEmbeddedForm function to do the heavy lifting, passing the collected parameters.
The code contains the following:
- Some style to give the embedded form some height and to hide headers
- A JavaScript library which contains the showEmbeddedForm function
- A JavaScript script containing
- A queryParamsMap map object which is populated with:
- default 'id' value which identifies a div on the web page to contain the injected iframe
- default 'formCode' value to identify the form to be rendered into the iframe
- Some code to take all of the query-string parameters from the URL and add them to the queryParamsMap
- If the parameter name is reserved 'id' or 'formCode', it will be replaced in the map with the value from the query-string parameter
- If the parameter name is not reserved, it will be added to the map if it is not already mapped
- If an unreserved parameter name has already been mapped, the map value will be converted to an array and the new value appended to it
- A call to the showEmbeddedForm function, which is passed the accumulated map as a parameter
- The function will use the 'id' and 'formCode' values to inject an iframe into the 'id' HTML element and render the 'formCode' form into it
- All other parameters will be passed to the showEmbeddedForm function
This is illustrated below:
Next, learn how to configure form space properties.