Exchange Package Configuration
Exchange Pre-configured Maestro services. | Platform Developer | All versions This feature is related to v5.1 and higher.
Exchange package architecture
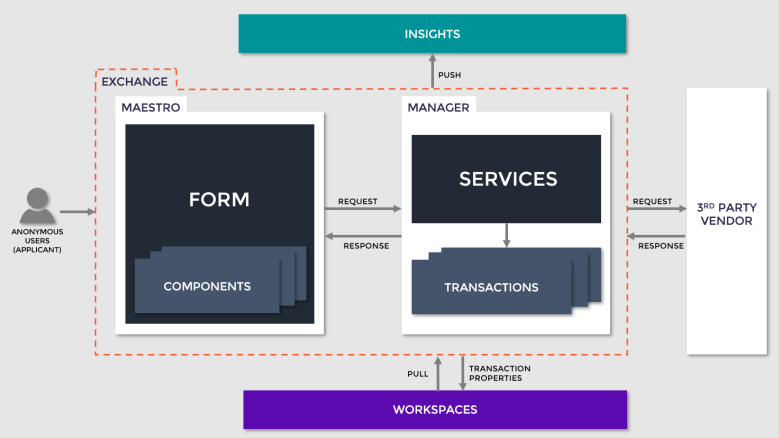
All Exchange packages are based on the same architecture and interact with Manager and Maestro in the same manner.
As the user interacts with an Exchange package implemented in their application (form), the third party services are called via Manager, and these events are recorded in Journey Analytics, the platform's analytics tool to be further analyzed in the future.
The transaction properties of the user's application are also sent to the Workspaces portal, so the application life cycle can be reviewed by the Workspaces users.
Package Configuration
Once an Exchange package has been installed from either the Exchange or a zip file (TPac), the Manager services and Maestro assets need to be configured. Most Exchange packages contain multiple experiences provided by the third party vendor, and it is this configuration that is necessary for the package to behave as expected. Configuration is usually required in both Manager and Maestro.
Typical configuration tasks required in Journey Manager
Typically the configuration tasks required in Manager include the following:
- Add your third party credentials (username and password) to the service connection. Use the path All Services > required service > Service Connections.
- Update the Service Parameters (such as setting Max Attempts) on the service definition. Use the path All Services > required service > Service Definition > Parameters Edit tab.
- Configure any other settings as mentioned in the package documentation.
- Test each required service to confirm they all run successfully. Use the path All Services > required service > green arrow icon (Run Unit Test).
Some packages will also require additional configuration tasks in Manager if attachments are added to the transaction after the application is completed, such as DocuSign and AdobeSign. These additional configuration tasks may also include the following:
- Create a new scheduled service job and link it to the service status poller. Use the path System > Scheduled Jobs > New Scheduled Service Job.
- Create a new delivery channel and link it to the service delivery process. This will attach the signed document to the transaction in Manager. Use the path Forms > Organizations > Delivery Channel > New.
- Link the Maestro form to the new delivery channel. Use the path Forms > Forms > Details tab.
Typical configuration tasks required in Maestro
Typically the configuration tasks required in Maestro include the following:
- Add the Maestro component to the form.
- Click on the component in the Structure panel to configure the following items.
- Map the input data fields to the response fields in the Configuration section of the Properties panel.
- Set Role Identifiers under Options in the Configuration section of the Properties panel if multiple applicants can use the same application form.
- Set any other Options as required by the package to behave as expected.
- Check the progress, success, and failure messages provided in the component and update them in the Properties panel if required.
- Update the error messages to be consistent with the language on the form, if the form has been translated into a language other than English. Use the Translation button in the menu bar.
- Add any Rules in the Rules section of the Properties panel to change the behavior of the component when certain conditions are met, if required.
