Journey Narrative
What is Journey Narrative?
Journey Narrative is a recommended way of thinking about application design with Temenos Journey Manager.
The primary objectives of Journey Narrative are:
- Simplify the task of controlling a user's flow through an application
- Make application flow (page navigation) configurable on the server-side
- Enable automated testing of the application flow
- Move complex business logic and validations to the server
- Reduce the burden on form developers in Maestro or other tools
A Narrative describes a customer journey. It defines each of the Pages in the application, the possible paths through those pages, and all the actions that occur along the way. Not only does the Narrative define the flow, along with the Narrator it also ensures that it is enforced.
For example, let's say you have an application with three pages and a series of actions such as calling an external service, validating application data or loading data from an external source:
- Page 1: About You
- Call IDV Service
- Load Legal Disclosures
- Page 2: Legal Disclosures
- Validate Signatures
- Page 3: Verification
- Create New Account
Skipping any of these pages (due to an error or malicious activity) or their actions would leave the application in an invalid state.
The Narrative helps with this problem by defining the pages and actions, and ensuring they're always performed and in the correct order. If any of these rules are broken, the Narrator rejects the application.
Getting started
info
This guide assumes intermediate knowledge of the Temenos Journey Manager platform, including Journey SDK, Fluent API, Developer Guide, Fluent Functions, Journey Maestro, and Journey Manager. We recommend you become familiar with these topics before using Journey Narrative.
One way to get started is to build an application using a Journey Narrative. The remainder of this guide will take you through a basic exercise to build your first Journey Narrative application.
Creating a Narrative form
The process to create a new Maestro form using a Narrative is designed to be simple. It involves these steps:
- Add Narrative Support to your Maestro Template
- Add Narrator Pages to your Form
- Map Maestro Pages to Narrative Pages
Add Narrative support to your Maestro template
Follow these steps to add Narrative support to your Maestro template:
Add a Narrator Controller to your template.
The Narrator Controller is a native Maestro Component that adds properties to Form Options when used in a template, as well as additional JavaScript functionality.
- In the Palette, search for Narrator.
- Add Narrator Controller to the Form elements in your template.
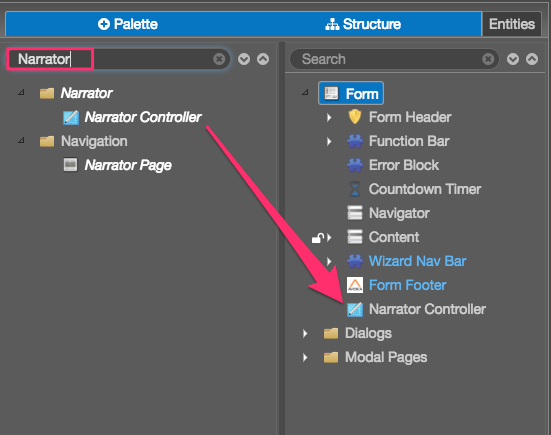
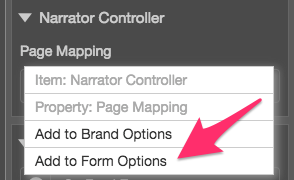
- Select the Narrator Controller component in the Structure panel to view the component's properties. Right-click the Page Mapping property and select Add to Form Options. This exposes the Page Mapping property in forms that are based on this template.
Update the navigation buttons so that they trigger the Narrator Controller. (The Controller will take care of all navigation related activities.)
To update the Next button:
- Click the Next button in your template.
- Edit the Click rule in the Rules section of the Properties pane.
- In the Click rule, replace
Form.$Pages.move(true)withNarrator.navigate("forward");. - Save the updated rule.
To update the Back button:
- Click the Back button in your template.
- Edit the Click rule in the Rules section of the Properties pane.
- In the Click rule, replace
Form.$Pages.move(false)withNarrator.navigate("back");. - Finally, edit the Back button's Visibility rule, and insert
!Form.data.SFMData.NarrativeMeta.DisableBack &&at the start.
The updated Back button Visibility rule looks like this:
!Form.data.SFMData.NarrativeMeta.DisableBack &&
Form.$Pages.currentPage && !Form.$Pages.currentPage.$isFirst
To update the Save button:
- Click the Save button in your template.
- Add the Save button's Visibility rule.
- The rule will be
!Form.data.SFMData.NarrativeMeta.DisableSave
Save everything, and close the template.
Your Maestro template is now ready to be used with the Narrative.
Add Narrator Pages to your form
The Narrator Page is a new Maestro component that extends the basic Page component. Narrator Pages allow the Narrative to control the visibility of your form's pages without you needing to write your own visibility rules for each page.
info
If you prefer not to use Narrator Pages, you can update the visibility rule of every page in your form and replace it with Narrator.isPageVisible(item).
As long as you create a form using Narrator Pages, or Pages with the appropriate visibility rule, your form will work with the Narrative.
note
When using Journey Narrative, all page visibility is controlled by the Narrative on the server, so don't create custom page visibility rules within your form.
Page mapping
info
Page mapping may not be required in the future if the client and server page names match, but it's required for now.
The last step in configuring your Maestro form to use a Narrative is to tell the Narrator which Maestro Pages correspond to which Narrative Pages. Essentially, you're mapping page Names in your Narrative to page IDs in Maestro. In order to map pages, you need to know the page names. Therefore, it's a good idea to define your Narrative before you do page mapping so that you know what the page names are.
To map Maestro Pages to Narrative Pages:
- Open a form based on a Narrative template (like the one you created earlier).
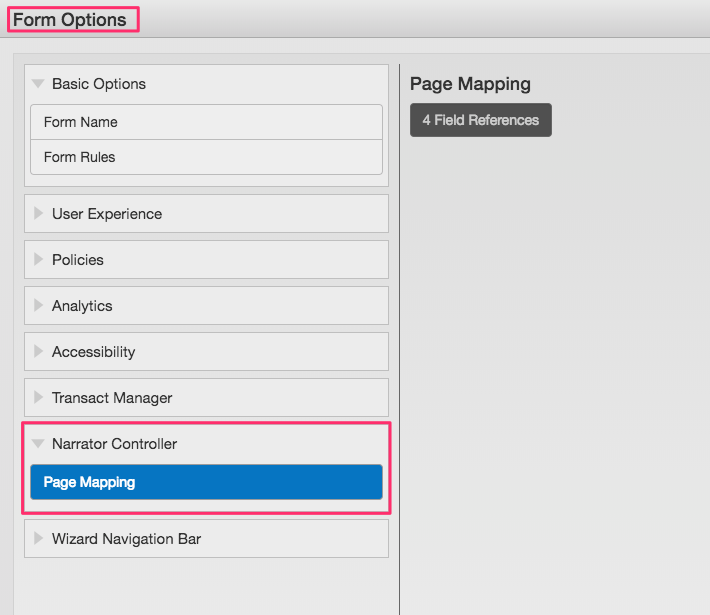
- Click Form Options.
- Navigate to Narrator Controller > Page Mapping.
- Click Field References to update the references.
- Add one reference for each of your pages.
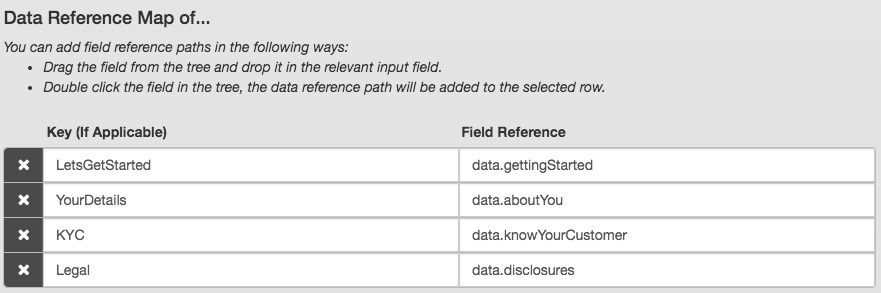
- Enter the server-side Narrative Page name as the Key.
- Enter the Page id as the Field Reference.
Setup on Journey Manager
Once you've created your Narrative JSON file and your new form using the Narrator Controller, you're ready to deploy everything to Journey Manager (JM). You can deploy the Form Version to JM just as you normally would.
Be sure to build your form in Maestro using the Use server side Transact Functions option (for details, see Build a TM Form Version) otherwise you won't have access to the Transact Functions tab once the Form is imported into TM.
Once that's done, follow the steps below to configure your form to use the Narrator and Narrative.
Setup the Narrator
For the Narrator to control your form, it needs to be run whenever your form is Opened, Updated or Submitted. To do this, you need to setup your form's Functions to trigger the Narrator.
- Login to JM, select Forms > Forms, then locate your form and click it.
- In the Form Versions panel, click Functions for your form version.
- Click New.
- From Triggers, select "Form Open".
- From Function, select "Narration Controller - vX.X.X"
- Leave Sequence as "1".
- Click Save.
Repeat steps 3 to 7 for the triggers "Form Update", "Form Resume" and "User Submit". You now have the Narration Controller setup on four triggers.
info
If you are leveraging Maven and Jenkins to build and deploy, set the following form-def.json:
{
    "trigger": "Form Open",
    "sequence": "3",
    "name": "Avoka - Narratives - Narration Controller",
    "version": "${narratives-version}"
},
{
    "trigger": "Form Update",
    "sequence": "1",
    "name": "Avoka - Narratives - Narration Controller",
    "version": "${narratives-version}"
},
{
    "trigger": "Form Resume",
    "sequence": "1",
    "name": "Avoka - Narratives - Narration Controller",
    "version": "${narratives-version}"
},
Add the Narrative JSON
For the Narrator Controller to control your specific Narrative it needs to be able to access it. The controller reads the Narrative JSON from a Form Property called "Form Narrative". To create this property, follow these steps:
- Login to JM, select to Forms > Forms, then locate your form and click it.
- Select the Form Versions tab, then select your form version and click Properties.
- Click New.
- In Name, enter Form Narrative
- Leave Property Type empty.
- In Data Type, select "JSON".
- A Value field appears. Paste your Narrative JSON into Value.
- Click Save.
info
If you are leveraging Maven and Jenkins to build and deploy, set the following form-def.json:
{
    "name": "Form Narrative",
    "description": "Form Narrative",
    "dataType": "JSON",
    "valueFile": "my-narrative.json"
}
Your form is now setup and ready to use.