Fluent Functions Quick Start
This guide is a quick walk-through of creating and deploying a Fluent Function in the Maestro Home Loan example form. The function will be called on a form update, where it will log a message in JM, and also return updated data to the form.
Fluent Functions are implemented as services in JM. Prior to undertaking this exercise, you need to have worked through the App Package Quick Start.
A note on Entities
This exercise includes a step which generates Groovy value object source representing entities. Entities are a feature that help to increase developer productivity in the IDE, and serve to promote good object-oriented code design and re-use in fluent functions.
The general flow of using entities in the development process is:
- Entity definitions originate automatically in a Maestro form as part of the form design process.
- Groovy source for entity value objects is generated by the
gen-voAnt task. - The generated Groovy source is bundled into the application package and deployed into JM.
- The Groovy classes can be instantiated in a fluent function by the
ObjectMapperutility class from form XML data, similar to the factory pattern. - Entities modified by code in the fluent function can be fed back to the form as part of the response data.
Learning outcomes
Upon completion of these step-by-step instructions, you will have:
- Generated value object source code using the Object Mapper via the
gen-voAnt task. - Scaffolded a new service into the project to log messages on a page.
- Re-deployed the Application Package to your Journey Manager server.
Then, in the Journey Manager Console, you will verify the result by:
- Rendering the form and navigating between pages.
- Verifying the log messages have been recorded in JM.
Exercise Steps
We'll be running the Ant targets in this exercise from IntelliJ on Windows, assuming the JM SDK has been unzipped into the folder C:\Development\SDK\Intellij.
info
The JM SDK Maven plugin includes goals that can be used in place of the Ant tasks in the example.
tip
If you use the function and package names shown in this example, you can copy and paste the provided code into your source and configuration files without having to change it.
Scaffold a Fluent Function
Here we scaffold a new Form Update function into our project.
In the Ant Build panel, select the
app-scaffold-functarget and click the Run icon. Alternatively, you can double-click theapp-scaffold-functarget to run it.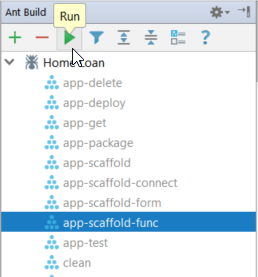
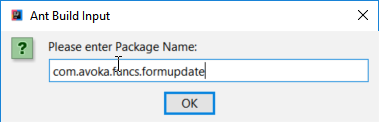
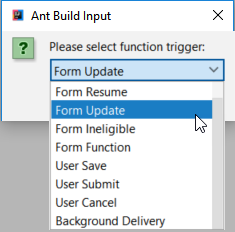
Provide responses to the prompts as shown.
Enter a function name.

Enter a Groovy package name.
Select Fluent Function as the function type.
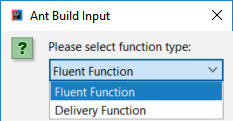
Select Form Update as the trigger. Form update events are fired by page navigation, providing the form data has changed.
Generate ObjectMapper value objects
Here we generate Groovy source for value objects derived from form seed XML. These value objects are convenient to use by the ObjectMapper in our function code.
In the Ant Build panel, select the
gen-votarget and click the Run icon. Alternatively, you can double-click thegen-votarget to run it.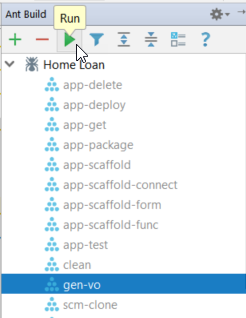
Provide responses to the prompts as shown.
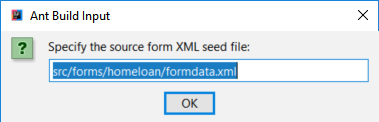
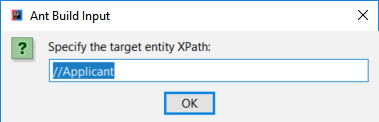

The value object source code will be generated under the named package folder; in this case
com.avoka.vo.applicant.Locate the package in the Project explorer and open the
Applicant.groovysource file to see the generated source.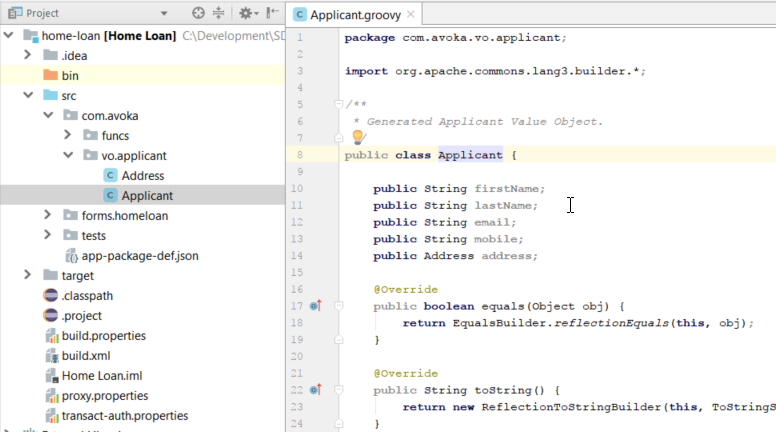
Edit the Groovy function code
We're going to use the ObjectMapper to instantiate an Applicant value object, and then log it.
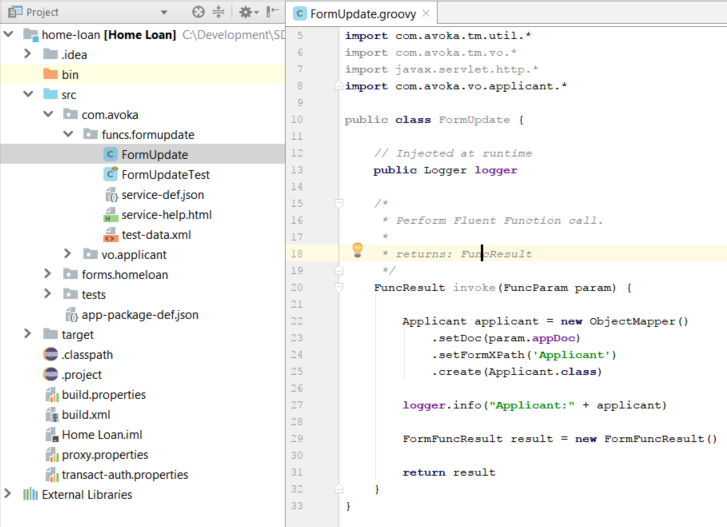
In the Project panel, open the
Applicant.groovysource file which is located under thecom.avoka.vo.applicantpackage.Applicant.groovycontains the source code for theFormUpdateclass.Insert the code fragments highlighted below, then save the package.
/home-loan/src/.../Applicant.groovyimport com.avoka.tm.util.*
import com.avoka.tm.vo.*
import javax.servlet.http.*
import com.avoka.vo.applicant.*
public class FormUpdate {
// Injected at runtime
public Logger logger
/*
* Perform fluent function call.
*
* returns: FuncResult
*/
FuncResult invoke(FuncParam param) {
Applicant applicant = new ObjectMapper()
.setDoc(param.appDoc)
.setFormXPath('Applicant')
.create(Applicant.class)
logger.info("Applicant:" + applicant)
FormFuncResult result = new FormFuncResult()
return result
}
}note
The example code above logs personally identifiable information which is not recommended in a live application. Always take care that no sensitive information is written to log files in a production environment.
Reference vo source in service-def.json
We are using value objects generated by the gen-vo Ant target in the service code.
In the Project pane, locate the package containing the
FormUpdatesource, and open theservice-def.jsonfile.Locate the GroovyScript object in the parameters array.
Insert the two vo source filenames –
com/avoka/vo/applicant/Applicant.groovyandcom/avoka/vo/applicant/Address.groovy– into thefileIncludesarray as shown below.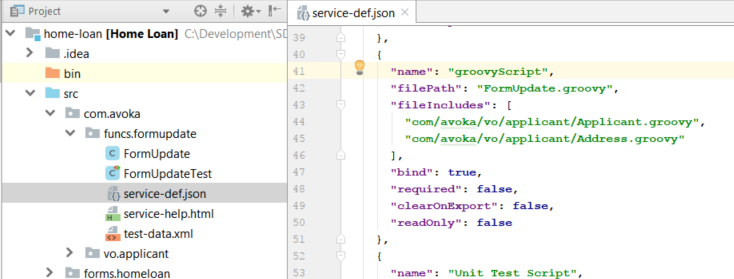
Save the changes.
Deploy your project to JM
Here we run the app-deploy Ant target to deploy the Application Package to the configured JM server.
In the Ant Build pane, select the
app-deploytarget and click the Run icon. Alternatively, you can double-click theapp-deploytarget to run it.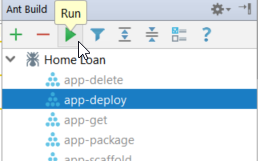
Press Alt+0 (zero) to display the Messages window and confirm successful deployment to JM.
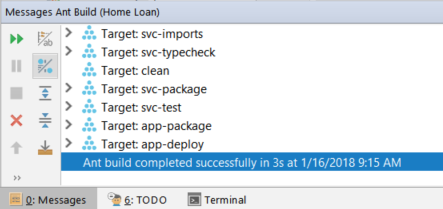
Your Application Package, including the example form, is now deployed to JM.
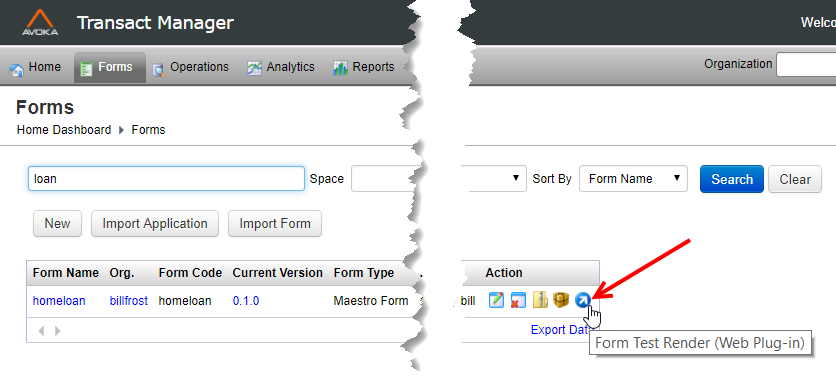
Render the form in JM
Here we locate the form in JM and render it.
Login to JM.
Select Forms > Forms.
Enter 'loan' in the search field.
Click Search.
Click the Form Test Render icon.
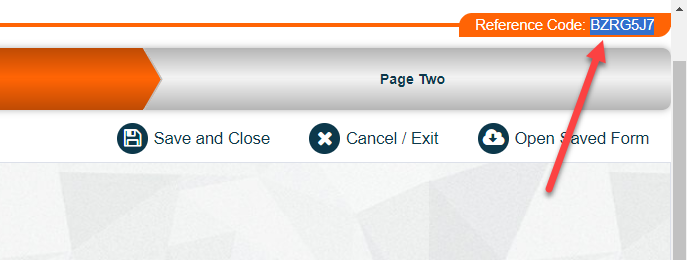
Generate a Reference Code
To generate a Reference Code, we need to fill in the form and navigate between pages.
First, enter some values, and click Continue. For example:

Because we have changed the form data, a form update event will be triggered when we click the Continue button, and our function will log a message.
Next, we copy the form reference code so we can lookup the transaction in JM.
Highlight the Reference Code at top right of the form, and copy it to the clipboard (Ctrl+C).
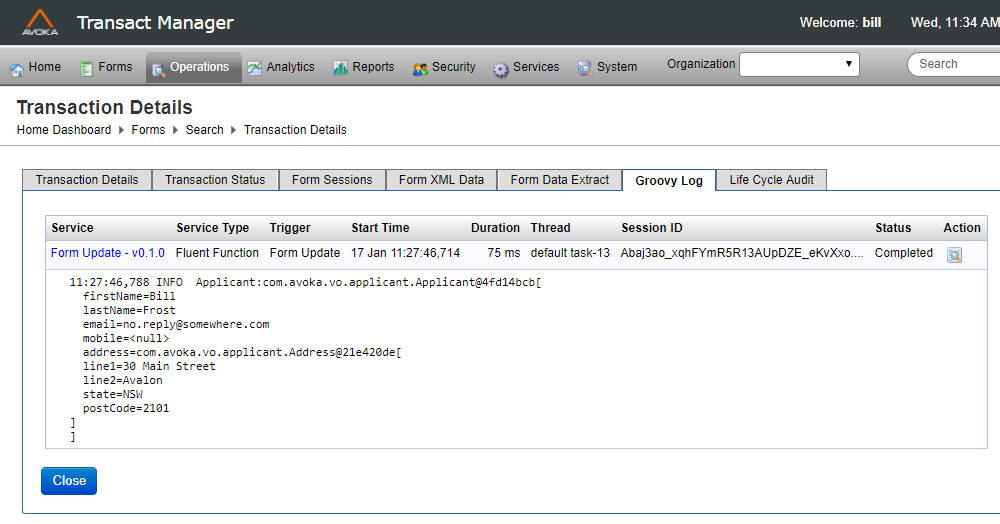
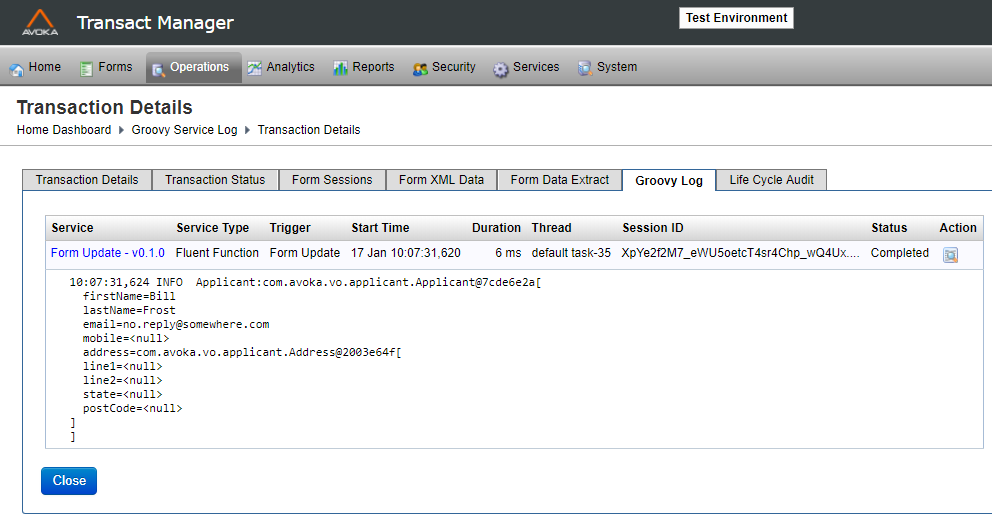
View the Groovy Service log
Here we look at the Groovy Service Log in Journey Manager to see the log messages from our service.
Login to JM.
Paste the reference code into the JM search field and press Enter.
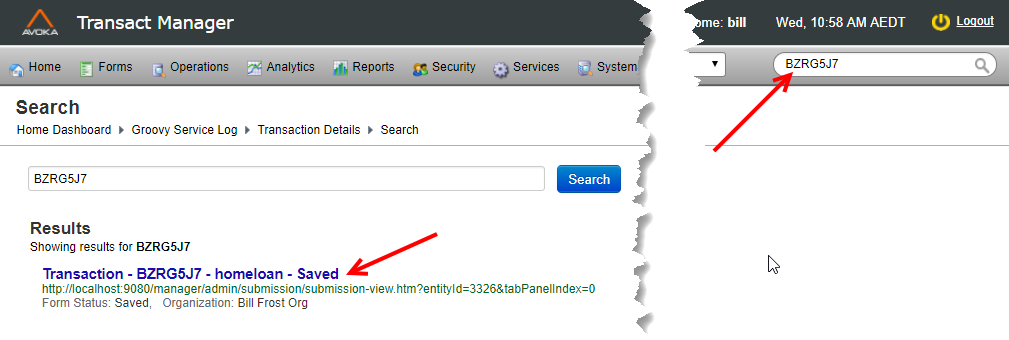
Click the link in the Results list to go to the Transaction Details page.
Click the Groovy Log tab to see the log entries.
Enhance the Form Function
Here, we make changes to the function code so it can return data into the form.
Go back to the groovy source.
Paste the following code into the code window as shown.
applicant.address.line1 = "30 Main Street"
applicant.address.line2 = "Avalon"
applicant.address.state = "NSW"
applicant.address.postCode = "2101"

new ObjectMapper()
    .setFormXPath("Applicant")
    .setObject(applicant)
    .update(param.appDoc);

FormFuncResult result = new FormFuncResult()
result.includeFormData = true
logger.info("Applicant:" + applicant)
Save the code.
Re-run the
app-deployAnt target.
Render and test the new form
Here we render the new form and note the address has been populated when we navigate to the second page.
Render a new form from JM.
Enter some values on the first form page.
Click Continue.
You will see the address has been populated by our function.

View the updated log entry
Here we search for the transaction detail and look at the log entries again.
Copy the form Reference Code to the clipboard.
Paste it into the JM search field and press Enter.
Click the link in the Results list.
Click the Groovy Log tab.
You will see the address has been logged by our modified function.