Journey Setup for credit unions
SpringboardThis topic is related to Springboard. | Form Builder | 23.10This feature relates to the 23.10 release
This topic expands on the information provided in Retail DAO for credit unions.
It is assumed you have access to the springboard/journey-setup GitLab project (login required), and that you are familiar with the requirements for developing solutions on the Temenos Journey Manager platform and dependent software. Information is available on these subjects and more in this documentation and on the TJM resources website. We also offer online courses and instructor-led training on developing Temenos Journey Manager platform solutions.
Define the brand
The first step in configuring a credit union is to define the brand as a credit union. This automatically enables the Eligibility page and membership share account requirements.
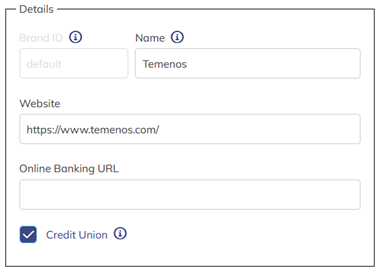
In Journey Setup, navigate to Brand Tools > Edit Brand. Under the Details section, select Credit Union as shown below.
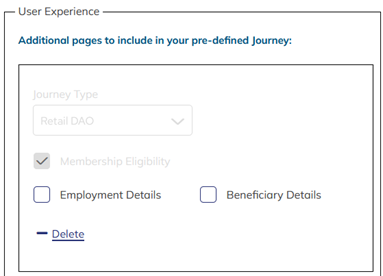
Once you have done this, Membership Eligibility appears preselected and read only in the User Experience section as shown below.
Membership eligibililty
In order to configure the Eligibility page, you must select Is Credit Union as described in the previous section. All credit unions have requirements of their members when joining the credit union, and each credit union has different criteria depending on their charter. To accommodate credit unions' varying requirements, the entire Eligibility page is configurable through Journey Setup. The client is responsible for providing their eligibility criteria in the US Retail DAO Customization Specification. Permissions are required to access this and other specification documents.
Navigate to Content Management Tools > Page Content > Manage Page Content. Currently, the only option is the Eligibility page. Here, you can define the page content, eligibility criteria, and any qualifiers for each criterion. You can define up to 10 criteria and, optionally, up to 3 qualifiers for each criterion. The platform does not validate whether the applicant really does meet the criteria to become a member.
Validation of credit union eligibility requirements is a customization.
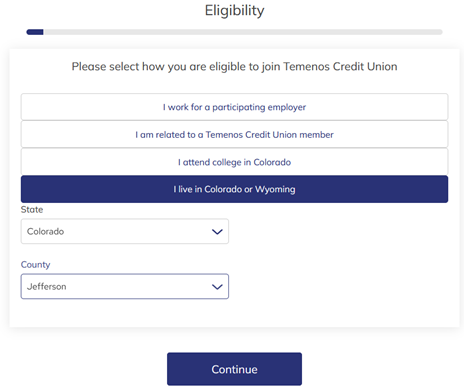
The following image shows an example Eligibility page with 4 criteria and the last criteria selected. In this example, the applicant lives in Jefferson County Colorado. The first drop down selection (Colorado) determines the values in the second dropdown (a list of Colorado counties). This is an example of two dependent qualifiers where the first determines the options for the second.
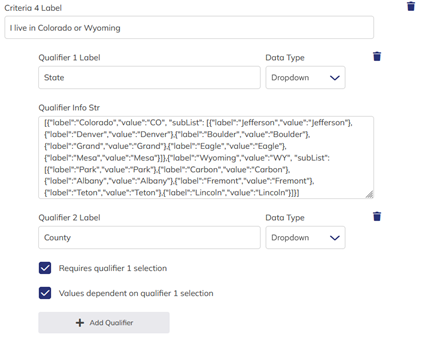
The following image shows the configuration for the selected criteria in the previous example.
Membership share account
One of the products offered for credit unions is a membership share account. This can either be selected by the applicant or automatically added by the platform.
Define the membership share account in the product catalog within Journey Setup. Navigate to Content Management Tools > Product Catalog > Manage Product Catalog then add the membership share as you would any other product. Under the Cross-sell Configuration section, select Is a Membership Share (for Credit Union only) as shown in the following image.
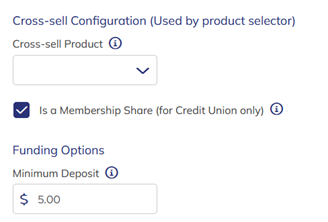
The client is responsible for completing the Springboard Product Configuration (login required) that provides all the data you need to complete the product definition. Ensure the account type for the membership share is Savings.
Access to specification documents is restricted. To learn more, see What clients need to know about Springboard > Specification documents.
How Springboard uses membership share product
The membership share will appear under Savings in the product selector. The applicant may select this alone or in combination with another product. The applicant is not required to select a membership share. After the applicant has provided their person details, Springboard queries the core banking system to check for a person record. If a person record is found, Springboard queries the core banking system again to retrieve any account assets. The results are examined for any account matching current or legacy membership share product IDs. For this reason, it is critical that the credit union provides any legacy membership share product IDs, and you must add these legacy IDs to the code.
Code logic
Credit Union Membership Share Account processing in the Product Fetch service performs the following actions:
- Retrieve all of the products to scan for Credit Union Membership share Account product.
- If any products are found, assign the share account Id as the value of the transaction property membershipShareAccountId.
- Update the Product Ids list and set flags for handling messaging about adding or removing the share account as needed.
- In the Narrative, the Membership Share Account page condition uses the flag
/Root/AvokaSmartForm/MembershipShare/Noticeset in this process.
Business logic
- If a person record is not found and a membership share is not present in the applicant shopping cart, a membership share will be automatically added, and the applicant advised. The applicant will be required to fund the membership share account with the minimum amount as defined in the product catalog.
- If membership share is in the applicant shopping cart, another is not added.
- If a person record is found but there is no membership share in their current assets, and a membership share is not present in the applicant shopping cart, a membership share will be automatically added, and the applicant advised. The applicant will be required to fund the membership share account with the minimum amount as defined in the product catalog.
- If membership share is in the applicant shopping cart, another is not added.
- If person record found and membership share in their current assets, and a membership share is present in the applicant shopping cart, the membership share will be automatically removed, and the applicant advised.
- If membership share is not in the shopping cart, one is not added.
- If membership share is the only item in the shopping cart, the application ends and the applicant is advised.
For more detail, see the Membership Share subprocess journey flow. Permissions are required to access journey flow diagrams.
Employment Details
The Employment Details page is an optional page available to all clients. When enabled, this page appears in the journey after Residential Address.
In Journey Setup, navigate to Brand Tools > Edit Brand. Under the User Experience section, select Employment Details as shown in the image below.
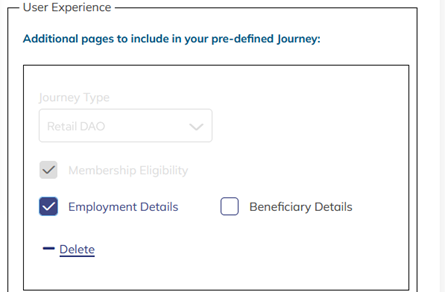
No further action is required. The page appears in the journey flow automatically after Residential Address.
Changing the content, page logic, or location in the journey flow is a customization.
Beneficiary
Account Beneficiary is an optional page available to all clients. When enabled, the Account Beneficiary page appears in the journey after Employment Details if that page is enabled, otherwise after Residential Address. The applicant is allowed to add none, one or two account beneficiaries.
In Journey Setup, navigate to Brand Tools > Edit Brand. Under the User Experience section, select Beneficiary Details as shown in the following image.
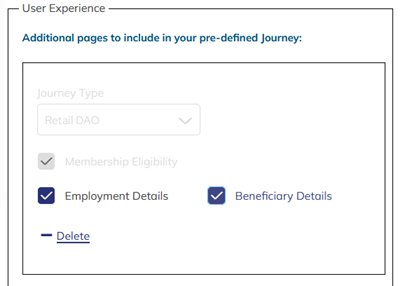
No further action is required. The page appears in the journey flow automatically after Employment Details or Residential Address.
Changing the content, page logic, or location in the journey flow is a customization.