Create a Custom Report
Journey Manager (JM) The transaction engine for the platform. | System Manager / DevOps | 19.05 This feature was removed in 19.05
Manager allows you to create and present a custom report.
A quite common requirement at the end stages of a project is to create "on-demand" reports on the data within TM. Reports help management and operational users clearly see data that could even be PII data. One benefit of creating reports that are presented within a formspace is that we are not responsible for the delivery of PII data. The results are displayed on screen or within a CSV file and it's up to the end user to safely and securely download and store the file. Reports can be heavily customized to show data from submission objects, data extracts, or form xml. Remember that the form xml will be purged based on data retention settings. Reports can also be quite processor heavy so special care should come with load testing.
Let's walk though a very simple report that uses the Core API to query submissions. Typically I use the Core API because the Fluent API doesn't have a start and end date as part of the querying criteria. Start and end dates are a standard for most reporting criteria. Most reports are based on submissions and all DAOs query off of submission date except for the TransactionHistoryDAO which queries off of form start/opened date.
The following example only shows how to display 1 report but the architecture is setup in a way to easily add more reports.
Form
After creating a new blank form with your customer's branding:
- Delete all non-essential components, especially the submit and save buttons. We don't want any transactions getting submitted to Manager or the customer will incur a fee.
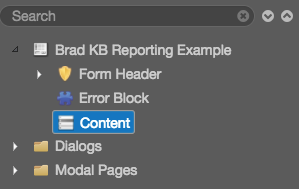
- On the Maguire form I deleted: Wizard Nav Bar, Form Footer, Function Bar, Navigation Second Level, Navigation Chevrons, Job Details Block, and everything within the "Content" Page Controller.

- Add a Page named"Reporting" to the Content Page Controller.
- Add a Section named"Report Criteria" to your "Reporting" Page.
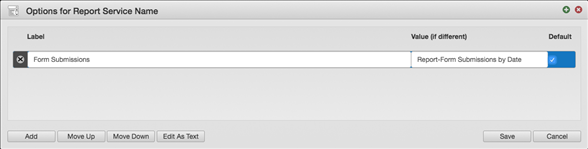
- Add a dropdownnamed "Report Service Name" to your "Report Criteria" Section. We will only have one report but this is where you can add multiple reports if required.
- Add one option to the dropdown. Make the label "Form Submissions" and the value has to be the name of the Groovy Service that creates the report data. We'll call our service "Report-Form Submissions by Date".
- Add a block called "Criteria1" to the "Reporting Criteria" Section. The reason for the block is to add visibility rules if you have different reports with different criteria.
- Add a 2 date fields called "Start Date" and "End Date".
- Prefill the "Start Date" and "End Date" with today's date.
- Add Validation that they must be Past Dates and Include Today.
- Make both fields Mandatory.
Add the following validation rule to "End Date" (optional):
if (Calc.daysBetween(data.startDate, data.endDate) > 7)
return "Date range cannot exceed 7 days.";
- Add a Text Display field beside the dates that states the valid date range. i.e. "Date range cannot exceed 7 days."
- Add a dropdown called "Output Format" with 2 options: CSV and HTML to the "Reporting" Section.
- Add a "Run Report" button.
- Add a Block called "OutputBlk" to house all the hidden data and output fields.
- Add a Text Display field with "Output records have been returned." to the "OutputBlk".
- Add a "recordsReturned", "rawData", and "outputReturned" Data Fieldsto the "OutputBlk".
- Add a "Download CSV"Button to the "OutputBlk" with the following Visibility rule:
data.outputreturned === "CSV" -
Add a "Show HTML" Button to the "OutputBlk" with the following Visibility rule:
data.outputreturned === "HTML" - At this point, all the necessary fields have been added. Now it's time to insert the logic to the fields.
-
Add the following "Click" script to the "Run Report" button:
var runReport = function() { data.rawdata = null; data.recordsreturned = 0; data.outputreturned = data.outputFormat; Form.showProgress("Your report is being generated..."); var inputData = { startDate: data.startDate, endDate: data.endDate, reportServiceName: data.reportServiceName, outputType: data.outputFormat } DynamicData.call("GenerateDynamicDataReport", inputData).then( function(response) { Form.showProgress(""); console.log(response); data.rawdata = response.data; data.recordsreturned = response.recordsReturned; }).catch( function(err) { Form.showProgress(""); console.log(err); } ); } Form.validate("data.reportCriteria").then( function(response) { if (response.valid == true) { runReport(); } else { return; } } ).catch( function(err) { console.log(err); } ); -
Add the following Click script to the "Download CSV" Button:
function requiredFeaturesSupported() { return ( BlobConstructor() && msSaveOrOpenBlobSupported() ); } function BlobConstructor() { return (window.Blob) } function msSaveOrOpenBlobSupported() { return (window.navigator.msSaveOrOpenBlob) } function b64toBlob(b64Data, contentType, sliceSize) { contentType = contentType || ''; sliceSize = sliceSize || 512; var byteCharacters = atob(b64Data); var byteArrays = []; for (var offset = 0; offset < byteCharacters.length; offset += sliceSize) { var slice = byteCharacters.slice(offset, offset + sliceSize); var byteNumbers = new Array(slice.length); for (var i = 0; i < slice.length; i++) { byteNumbers[i] = slice.charCodeAt(i); } var byteArray = new Uint8Array(byteNumbers); byteArrays.push(byteArray); } var blob = new Blob(byteArrays, {type: contentType}); return blob; } if (requiredFeaturesSupported()) { blobObject = b64toBlob((data.rawdata), "text/csv"); window.navigator.msSaveOrOpenBlob(blobObject, 'report.csv'); } else { var a = document.body.appendChild(document.createElement("a")); a.download = "report.csv"; a.href = "data:text/csv;charset=utf-8;base64," + data.rawdata; a.innerHTML = "download report csv"; a.hidden = true; a.click(); } -
Add the following code to the "Show HTML" Button:
if (data.rawdata) {
var win = window.open("", "Report", "toolbar=no, location=no, directories=no, status=no, menubar=no, scrollbars=yes, resizable=yes, width=780, height=200, top="+(screen.height-400)+", left="+(screen.width-840));
win.document.body.innerHTML = data.rawdata;
}

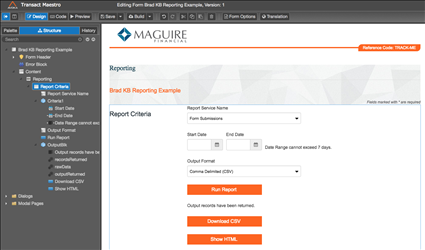
All done... now it's time to write the services! Here's what it should look like:
Groovy Script
The form is designed to call one generic DDS with the name of the report service as a parameter. There are 3 services which sort of represent a typical 3 layer java framework of "Service Layer", "Manager Layer", and "DAO Layer". Only the "Manager Layer" has to change in most situations since the Submission object that gets returned gives you access to everything you'll need.
-
GenericDynamicDataReport - This is the main DDS service that the form calls. It's just passes on the parameters to the right Groovy Service. In a perfect situation you would also handle any bubbled exceptions here too.
import com.avoka.core.groovy.GroovyLogger as logger import com.avoka.fc.core.service.ServiceLocator import com.avoka.fc.core.dao.* import com.avoka.fc.core.entity.* import groovy.json.* String reportServiceName = request.getParameter('reportServiceName') String startDate = request.getParameter('startDate') String endDate = request.getParameter('endDate') String outputType = request.getParameter('outputType') def reportService = ServiceLocator.getServiceForName(reportServiceName) Map<String,Object> result = reportService.invokeService([ startDate:startDate, endDate:endDate, outputType:outputType ]) return JsonOutput.toJson(result) -
Report-Form Submissions by Date - This is the name of the service that you configured in your Maestro form. It has to match perfectly with the value of the dropdown in "Report Service Name" and the parameters have to match as well. This service assembles the data returned from the next DAO call. This is where you can get really creative and return back submission properties, data extracts, form XML, etc... But this is where you also have to be careful with performance. The more introspecting and filtering you do the slower your report will be. The "filterData" function.
import com.avoka.core.groovy.GroovyLogger as logger import com.avoka.fc.core.dao.*; import com.avoka.fc.core.entity.*; import com.avoka.fc.core.service.ServiceLocator import groovy.json.* DATEFORMAT = 'yyyy-MM-dd' String formCode = serviceParameters.formCode // You'll have to add a service parameter or hardcode your formcode here. String startDate = parameters.startDate String endDate = parameters.endDate String outputType = parameters.outputType String encodeCsv = parameters.encodeCsv ?: 'false' //logger.info "---------------------------------------------------" //logger.info serviceDefinition.getServiceName() //parameters.each { logger.info "$it.key: $it.value" } //logger.info "---------------------------------------------------" def reportHeaders = createReportHeaders() def reportData = retrieveData(formCode, startDate, endDate) reportData = filterData(reportData) def output = null if (outputType.toUpperCase() == "CSV") { String csvString = createCsvReport(reportHeaders, reportData) if (encodeCsv == 'true') output = Base64.getEncoder().encodeToString(csvString.getBytes()) else output = csvString } else if (outputType.toUpperCase() == "HTML") { StringBuilder reportHtmlStr = new StringBuilder(); reportHtmlStr.append startHtmlBody() reportHtmlStr.append createHtmlReport(formCode, reportHeaders, reportData, startDate, endDate) reportHtmlStr.append endHtmlBody() output = reportHtmlStr.toString() } return ["data":output, "recordsReturned": reportData.size] /******************* * HELPER FUNCTIONS *******************/ def createReportHeaders() { def reportHeaders = ["ApplicationId" // 1 ,"Submit Date" // 2 ,"Submit Time" // 3 ,"Current Status" // 4 ,"Last Updated" // 5 ] return reportHeaders } def retrieveData(formCode, startDate, endDate) { def getSubmissionDeliveryListService = ServiceLocator.getServiceForName("GetSubmissionDeliveryList") def results = getSubmissionDeliveryListService.invokeService(["formCode":formCode, "startDate":startDate, "endDate":endDate]) return results } def filterData(results) { StringBuilder dataStr = new StringBuilder(); def dataTable = [][] def filteredResults = results.sort { it.timeSubmission }.reverse() filteredResults.eachWithIndex { it, i -> dataTable[i] = [ it.trackingNumber, // 1 it.timeSubmission.format(DATEFORMAT), // 2 it.timeSubmission.format(TIMEFORMAT), // 3 it.job?.currentStep?.name, // 4 it.job?.currentStep?.timeCreated.format(DATETIMEFORMAT) // 5 ] } return dataTable } def createHtmlReport(formCode, reportHeaders, dataTable, startDate, endDate) { StringBuilder dataStr = new StringBuilder(); dataStr.append "<p>Applications submitted for ${formCode} from ${startDate} to ${endDate}</p>" dataStr.append "<table>" dataStr.append "<tr>" reportHeaders.each { dataStr.append "<th>${it}</th>" } dataStr.append "</tr>" dataTable.each{ it1 -> dataStr.append "<tr>" it1.each { dataStr.append "<td>${it ?: ""}</td>" } dataStr.append "</tr>" } dataStr.append "</table>" return dataStr.toString() } def startHtmlBody() { StringBuilder dataStr = new StringBuilder(); dataStr.append "<!DOCTYPE html><html>" dataStr.append '''<head> <style type="text/css"> body { font-family: Verdana, Arial, Helvetica, sans-serif; font-size: 10px; } table { border-collapse: collapse; } table, th, td { font-size: 10px; padding: 3; border: 1px solid black; } td { color: #898989; font-size: 10px; padding: 3; text-align: right; } </style> </head>''' dataStr.append "<body>" return dataStr.toString() } def endHtmlBody() { return "</table> </body> </html>" } def createCsvReport(reportHeaders, dataTable) { StringBuilder dataStr = new StringBuilder(); reportHeaders.each { dataStr.append "\"${it}\"," } dataStr.append "\n" dataTable.each{ it1 -> it1.each { dataStr.append "\"${it ?: ""}\"," } dataStr.append "\n" } return dataStr.toString() } -
GetSubmissionDeliveryList - This "DAO Layer" extracts submission objects for a given date range for a specific formcode. I've played with many DAOs and maybe one suits your purpose more than this but what I've found is that many of the DAOs cut off after a certain limit regardless of what you specify. The requirements I've had in many reports goes beyond these limitations so I've found this script/DAO to be the best and surprisingly performs very well. You can also pass a parameter to include Saved transactions.
import com.avoka.core.groovy.GroovyLogger as logger
import com.avoka.fc.core.service.ServiceLocator
import com.avoka.fc.core.dao.*
import com.avoka.fc.core.entity.*
import groovy.json.*
String formCode = parameters.formCode
Date startDate = Date.parse('yyyy-MM-dd', parameters.startDate)
startDate.set(hourOfDay : 0)
startDate.set(minute : 0)
startDate.set(second : 0)
Date endDate = Date.parse('yyyy-MM-dd', parameters.endDate)
endDate.set(hourOfDay : 23)
endDate.set(minute : 59)
endDate.set(second : 59)
String includeSaved = parameters.includeSaved ?: 'false'
//logger.info "---------------------------------------------------"
//logger.info serviceDefinition.getServiceName()
//parameters.each { logger.info "$it.key: $it.value" }
//logger.info "---------------------------------------------------"
List deliveryStates = ["Not Ready", "Ready", "Sent Email", "In Progress", "Pending", "Completed", "Error", "Undeliverable", "Not Required"]
String clientId = DaoFactory.getClientDao().getClientByCode("digital").getId();
String deliveryDetailsId = null
String deliveryMessageLike = null
int fetchLimit = 10000
SubmissionDao submissionDao = DaoFactory.getSubmissionDao();
List allResults = []
deliveryStates.each {
allResults.addAll(submissionDao.getSubmissionDeliveryList(it,
clientId,
deliveryDetailsId,
formCode,
deliveryMessageLike,
startDate,
endDate,
fetchLimit))
}
if (includeSaved == 'true') {
def savedList = submissionDao.getSavedSubmissionList(null, clientId, null, null, startDate, endDate)
def filteredResults = savedList.findAll{ it.formCode == formCode }
allResults.addAll(filteredResults)
}
//logger.info "Total records retrieved - getSubmissionDeliveryList.size:${allResults.size}"
return allResults
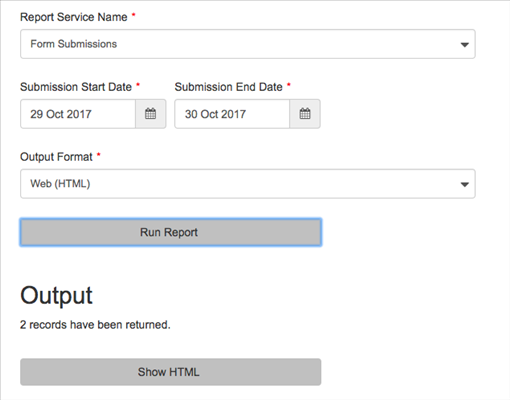
The interface for the custom report is shown below:
You can also use the TxnHistoryQuery class to create a custom report using a Groovy script.
Next, learn how to view job licensing report.