Preferences
Journey Analytics The behavioural analytics tool. | Analytics User | Latest Version Latest version 23.04.0 cloud hosted.
The Journey Analytics preferences are used to configure the Segment Whitelist. Preferences can be opened by clicking the settings cog in the top right of the user interface.

Segment Whitelist
Within Preferences, the Segment Whitelist determines which segmentation data is allowed to be stored in Journey Analytics datasets. It is designed to help prevent inadvertent storage of Personally Identifiable Information (PII) in the Journey Analytics database.
To avoid losing any segmentation data, add them to the segment whitelist prior to making the application (form) available to users.
To collect segment data for Journey Analytics purposes, the segments and their values must be whitelisted. Any incoming segment data which is not whitelisted is discarded and is not stored.
Modify the segment whitelist
You will need Journey Analytics Administrator, or "Transact Insights Administrator", role for your user account to access the whitelist. For more information on Personally Identifiable Information (PII) and the types of data allowed to capture using custom segmentation, see Data Privacy and Security.
Using the UI
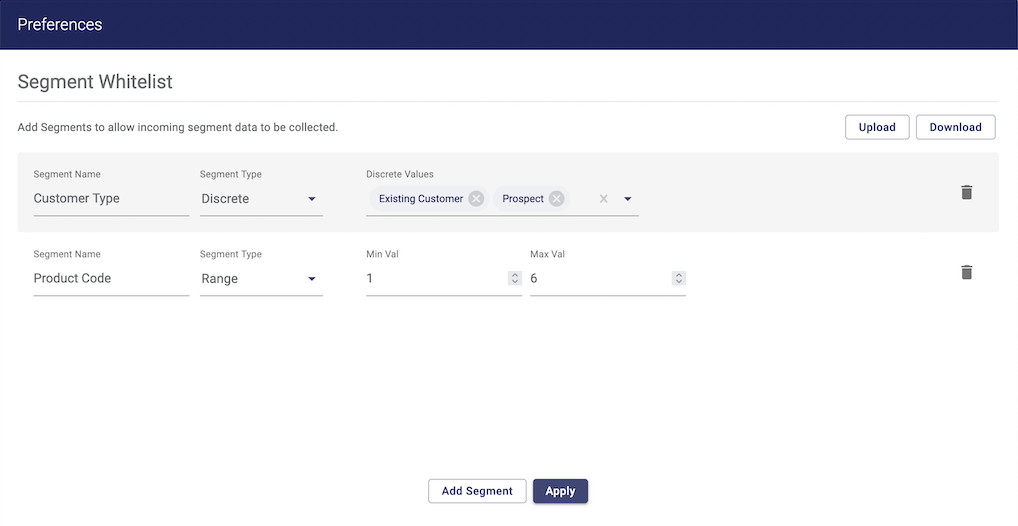
Using the UI, add and amend entries using the steps below:
- Click the settings cog to open the segment whitelist.
- Click Add Segment to add new entries.
- In the new row, input the details for the new whitelist entry:
- Segment Name: the name of the segmentation.
- Segment Type: the type of segmentation, either DISCRETE or RANGE.
- Segment Values: the segment values or range of values that are allowed.
- Click Apply to save entries.
The segment whitelist is shared across all Journey Manager environments (DEV, UAT, TEST, STAGING, PROD). Changes to the segment whitelist in one environment will be reflected in all environments.
Using a file
Alternatively, use the Download and Upload buttons to maintain the whitelist using a file.
- Click the Download button to download the
segment-whitelist.yamlfile. - Open the file using your choice of text editor or integrated development environment (IDE).
- Input input the details for the new whitelist entries to the file using the format:
segmentName: the name of the segmentation.segmentType: the type of segmentation, either DISCRETE or RANGE.values: the segment values or range of values that are allowed:- For DISCRETE segmentations, set the list of all discrete values allowed.
- For RANGE segmentations, set the minimum and maximum values for the range values allowed.
- Click the Upload button to upload the modified
segment-whitelist.yamlfile. - Click Apply to save entries.
    - segmentName: Customer Type
      segmentType: DISCRETE
      values:
        - Existing Customer
        - Prospect
    - segmentName: Product Code
      segmentType: RANGE
      values:
        - 1
        - 6
Each whitelist entry requires the following properties to be set:
This file can also be stored in your solution as a backup to track changes using version control.
To cancel all modifications, before clicking Apply, click anywhere outside the preferences dialogue.
For more information on sending segments, see How to Send Custom Milestones and Segments.