Form Functions Quick Start
This guide is a quick walk-through of creating and deploying a Fluent Form Function and calling it from JavaScript code in a Maestro form. The form will fetch a list of currency codes when it loads, and lookup an exchange rate when a button is pressed.
Prior to undertaking this exercise, you need to have worked through the App Package Quick Start.
In this exercise, we'll be creating a new Maestro form and a new IDE project.
Notes on Form Functions
Form Functions provide an improved programming model for client applications to call server side business functions. Form Functions are designed for applications to make call to other system for doing remote data lookups or executing some secure business logic on the server. They provide the modern replacement for Form Dynamic Data Services but with an improved programming and security model.
Note that the "Form Function" trigger don't provide automatic support for transaction updates. Use the Fluent Functions with a "Form Update" trigger for automatic persistence. Form Functions are for light weight calls such as data lookups or type ahead queries.
For an application to call a Form Function it must be associated with the Form Version as with all Transact Functions. This is different from Form Dynamic Data services where the service simply needed to be associated with the Organization. The reason for this change is to provide improved security and application services dependency analysis. If a form function has not been associated with a form version, calls to it will result in HTTP 400 Bad Request errors.
When you first create a form version in Maestro, there are no form functions associated with it. You must add them in the to your SDK project with the app-scaffold-func Ant task.
If you swap between Maestro and the SDK app-deploy Ant task when developing forms containing form functions, take particular care to render the correct form version when testing the form.
Both Maestro and the app-deploy Ant task set the Current Version of a form after it is built or deployed. If you have configured different form versions in Maestro and in the form-def.json using Ant, different versions will be made current in Journey Manager (JM) each time you build or deploy.
Object of this exercise
The scenario is that we need to include an exchange rate calculation in a form. To provide that capability we will use an external SOAP web service which provides a list of countries and their currency codes, and another REST web service which provides an exchange rate, given two currency codes.
We will call the first SOAP web service in a form load rule, because we can use it for the lifetime of the form. The returned data is used to populate two dropdown lists to enable choosing from and to currency codes. When a country name is selected from either list, its currency code is populated into the associated Currency Code read-only field.
The second REST web service is called whenever the Convert button is pressed. The response is populated into the Conversion Rate field which triggers a calculation rule to update the Converted Amount field by applying the conversion rate to the Conversion Amount field.
Some from/to values are not valid conversions, and in this case a validation error will be shown. The error is cleared when a different country name is selected in either list.
Our form will look like this when it runs:
Learning outcomes from this exercise
Upon completion of these step-by-step instructions, you will have:
- Scaffolded a new Journey SDK Project with an application package and form functions.
- Written the form function code.
- Added a service parameter and accessed it in the service.
- Imported the example form from the SDK into Maestro.
- Built the Maestro form with Transact Functions enabled.
- Downloaded and included the Maestro form in the application package configuration files.
- Deployed the application package to your Journey Manager server.
Then in the Journey Manager Console, you will verify the result by:
- Searching for your new form.
- Rendering your new example form.
Finally, we show how you can work with your own Maestro form instead of using the example form included with the SDK.
Exercise Steps
We'll be running the Ant targets in this exercise from IntelliJ on Windows. The SDK has been unzipped into the folder C:\Development\SDK\Intellij.
Scaffold a new SDK project
Here we use the main Journey SDK project to scaffold a new SDK project.
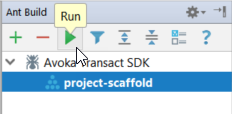
In the main SDK project's Ant Build panel:
- Run the
project-scaffoldAnt target. - Use 'Foreign Currency Exchange' for the Project Name.
- Use 'foreign-currency-exchange' for the Project Folder.
Open the scaffolded project
Here we open the Foreign Currency Exchange project in a new window and configure properties and Ant dependencies.
- Select File > Open... from the Menu.
- Locate the new project root folder and open it in a new window.
- Edit the
build.propertiesandtransact-auth.propertiesfiles and save them. - Select View > Tool Windows > ant Build from the main menu.
- Drag
build.xmlfrom the Project panel into the Ant Build panel. - Right-click in the Ant Build panel and select Properties.
- Click the Additional Classpath tab.
- Click Add All in Directory.
- Select the lib folder from the main SDK project and click OK.
Scaffold an Application Package
Here we scaffold an application package and two form functions into the project to provide the currency conversion services.
Run the
app-scaffoldtarget from the Ant Build panel.Run the
app-scaffold-functarget from the Ant Build panel.- Use 'Get Currency Codes' as the Function Name.
- Use 'com.yourcompany.funcs.currency' as the Package Name.
- Choose Fluent Function as the function type.
- Choose Form Function as the function trigger.
Run
app-scaffold-funcagain.- Use 'Get Exchange Rate' as the Function Name.
- Use 'com.yourcompany.funcs.exchange' as the Package Name.
- Choose Fluent Function as the function type.
- Choose Form Function as the function trigger.
Define the Form Functions
Now that we've scaffolded the two form functions, we need to define them.
GetCurrencyCodes
Replace the code in the scaffolded GetCurrencyCodes form function class with the following code.
package com.avoka.funcs.currency;
import com.avoka.tm.func.*
import com.avoka.tm.util.*
import com.avoka.tm.http.*
public class GetCurrencyCodes {
    public Logger logger
    FuncResult invoke(FuncParam param) {
        FormFuncResult result = new FormFuncResult()
        if (param?.svcDef?.svcConn?.endpoint) {
            String message = param.svcDef.paramsMap.get('Soap Envelope')
            def response = new PostRequest(param.svcDef.svcConn.endpoint)
                .setContentType('text/xml')
                .setMessage(message)
                .execute()
            if (!response.isStatusOK()) {
                throw new RuntimeException(response.statusLine)
            }
            def countries = new Path(response.getPathContent().val('string'))
                .paths('//Table[normalize-space(CurrencyCode) != ""]')
            result.data.put('success', true)
            result.data.put('countries', countries.collect {[
                Name        : it.val('//Name'),
                CountryCode : it.val('//CountryCode').toString().toUpperCase(),
                CurrencyCode: it.val('//CurrencyCode').toString().toUpperCase(),
            ]})
        }
        return result
    }
}
About the GetCurrencyCodes class:
- This code calls a free SOAP service which returns a list of counties along with their country and currency codes.
- Being a free service, it may not always be available.
- The URL of the service is configured in the related service connection.
- The SOAP envelope of the service is configured as a service parameter which we will add in the next step.
- The SOAP service strangely returns its result as an XML string inside a root element called 'string'.
- The code parses the 'string' element into an XML document, then extracts a list of all Table elements that have a non-empty CurrencyCode child element.
- The list is then converted to a Groovy map object that will be returned as a Json array of objects with Name, CountryCode and CurrencyCode properties.
- In case you are wondering, the 'it' variable is an implicit variable name provided by Groovy in the closure passed to the countries.collect method. It represents each item being iterated in the countries array.
GetExchangeRate
Replace the code in the scaffolded GetExchangeRate form function class with the following code.
package com.avoka.funcs.exchange;
import com.avoka.tm.func.*
import com.avoka.tm.util.*
import groovy.json.JsonSlurper
import com.avoka.tm.http.*

public class GetExchangeRate {
    public Logger logger

    FuncResult invoke(FuncParam param) {
        FormFuncResult result = new FormFuncResult()

        if (param?.svcDef?.svcConn?.endpoint) {
            def from = param.params.get('from').toString().toUpperCase()
            def to = param.params.get('to').toString().toUpperCase()
            def params = [base: from, symbols: to]
            def data;

            try {
                HttpResponse response = new GetRequest(param.svcDef.svcConn.endpoint)
                    .setContentType('application/json')
                    .setParams(params)
                    .execute()

                if (!response.isStatusOK()) {
                    throw new RuntimeException(response.statusLine)
                }

                def json = new JsonSlurper().parseText(response.textContent)
                def rate = json['rates'][to]
                if (rate == null) {
                    throw new Exception('invalid response received from service')
                }

                result.data.put('success', true)
                data = [
                    rate: rate
                ]
            }
            catch (Exception e) {
                result.data.put('success', false)
                data = [
                    error: 'not available'
                ]
            }
            result.data.put('exchangeRate', data)
        }
        return result
    }
}
About the GetExchangeRate class:
- This code obtains the parameters
fromandtothat have been passed up by the call toTransact.formFunctionin the Click rule of the form's Convert button. - The code then issues a GET request to an exchange rate service, passing the
fromandtoparameters asbaseandsymbols, and requesting a JSON-format response. - The response is validated and if a valid rate is found a
truesuccessresponse is returned to the form along with an exchangeRate object containing a rate property. - Any errors or if a valid rate is not found will cause a
falsesuccessresponse with an error property containing the reason.
Externalize GetCurrencyCodes
Here we add a parameter to the GetCurrencyCodes service, and populate it from an example file included in the SDK.
It's best practice to externalize anything that might possibly change in a service, and although this property should be relatively stable, we are doing it here so you get in the habit.
The URL endpoint of the service has already been externalized in the service connection.
In your IDE:
Open the
service-def.jsonfile of the 'Get Currency Codes' service.Add the following JSON object to the top of the parameters array, making sure you include the trailing comma.
{
    "name": "Soap Envelope",
    "type": "String",
    "filePath": "soap-envelope.xml",
    "bind": false,
    "required": true,
    "clearOnExport": false,
    "readOnly": false,
    "unitTest": false
},
Change the description to
"Obtains a list of countries with their country and currency codes".Copy
soap-envelope.xmlfrom the examples folder of the main SDK project to the folder that contains theservice-def.jsonfile.soap-envelope.xml<soap12:Envelope xmlns:xsi="http://www.w3.org/2001/XMLSchema-instance"
xmlns:xsd="http://www.w3.org/2001/XMLSchema" xmlns:soap12="http://www.w3.org/2003/05/soap-envelope">
<soap12:Body>
<GetCurrencies xmlns="http://www.webserviceX.NET" />
</soap12:Body>
</soap12:Envelope>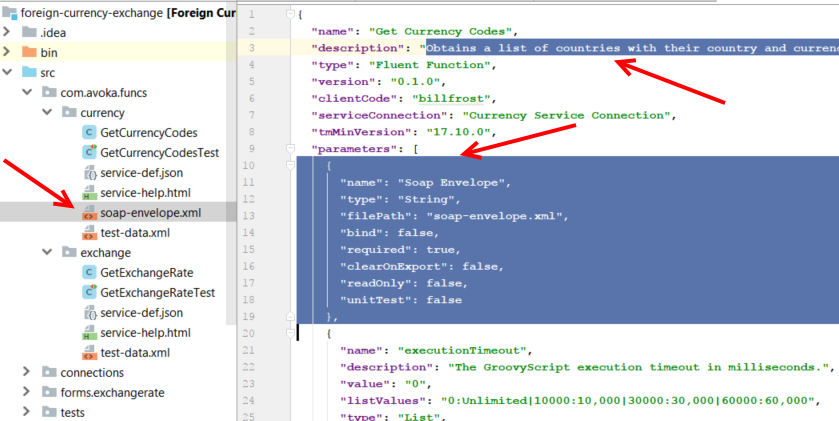
Save the
form-def.jsonfile.
Import the pre-built form
To save time, we have created a pre-built Maestro form that will call the two form functions.
You can import the form into your own Maestro project and inspect the code, but the two code fragments that call the form functions are also shown below.
Form Notes
The 'Get Currency Codes' function is called in the Form Load rule to fetch and store a list of countries and their currency codes. The steps in this function are:
- Initialize an array
$countrieson the form data object. - Call the 'Get Currency Codes' form function which returns a Promise.
- If the promise is fulfilled, and the response indicates success,
data.countriesis replaced with the returned values.
Two data driven dropdowns have their data source set to data.$countries. When a country is selected, the currency code for the country will be shown in the Currency Code text fields.
The 'Get Exchange Rate' function is called in the Click rule of the Convert button. The steps in this function are:
- Build a params object containing the from and to currency codes.
- Call the 'Get Exchange Rate' form function which returns a Promise.
- If the promise is fulfilled, and the response indicates success, and a valid rate is returned, the exchange rate is converted to a number and stored in
data.$exchangeRate.
When data.$exchangeRate is populated, a calculation rule on Converted Amount will fire to convert the Conversion Amount value using the exchange rate.
info
Variables that begin with $ on the form data object are never sent with the form XML data.
Create a new project in Maestro or navigate to one of your existing projects.
Click the Import Form button.

Import
maestro-form-exchangeRate-v1.0-develop.zipfrom the main SDK project 'examples' folder, or click here to download it so you can save it elsewhere. The form looks like this: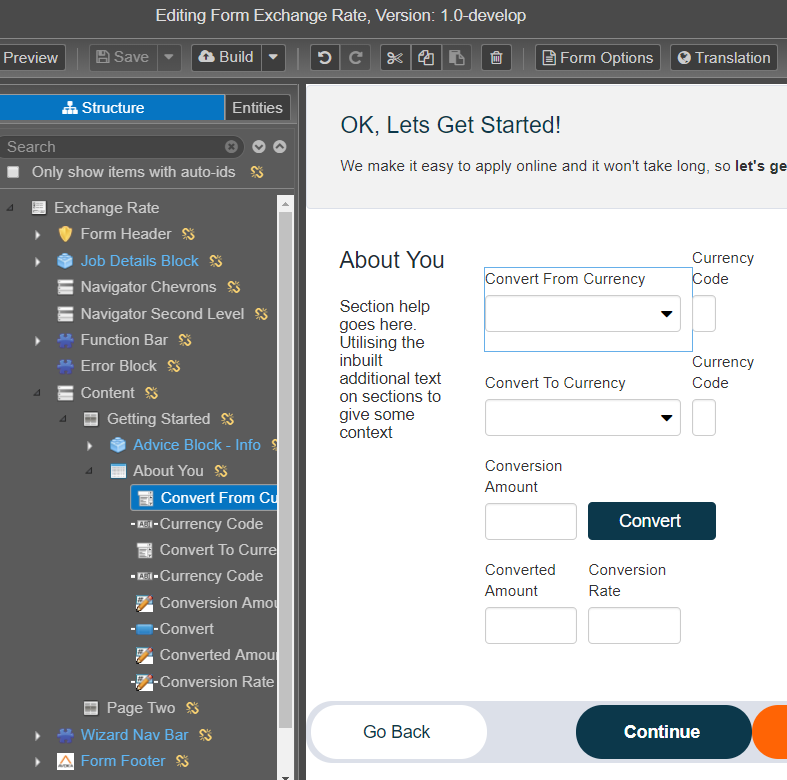
Edit the form version.
The Form Load rule code contains:
data.$countries = [];
Transact.formFunction('Get Currency Codes', '0.1.0', 'formload', {})
.then(function (response) {
    if (response.data.success) {
        data.$countries = response.data.countries;
    }
});
The Convert button click rule code contains:
var params = {from: data.currencyCodeFrom, to: data.currencyCodeTo};
Transact.formFunction('Get Exchange Rate', '0.1.0', 'ratelookup', params)
.then(function (response) {
    if (response.data.success && response.data.exchangeRate.rate) {
      data.$exchangeRate = response.data.exchangeRate.rate * 1.0;
    }
    else {
      data.$exchangeError = response.data.exchangeRate.error;
      data.conversionRate = -1;
      Form.validate("conversionRate", data);
    }
});
Build the form
In Maestro, build the form and configure it to use Fluent Functions (also known as Transact Functions).
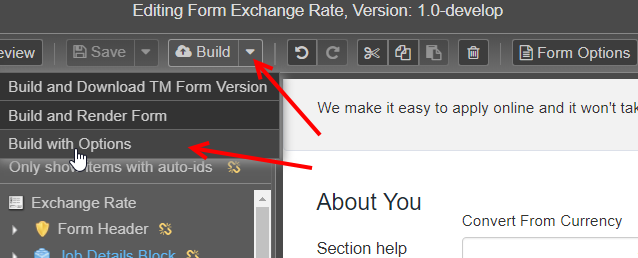
Click the arrow next to the Build button on the Maestro toolbar and select Build with Options.
Tick the Use Transact Functions checkbox.
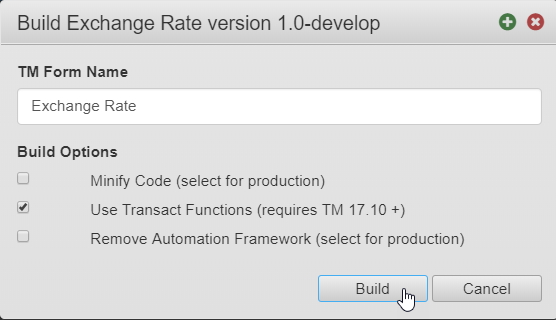
Click Build.
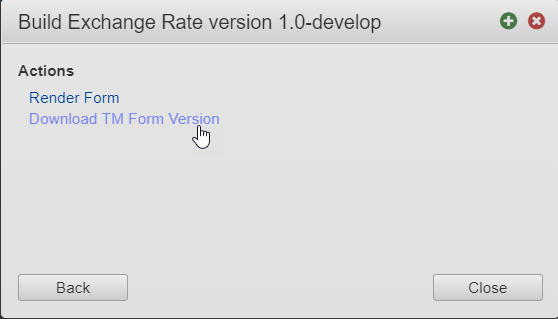
Click Download TM Form Version.
Copy the downloaded file into the
src/forms/exchangeratefolder of the SDK project.Edit the
form-def.json file. Set the version and filename properties to match the Maestro form. Save the file when done.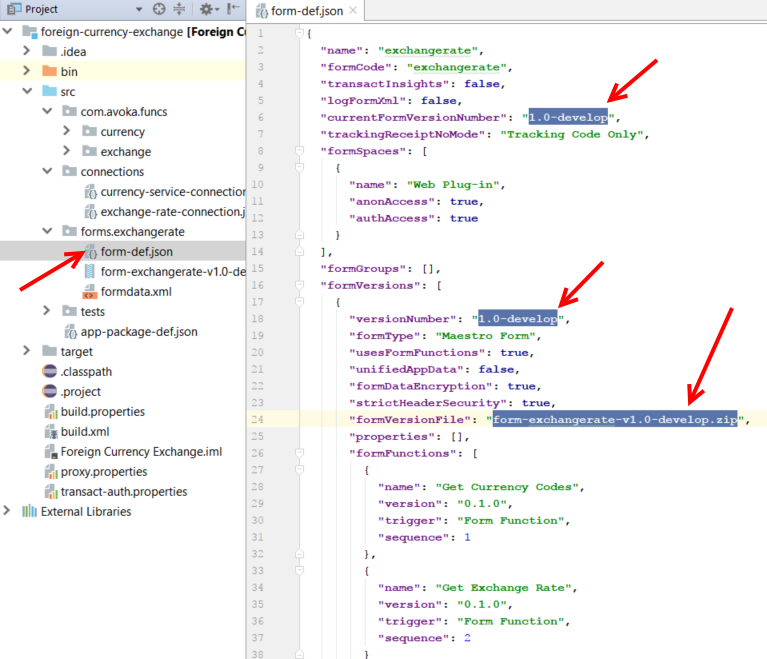
Deploy the project
Here we run the app-deploy Ant target to deploy the Application Package to the configured JM server.
In the Ant Build panel:
Select the
app-deploytarget and click the Run icon. Alternatiovely, you can double-click theapp-deploytarget.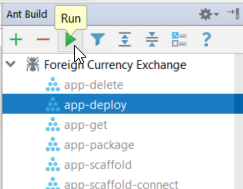
Check the result in the Messages window. Pressing Alt+0 (zero) will show the Messages window.
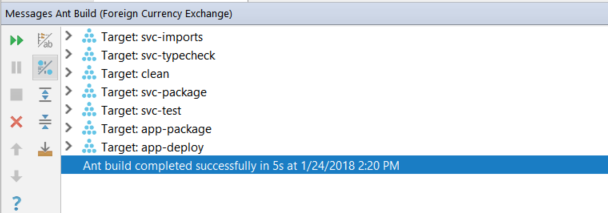
Your Application Package, including the example form will now be deployed to your Journey Manager instance.
Verify the form in Journey Manager
Here we locate the new form in JM and render it.
Login to JM.
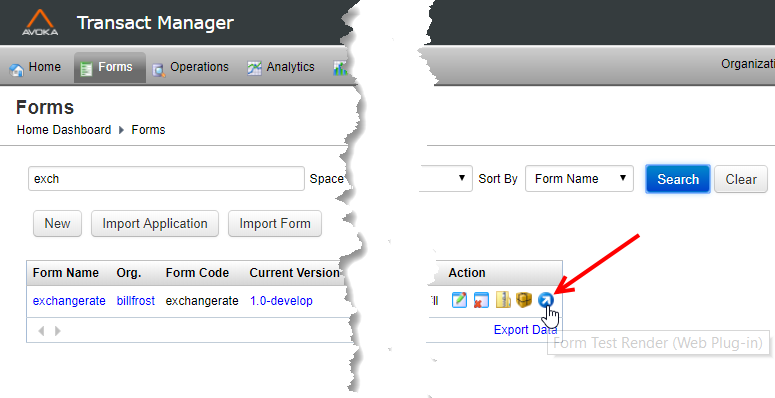
Select Forms > Forms from the menu.
Enter 'exch' in the search field.
Click Search.
Click the Form Test Render icon.
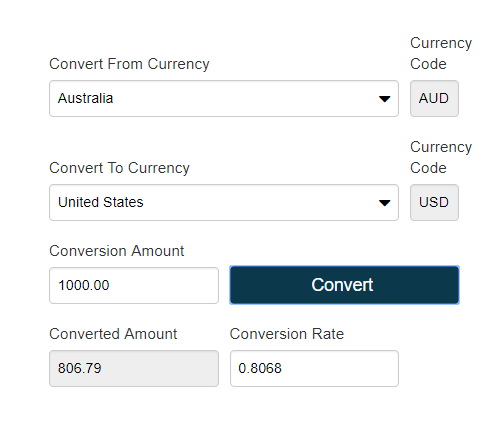
Test the form by entering from and to currencies and an amount, then click Convert. Australia and United States are valid conversions.
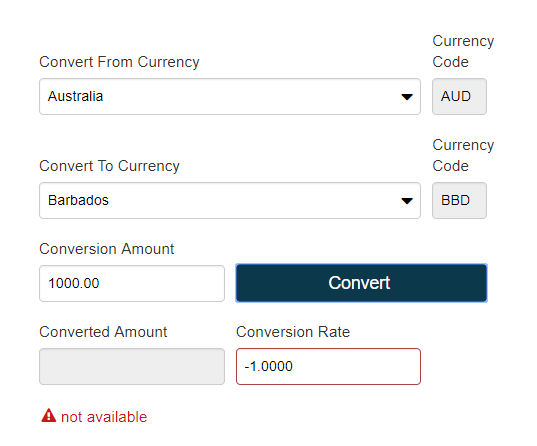
An invalid conversion is Australia to Barbados, which will show an error. The error will be cleared when a different currency is chosen.