Setup Journey SDK
If you have previously relied on Maestro and/or the Journey Manager (JM) Console to develop JM applications, you may not be familiar with using an IDE to achieve the same result. This guide does not assume any prerequisite knowledge, and is suitable for developers who have not had a lot of exposure to IDEs.
System Requirements
Building Journey SDK applications requires Java, Groovy and Ant to be installed on your computer. The installers for many modern IDEs can install additional software products such as Groovy and Ant. If your IDE's installer does not include these products, you will need to add them to your IDE manually.
The following software product versions are recommended for use with Journey SDK.
- Java JDK: Use the same version that your Journey Manager server uses; see Journey Manager Third-Party Libraries > Java.
- Apache Groovy 2.4 or higher (unless your IDE includes a bundled version)
- Apache Ant 1.10 or higher
- Apache Maven 3.6.1
info
Some Java 11 features are not available with Groovy 2.4.
Install Journey SDK
To install Journey SDK:
- Download Journey SDK from the Temenos Journey Manager resources website (login required). The distribution file is called
transact-sdk-VERSION.zip; for exampletransact-sdk-23.4.0.zip. - Unzip the distribution ZIP file into a folder of the same name as the ZIP file.
note
It is important that you extract the ZIP file into the correctly named folder, otherwise classpath settings for scaffolded projects will not resolve classes correctly.
(Optional) Setup a Journey SDK Maven project
If you're using Maven to develop your JM application, the Journey SDK Maven project template provides a convenient way to get things started. This project template uses the Journey SDK Maven plugin which includes a set of Maven goals and build lifecycles that support Journey SDK platform development.
Prerequisites
To develop a JM application using the Journey SDK Maven plugin, you need a Java JDK and Apache Maven installed on your computer (for version information, see System Requirements above). Additionally, you need the Journey SDK Maven project template and access to CS Artifactory. When you build a Journey Manager application based on the Journey SDK Maven project template, all required dependencies are downloaded from CS Artifactory including the Journey SDK Maven plugin.
If you don't have access to CS Artifactory, contact your TJM support representative to request access. When your account is created, you'll receive an email that includes instructions for setting up the settings.xml file. Make sure your Maven settings.xml is configured to connect to the correct Artifactory in order to download the required dependencies.
Project setup
To setup a Journey SDK Maven project:
- Download the Journey SDK Maven project template from the Temenos Journey Manager resources website (login required). The distribution file is called
transact-sdk-maven-VERSION.zip; for example,transact-sdk-maven-23.4.0.zip. - Extract the contents of the distribution file into your JM application project folder.
- Edit the
pom.xmlfile, and replace the placeholder values in the following tags:<groupId>com.example</groupId>
<artifactId>com.example.artifact</artifactId>
<version>1.0.0-SNAPSHOT</version>
Configure Journey Manager Permissions
To access SDK functionality in Journey Manager, each application developer must be provisioned a role or roles which have one or more of the following Journey Manager permissions.
- REST Application Package API
- REST Delivery Service API
- REST Form Groups API
- REST Groovy Service Invoke
- REST Service Definitions API
For security reasons, none of these permissions are assigned by default to existing Journey Manager roles; therefore, suitable roles must be assigned to user accounts manually.
Best practice is to create a new role or roles, such as 'IDE Developer' and assign permissions to the Journey Manager module as required.
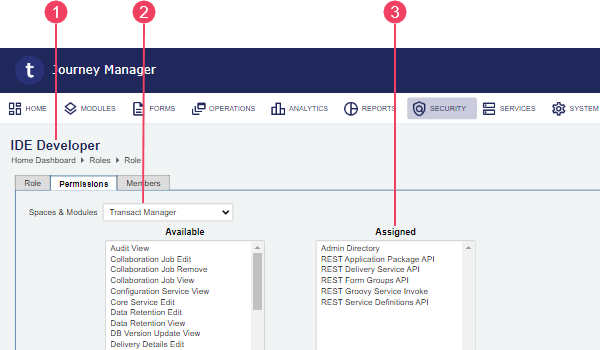
- IDE Developer role
- Journey Manager module
- Assigned permissions
To provide even finer granularity, create roles such as 'IDE Application Package Developer' and assign individual permissions to it.